MFP Management Guide
Page
‰ Model and series names in this manual
„ How to read this manual ‰ Symbols in this manual
Preface
‰ Explanation for control panel and touch panel
‰ Trademarks
Contents
Managing Counters Counter Menu
Appendix
Index
Contents
Setting Items User
Checking E-mail Setting BIP Printing Change User Password
Continue the user setting operation that you require
Entering User Menu
Press General in the User menu
Setting General Functions
„ Changing the display language
Press Change Language
„ Setting the reversed display mode
Press Reversed Display
Setting General Functions
Adjust the touch panel contrast
„ Adjusting the display contrast
Press Display Setting
„ Setting the calibrations
Place the paper to be used for the calibration in the drawer
Press Calibration
Refer to in the following operations
Refer to in the following operation
„ Setting the registration
Press Registration
Setting Copy Functions
Press Copy in the User menu
Press the desired media type button and press
For the e-STUDIO4540C Series For the e-STUDIO6550C Series
Specify the following items as required and press OK
For e-STUDIO456 Series For e-STUDIO856 Series
Specify the following items as you require
For e-STUDIO456 Series
Specify the following item as you require and press OK
Setting Fax Functions
Press FAX in the User menu
Specify the following items as required and press OK
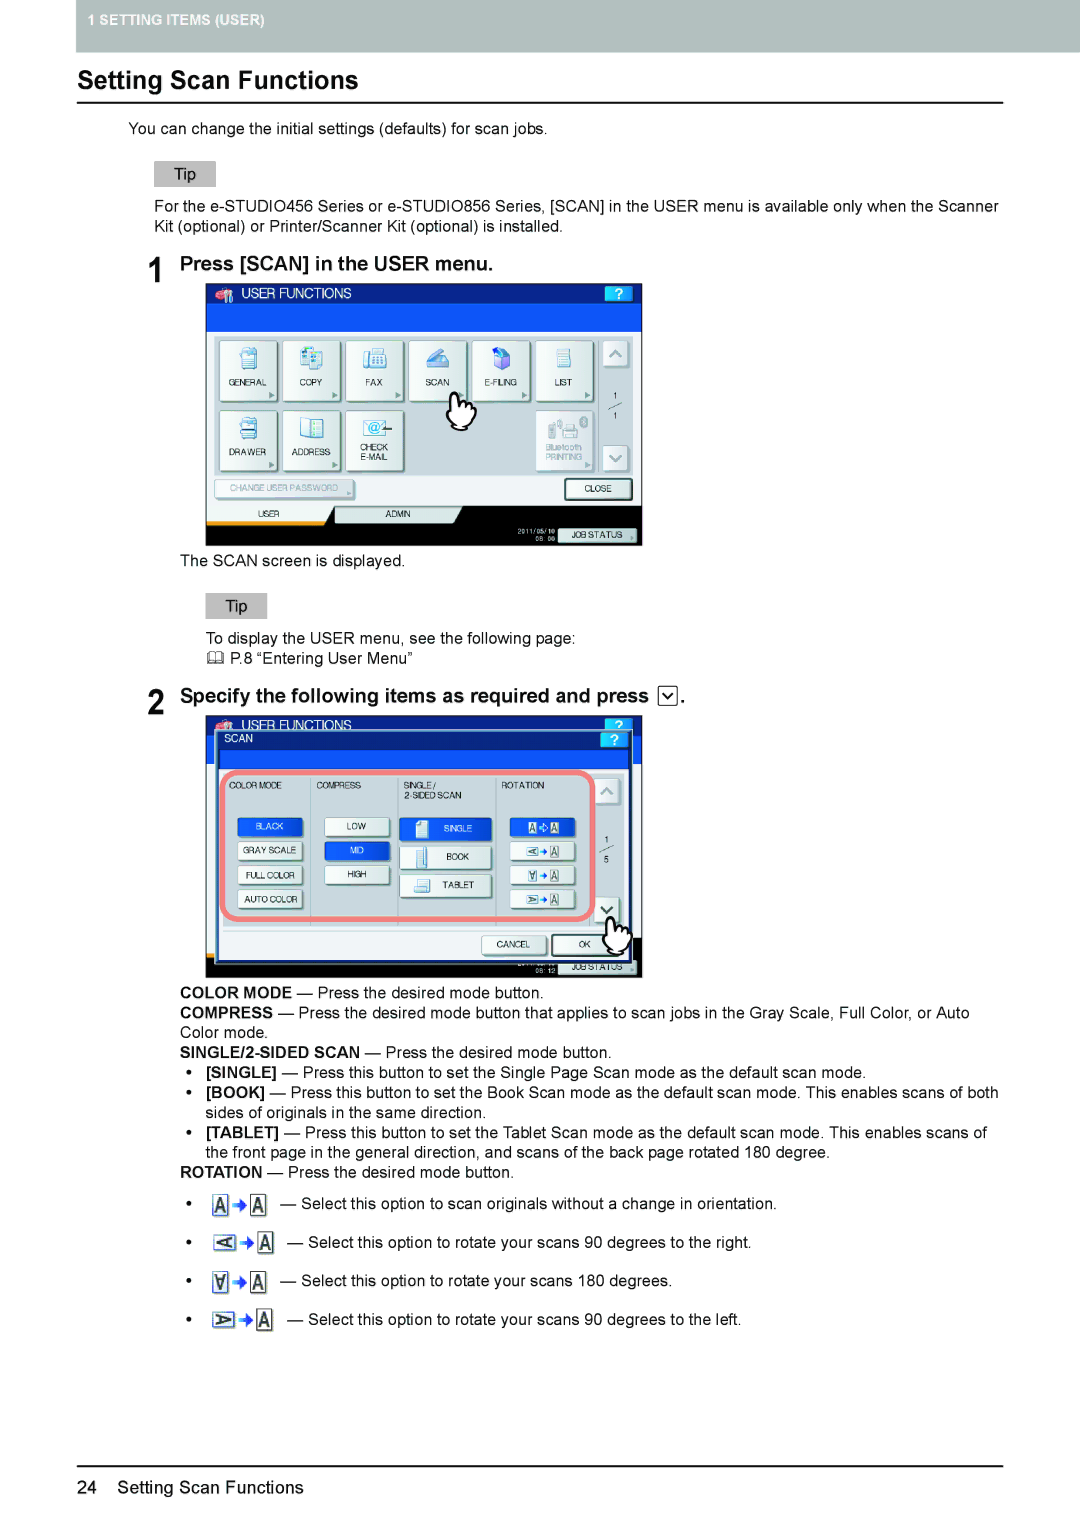
Setting Scan Functions
Press Scan in the User menu
Specify the following items as required and press
Specify the following items as required and press OK
Setting e-Filing Functions
Press E-FILING in the User menu
Continue the operation that you require
Printing Lists
Press List in the User menu
Printing Address Book Information Press Address Book
Printing Group Number Information Press Group Numbers
Printing Function List User Press Function
Setting Drawer
Press Drawer in the User menu
For the e-STUDIO6550C Series
For the e-STUDIO4540C Series
For e-STUDIO856 Series
‰ Registering contacts
Managing Address Book
„ Managing contacts in address book
Managing Address Book
Number of characters
Press OK to register the contact
Following information can be registered from the Scan Log
Registering contacts from Log lists
Following information can be registered from the Send Log
Enter the contact information
‰ Editing contacts
Press OK to save the contact
‰ Deleting contacts
Press YES to delete the contact
‰ Searching for contacts
Press the Single tab Press Known ID
Managing Address Book
Press the Single tab Press Search
On-screen keyboard for entering the fax number
Enter the search string and press OK
On-screen keyboard
To edit the contact information
Press the Group tab
„ Managing groups in address book
‰ Creating new groups
Press Group Name
Enter the group name and press OK
Press OK
New group is created and it appears on the touch panel
‰ Editing groups
Press the group that you want to edit and press Edit
Press Group Name to edit the group name
Group is saved
Known ID screen is displayed
Enter the ID Number using the digital keys and press OK
Enter the search string and press OK
On-screen keyboard for entering the fax number
Managing Address Book
‰ Deleting groups
Press the group that you want to delete and press Delete
Press YES to delete the group
‰ Searching for groups
Touch panel displays the found group
Group Search screen is displayed
Press Group Name to specify the search string
Touch panel displays the found groups
‰ Confirming the members of a group
Managing Address Book
Checking E-mail
Press Check E-MAIL in the User menu
Setting BIP Printing
Change the password
Change User Password
Press Change User Password in the User menu
Setting Copy Functions 166 Setting Fax Functions 169
Entering Admin Menu
Setting Network Functions 134
Setting Security Functions 177
Setting IEEE802.1X authentication 201
Enter the administrator password and press OK
Entering Admin Menu
Press Password
Continue the administrative operation that you require
„ Setting the device information
Press General in the Admin menu 1/2
Press Device Information
Location
„ Setting the notification
Press Notification
Press E-MAIL
Enter the e-mail address and press OK
Press Password Setup
Enter the current administrator password and press OK
Changing the administrator password Press Admin Password
Press OLD Password
Press YES to reset the service password
Set new password and complete the setting
Resetting the service password Press Reset Service Password
Press Clock
„ Setting the date and time
Press General in the Admin 1/2 menu
Changing the date and time Press DATE/TIME
Changing the date format Press Date Format
Press the desired date format button
Auto Power Save mode
„ Setting the energy saver modes
Weekly timer
Sleep mode/Super Sleep mode
Setting the weekly timer Press Weekly Timer
Press Energy Saver
Make settings for the weekly timer
Setting the Auto Power Save mode Press Auto Power Save
Auto Power Save mode is activated
Setting General Functions
Press Display Level
„ Setting the calibration and registration display level
Press User or Admin for each option and press OK
„ Setting the calibration
Setting the copy calibration Press Copy
Are placed on the left side
Press the Start button on the control panel
Press Print
Are placed on the left side
Press YES to start the registration
„ Setting the option
Press Option
Press Enable or Disable for each option and press OK
Press POP UP
„ Setting the status message
Press Status Message
„ Setting the auto clear function
Press on or OFF for each status message and press OK
Press Auto Clear
Press the button that indicates the desired time in seconds
„ Managing the option licenses
Press License Management
After you confirm product information, press Close
Installing the option Press Install
When the installation is complete, press OK
Press YES
„ Adding or removing the display languages
Press on the General menu 1/2 screen
Adding the language Press Install
Press Languages
On the equipment, and OK
When the installation is complete, press OK
Mark is displayed beside the selected default language
Press System Updates
„ Updating your system
Select the file type, and press OK
Select the file that you want to install, and press Install
„ Creating or installing cloning files
Installing the cloning data Press Install Clone Data
Press Cloning
Confirm the file name and file contents, and press Install
Enter the password and press OK
Press YES
Creating cloning files Press Create Clone File
Data category Data to be duplicated
When the creating of the cloning files is complete, press OK
„ Setting the panel calibration
Press Panel Calibration
Touch panel
Touch panel
„ Exporting logs
Press Export Logs
Begin exporting the log data
„ Job skip
Press JOB Skip
Setting General Functions
„ Changing the keyboard layout
Press Keyboard Layout
Select the desired keyboard layout, and press OK
‰ USB keyboard
When you assign the TCP/IP using only the Dhcp server
Setting Network Functions
„ Setting the TCP/IP protocol IPv4
Press Network in the Admin menu 1/2
Press IPv4
You will be returned to the Network menu
Setting Network Functions
Setting Network Functions
When you select the stateless mode
„ Setting the IPv6 protocol
When you select the manual mode
When you select the stateful mode
Press IPv6
Confirm the settings, and press OK
Press IPv6
Confirm the settings, and press
Confirm the settings and press OK
Press IPv6
Specify the following items as required and press
Setting Network Functions
„ Setting the IPX/SPX protocol
Press IPX/SPX
„ Setting the NetWare settings
Press Netware
Specify the following items as required and press OK
„ Setting the SMB protocol
Press SMB
Specify the following items as required and press OK
„ Setting the AppleTalk protocol
Press Appletalk
Specify the following items as required and press OK
„ Setting the Http network service
Press Http
Specify the following items as required and press OK
„ Setting the Ethernet speed
Press Ethernet
Press the desired Ethernet speed button, then press OK
For e-STUDIO6550C Series, e-STUDIO4540C Series
„ Setting the Ldap services and the filtering functions
Press Other
„ IPsec IP security setting
Press IPsec
Specify the following items as required and press OK
„ Network check
Press Network Check
Setting Network Functions
Press Close
To designate the desired server manually
Press Copy in the Admin menu 1/2
Specify the following items as required, and press
Options Paper Feeding
Specify the following items as required, and press OK
Press FAX in the Admin menu 1/2
Press RX Print
Press on or OFF for each item as required and press OK
Setting File Functions
Press File in the Admin menu 1/2
Mail Message Properties
Setting E-mail Functions
Press E-MAIL in the Admin menu 1/2
Scan to E-mail Fragmentation
Operations in the E-MAIL Subject screen
Panel to enter numerals
Internet Fax Message Properties
Setting Internet Fax Functions
Press Internet FAX in the Admin menu 1/2
Internet Fax Fragmentation
Specify the following items as required and press OK
„ Managing certificates
Setting Security Functions
Press Security in the Admin menu 1/2
Press Certificate Management
Importing the device certificate Press Import
Press Device Certificate
Port on the equipment, and OK
Select the certificate that you want to import, and press OK
When importing the certificate is complete, press OK
Select the encoding method for the CA certificate
Importing the CA certificate Press Import
Press CA Certificate
Select the certificate that you want to import, and press OK
Exporting the device certificate
Press Export
When exporting the certificate is complete, press OK
Press Security in the Admin menu
Specify the following items as required and press OK
„ Performing the integrity check
Press Integrity Check
Press OK to reboot the equipment
Checking the minimum required data Press Minimum
Checking all data Press Full
Press Report Setting
Setting List/Report
Press LIST/REPORT in the Admin menu 1/2
Setting the transmission / reception journal Press Journal
Setting the communication report Press COMM. Report
Specify the conditions for each transmission type and press
Setting List/Report
Setting the reception list Press Reception List
Press List
Press the button for the list that you want to print
Setting Printer/e-Filing Functions
Press PRINTER/e-FILING in the Admin menu 1/2
Source Manually
Specify the following items as required, and press OK
Wireless Settings and Bluetooth Settings
Press Change User Password on the Admin menu 1/2
Set a new password
Press 802.1X Settings on the Admin menu 1/2
Ieee 802.1X Authentication Setting
„ Setting IEEE802.1X authentication
Specify the following items as required and press Next
Select EAP-MSCHAPv2 and press Next
‰ Setting EAP-MSCHAPv2
Confirm the settings and press Apply NOW
‰ Setting EAP-MD5
Select EAP-MD5 and press Next
‰ Setting EAP-TLS
Select EAP-TLS and press Next
Confirm the settings and press Apply NOW
‰ Setting Peap
Select Peap and press Next
Specify the following items as required and press Next
‰ Setting EAP-TTLS
Select EAP-TTLS and press Next
Wired 802.1X Settings PAP screen is displayed
Wired 802.1X Settings Chap screen is displayed
Wired 802.1X Settings EAP-MD5 screen is displayed
Specify the following items as required and press Next
‰ Error messages
Message Cause
Press on the Admin menu 1/2
Settings Data Remarks
Press Factory Default
Managing Counters Counter Menu
Scan counter
Total Counter
Print counter
Displaying print counter Press Print Counter
Displaying scan counter Press Scan Counter
Select the function button whose counter you want to check
Print Out Total Counter
Print counter for department code
Department Counter
Press Department Code
Scan counter for department code
Enter the department code and press OK
Department Counter
Department Counter
„ Logging on as administrator
Managing Department Codes
Enter the administrator password and press OK
„ Printing Department Code List
DEPT. Management menu, press Print OUT Department Codes
„ Enabling department codes
DEPT. Management menu, press Department Management
„ Registering a new department code
DEPT. Management menu, press Department Registration
Enter the department code, and press OK
Enter the department name, and press OK
Press NEW Code
Quota screen is displayed
„ Editing department codes
Enter a new department code, and press OK
Press OK
„ Deleting department codes
„ Resetting the counter for each department
Press YES
DEPT. Management menu, press ALL Limit
„ Setting output limitations for all departments
Enable or disable the All Limit function, and then press OK
„ Setting the No Limit Black function
DEPT. Management menu, press no Limit Black
„ Setting the registered quota
DEPT. Management menu, press SET Registered Quota
„ Resetting all department counters
DEPT. Management menu, press Reset ALL Counters
„ Deleting all department codes
DEPT. Management menu, press Delete ALL
Page
Appendix
List Print Format 246
List Print Format
Output example of Total Counter List e-STUDIO4540C Series
„ Department Code List
Output example of Department Code List e-STUDIO4540C Series
„ Address Book Information
Output example of Address Book Information
„ Group Number Information
Output example of Group Number Information
„ Function List User
Output example of Function List User e-STUDIO4540C Series
„ NIC configuration
Output example of the NIC Configuration
Llmnr
„ Function List Administrator
General
Energy Saver Auto Power Save
Address Book Restriction by Admin
Copy
Scan
Original Outside Erase
LINE-2 Mode Start *2
FAX
File
Filing
BIP Printing
Mail
Report Setting
Internet FAX
Bluetooth Settings
Wired 802.1X Setting
Wireless Settings
PRINTER/E-FILING
Network Setting Network IPv6
Network Setting General Product General
Network Setting Network TCP/IP
Network Setting Network IPX/SPX
Network Setting Network Appletalk
Network Setting Session Ddns Session
Network Setting Session Ldap Session
Network Setting Session DNS Session
Network Setting Session SMB Session
Network Setting Session SLP Session
Network Setting Session Netware Session
Network Setting Session Bonjour Session
Network Setting Network Service Http Network Service
Network Setting Network Service IP Security Service
Network Setting Network Service Smtp Client Network Service
Network Setting Network Service Smtp Server Network Service
Network Setting Network Service POP3 Network Service
Network Setting Network Service WEB Services Setting
Network Setting Network Service FTP Client Network Service
Network Setting Network Service FTP Server Network Service
Network Setting Network Service Snmp Network Service
Network Setting Network Service Filtering
Network Setting Network Service Sntp Service
Network Setting Network Service Telnet Service
Network Setting Print Service Setting RAW TCP Print
Network Setting Print Service Setting Netware Print
Network Setting Print Service Setting IPP Print
Network Setting Print Service Setting FTP Print
Network Setting Print Service Setting E-MAIL Print
Security Setting Authentication Email Address Setting
Security Setting Authentication Department Setting
Security Setting Authentication User Authentication Setting
Print Data Converter
Security Setting Certificate Management
Security Setting Authentication Single Sign on Setting
Security Setting Authentication Home Directory Setting
Security Setting Password Policy Policy for Users
List Print Format
„ PS3 font list
Output example of the PS3 Font List
„ PCL font list
Output example of the PCL Font List
Page
Index
143
18, 20
Weekly Timer
Page
MFP Management Guide