Nikon 5000ED user manual Information Panel, Preview and Scan Buttons, Preview button, Scan button

Page 51

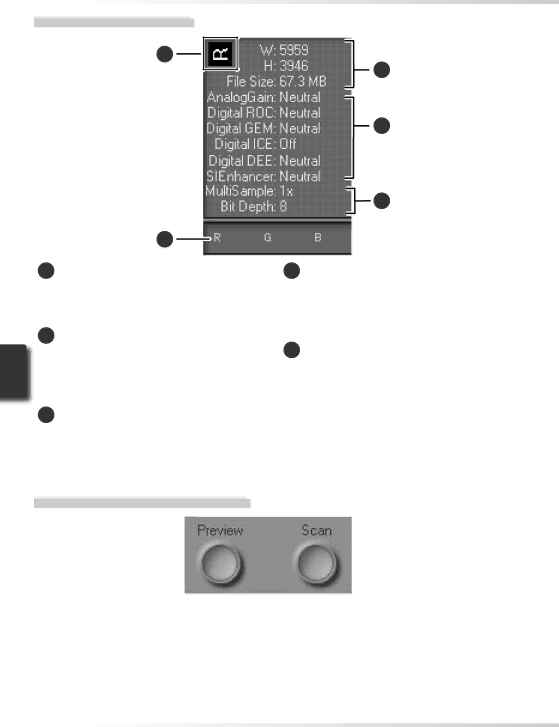
The Information Panel

1

5

2

3

4

1Orientation

Shows the orientation of the image in the preview area, reflecting any flips or rota- tions that have been performed.

2Dimensions/file size

Lists the width and height of the current selection (in pixels) and the size of the file that would be produced if the selection were scanned at current settings.

3Image enhancement

Shows the current status of Digital ICE4 Advanced and analog gain. Note that using Digital ICE4 Advanced can increase scanning times.

4Scanner extras

Lists the current bit depth (which deter- mines the maximum number of colors available) and shows whether multi-sam- ple scanning (5000 ED only) is in effect.

5Color values

Lists the color values for the pixel under the cursor. The values for the Natural panel are listed in the top row, the values for the Processed panel in the bottom row.

The Preview and Scan Buttons

Preview button

Click to preview the image to be scanned (if multiple frames are selected in the thumbnail drawer, a preview will be performed for each frame). Be sure to click this button after changing the film type or choosing a new value for analog gain.

Scan button

Scans the images and opens them in the host application (if multiple frames are selected in the thumbnail drawer, a scan will be per- formed for each frame and the resulting im- ages will be opened in separate windows).

42

Image 51
Contents 35mm/APSIX240 Film Scanner Manuel de Iutilisateur Manual del UsuarioSetup On CD Product DocumentationAt voltages of AC 125 V or less For Your SafetyDo not handle with wet hands Iii Page Table of Contents Scanning Short, Long, or Damaged Film Before You Begin Terminology Principal FeaturesIntroduction IllustrationsParts of the Scanner Status LED Scanner status is indicated as followsScanner status Rear View Check the status LED Precautions for UsePage Setup Imaging applica Tion e.g., Adobe Setup and Scanning GuideChoose an adapter 25 and insert film Earlier Versions of Nikon Scan Installing Nikon ScanWindows Windows XP/Windows 2000 ProfessionalIf the Language Selection Dialog Is Not Displayed Click InstallWindows XP, Windows Me, Windows 98 SE Select LS- 40/50/5000 and click NextWindows 2000 Professional Device Registration Windows 2000 ProfessionalSettings File Extensions 10Click WindowsWindows 98 SE Viewing the Easy Scanning Guide Windows Macintosh USBMac OS Authenticate Mac OS X Only Click Easy InstallSelecting a Plug-ins Folder Mac OS Click Install to begin installation10Select Apple RGB Click MacintoshViewing the Easy Scanning Guide Macintosh Choose a flat, stable location close to the computer Installing the ScannerInstalling the Scanner Choose a LocationMake sure the power switch is in the off position Connect the Power CableUSB Connecting the USB CableConnecting the Scanner Connect the USB cableBasic Scanning Turn the Scanner On Windows 2000 ProfessionalIf the Status LED Flickers Removing Adapters Insert an AdapterChoose an adapter Check the status LEDApplication Platform Open the Scan WindowApplication DescriptionScan window will open Nikon Scan Is Unable to Find Any Active DevicesTemporary Storage Windows Only MA-21 slide mount adapter Insert FilmInsert film as shown SA-21 strip film adapterSA-21 Lock Mechanism Preview/Thumbnail When Film Is InsertedCaring for Film Inserting Film in the SA-21Choose a Film Type and Color Model OptionDescription Choose the film typeOption Use withMA-21 Slide-Mount Adapter PreviewPreview button Rotating and Flipping ImagesButtonFunction Select a Crop Easy Scanning Guide Choosing an Output Size and ResolutionScan Bit Depth Scan Image EnhancerScan and Save Click the Scan buttonBatch Scans Select the save command Typical Save As dialogsPrinting Images MA-21 Eject and ExitSA-21 Ejecting Film from the SA-21Scan Window Tool Chest Nikon ScanParts of the scan window are identified below Scan WindowControl Area Tools buttonPrefs button Scan button Information PanelPreview and Scan Buttons Preview buttonThumbnail Drawer Tab Preview AreaProgress Window Sions Tool ChestAccording to how image will be used Best choice in most situationsCurves Scan Bit Depth Digital ICEKodachrome Film Technical Notes Adapter Optional Holders and AdaptersSpecifications FH-3 Film Holder Open the holder Holding the FH-3 with the Nikon logoUppermost, unlatch the holder snaps Open the holder Inserting the Holder Servicing MaintenanceWhen the Scanner Is Not in Use Caring for the ScannerTransporting the Scanner TransportCaring for the SA-21 Strip-Film Adapter Opening the Roller FrameContinuing Jams Rollers Toothed Wheel Caring for the MA-21 Slide-Mount AdapterProblem TroubleshootingNikon Scan Reference Manual Possible causeScanning Short, Long, or Damaged Film Problem SolutionMm or more 30 mm Or less Film Feed Errors SA-21 Open the front panel Press the release button and openFront panel Adapter cover Toothed wheel Roller frame Frame lock lever Uninstalling Nikon Scan Export SettingsSelect Nikon Scan 4 Uninstall Click Accept License agreement will be displayed Click Continue… Select UninstallSelect Custom Install Custom Install Macintosh OnlyPage If the Scanner Is Not Listed Specifications Scan range Optical resolution35-mm film strips SlidesSupplied Adapters Index Symbols6MRA0830