JVC VN-C205 manual Time Stamp, Changing Registered Information, When alteration is complete, click

Page 33

Settings (Step 3 Setting Using the V.Networks Controller)

3-8 Time Stamp

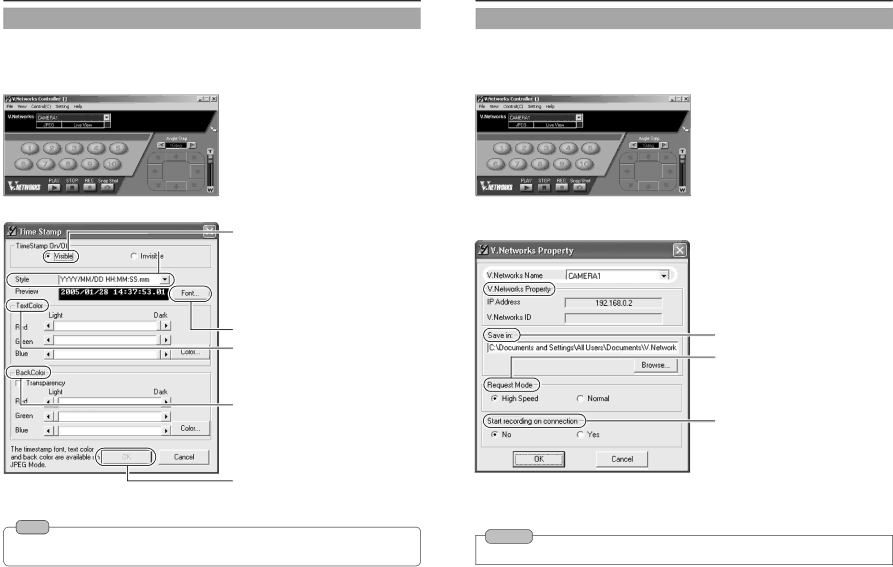
The "V.Networks Controller" can be used to set the time stamp that displays date/ time on camera images. The displayed time/date will be recorded.

1.Select [Setting] and [Time Stamp].

2.Perform setting.

1 Select [Visible].

2 Select the display style in [Style].

Year, month and day are represented as "YYYY", "MM" and "DD" respectively. Hour, minute and second are represented as "HH", "MM" and "SS".

Millisecond is represented as "mm".

3 Select the display [Font].

4 Set the [Text Color].

5 Set the background color.

6 Click .

Note

Left-click on the motion image or playback window while holding down the [Shift] key at the same time. The time stamp will appear where the mouse was clicked.

3-9 Changing Registered Information

The "V.Networks Controller" can be used to change information such as the preset connection method for a camera.

1.Select [Setting] and [Property].

2.Perform setting.

1 Change the camera. Cannot be changed.

2 Recorded files will be stored in the folder specified here.

3 Select the mode for image acquisition. *For details, refer to Page 54.

4 Set whether to [ON].

3.When alteration is complete, click .

Caution

Information cannot be changed for a camera that is currently connected.

64


65

Image 33
Contents VN-C205 VN-C205INSTRUCTIONSInformation for USA Not apply to all appliancesContents Introduction SettingsPreparation Settings OperationCharacteristics Operating PrecautionsIntroduction Operating Environment Name and Function of Parts Latest UpdatesVideo setting switch Connection Examples Preparation ProcedureInstallation Flowchart of installation work for camera Getting StartedAdjustment of the camera’s angle of view PreparationPreparation Connection/Installation Mounting the Camera to the CeilingPreparations  Inserting the CF card Preparations  Connection to Alarm Input/Output TerminalConnect the input power supply cable Connect the alarm terminalConnect the LAN cable Point the camera in the direction you wish to captureAdjusting the iris level Adjusting the focal length When installing the Camera to the electrical boxAdjusting the focus Settings related to videoInstalling the Software Pull out the cables aside and mountWhite-spot correction Settings Network Settings Setting PCs IP Address Windows XPClick Select Internet Protocol TCP/IP and click PropertiesFor Windows 2000, set according to the following procedure Setting PCs IP Address WindowsSelect Settings and click Properties Set IP address toCheck settings This VN-C205U Setup Tool only allows connection of VN-C205For other settings, next Click Start up the V.Networks Controller.Authorization Level Allowed Access Other Settings Using the VN-C205U Setup ToolAll operations using the V.Networks Controller Viewing of motion images onlyOther Settings Using the VN-C205U Setup Tool 2. Multicast Perform area setting This section describes procedures for alarm setting Alarm InputOperation when an alarm input is activated Detect Mode Alarm 1/AlarmAlarm Output Alarm FTPOutput  Alarm Output Function/Set ValueOutput Set Values Output ValueSetting the Advance screen Recording timeRecording files Other Settings Using the VN-C205U Setup Tool 7. FTP Server Other Settings Using the VN-C205U Setup Tool 6. WebStart up the VN-C205U Setup Tool and select FTP Server Displaying still images uploaded to the /user folderError recovery Connection error PasswordTransfer error Alarm FTP Upload SettingStart up the VN-C205U Setup Tool and select Time When NTP is usedStart up the VN-C205U Setup Tool and select Memory Info Normal High SpeedConnect to VN-C205 Starting Up V.Networks Controller Features that Allow Setting Using the V.Networks ControllerSelect View Specify Image Size and Upside Down settings Settings Setting Using the V.Networks ControllerMotion Detection Standby Image Size and InversionImage Quality Setting Operations Setting Using the V.Networks ControllerFrame Rate Alarm Setting Select Setting and Property Perform setting Select Setting and Time Stamp Perform settingWhen alteration is complete, click Time StampRecord/Stop Playback Operations Operation Using the V.Networks ControllerPlay button Click Playback screen is displayedSnapshot Operating Environment Access Authorization LevelSetting Using the Web Browser Operations Operating Using a Web BrowserStarting Up the Web Browser Setting Using the Web Browser 1. Other Settings Setting Using the Web Browser 2. View Setting Click to apply settings and to save the set values Setting Using the Web Browser 3. Alarm Setting Alarm  Alarm OutOperations Setting Using the Web Browser Setting Using the Web Browser 4. FTP SettingViewing Live Images Viewing Still ImagesSymptom Causes/Remedial Actions TroubleshootingImage Link Displaying a still imageOthers Specifications120 Template テンプレート