JVC GV-DS2 manual Counter Value Change, Counter Reset, Modify Capture Point window appears

Page 33

ADDITIONAL OPERATIONSEN 33

COUNTER VALUE CHANGE

If you want to replace a captured image with a different one, you can capture the new one by changing the counter value.

02

00:02:17:21

Edit

Transfer the Index Image

Transfer the Full Image

Modify…

DeleteDel

02

00:01:23:12

02

00:01:23:12

NOTE : Note that if the index image data is saved in step 4, the hatching pattern indicating the change will no longer appear the next time it is called up.

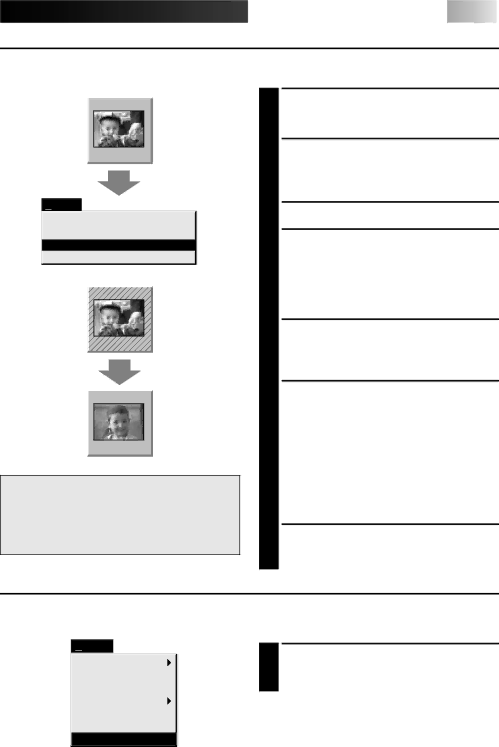
1 Click the image display box of the index number you want to change.

•The box is bordered in green.

2 Open the menu bar and click "Edit" — "Modify…".

•The "Modify Capture Point" window appears.

3 Enter a new counter value.

4 Click "OK".

•The index image is surrounded by a hatching pattern indicating that a change is being made.

•The counter value is changed to the value you just entered.

5 Open the menu bar and click "Set-up" — "Capture Mode" — "Automatic", then select "Program Capture" in the "Auto- matic Transfer" window and click "OK".

6 Play the tape on the video source unit and click "Edit" — "Transfer the Index Image".

•Index image data at the counter setting is captured.

•Be sure to complete steps 1 through 7. If they are not all followed, the index image and the full image will be different as the full image data will not have been changed in step 6.

7 Click "Edit" — "Transfer the Full Image". •Full image data at the counter setting is

transferred.

COUNTER RESET

You can change the counter setting on connected video source units (VHS, VHS-C). Since digital camcorders record the counter as a time code, the counter on a digital camcorder cannot be reset.

Set-up

Capture Mode

Image Format

Device Change

Preroll

Initialize

ID Change

Counter Reset

1 Open the menu bar and click "Set-up" — "Counter Reset".

•The VCR's counter is reset.

Image 33
Contents GV-DS2 It is recommended that you Dear CustomerSome DO’S and DON’TS on the Safe USE of Equipment How to handle a CD-ROM MaintenanceDo not place the Video Capture Docking Station Contents EN Additional Operations Troubleshooting List of Error MessagesJlip Video Producer Software Starting Jlip Video Producer SoftwareAdvanced Operations Troubleshooting Major Specifications IndexBusiness presentations Internet homepageVideo journal and postcards Video Capture Facility Jlip Video Capture SoftwareJlip Control Facility Jlip Video Producer SoftwareControls and Conne Ctors Open Cover Connect the power cord to an AC outletAttach FIXWhen connected with the Video Printer When connected with the camcorderPower Connec T Ions Jlip Video Capture Software Section What is Jlip ? What is video capture software ?EN Getting Started Operating EnvironmentWindows Installation ProcedureMain Desktop Window PreparationClick Exit from File in the menu bar. The program closes HOW to Close the ProgramSelect Transfer Rate. Normally select Initializing JlipSelect Units Main Desktop Window Menu barControl buttons Image display area When an image display box is double-clickedMenu BAR Each pulldown menu is configured as followsSet-up VCR operation windowCapturing Video Images Image data flowStep by Step Capture Set-up Capture Mode Step by StepEN V Ideo CA Pture Automatic CaptureProgram Capture Transfer Select Interval Capture Interval CaptureSave the Full Image Data SavingCapture Mode Picture Data FormatSelecting a Picture Format Counter Reset Counter Value ChangeModify Capture Point window appears Additional Operation S Delete Index Image and Full ImageChange ID Open Index Create NEW FolderOpen Jlip jlp File window is displayed Using Jlip Video Producer Software DataSave As Jlip jlp File window is displayed HOW to Store Jlip Video Producer Software DataProblem Cause Where the program run file Counter cannot be resetCannot capture video data With the desired counterMessage Appears when Action Execute after ErrorPlaying back Not enough diskEN Memo Jlip Video Producer Software Section Player RecorderVideo printer Installing Jlip Video Producer Software EN Access Video Producer Prepare DevicesSelect Serial Port Select Recorder Select DevicesMenu bar Title bar Control-menu boxElapsed Time MemoEN Basic Oper Ations Setting in/out pointsOperating camcorder Playback on TV MonitorStart Playback Select SceneDubbing EN Basic OP E Ration SPrepare NEW Tape Start EditingEnter File Name Start SavingSave File Select Floppy Disk DriveCorrecting and cutting the programmed counter data Opening a saved fileDesignatecopied Scene to be Overwriting the fileStore Designated Scene in Memory Designate Scene to be TransferredSelecting a P.AE/Effect Basic Operat IonsSelecting a Fade/Wipe Effect Select P.AE/EFFECTSepia AE/Effect buttonsPosition button Strobe Speed button Title bar Power button Store buttonButton Position button Content buttonMULTI-PIX button Strobe Speed buttonBring UP Video Printer Window PrintingPlayback Store SceneQuitting the Jlip Video Producer window Quitting the Video Printer windowClick Close Auto Capture PreparationTo Print Captured Video Data with Video Printer Select Set-up Function Set Auto Capture To print only the cut-in scene on the edited tapeConnecting other device during operation EN Advan CED Oper AtionsChanging ID number Access Device Selection Dialog BOX Access Name Change Dialog BOXEnter NEW Name SET NEW Name Return to Video Producer WindowEN Advanced Operat Ions Access Record Time Correction Dialog BOXEnter Value Determine ValueCounter reset Rewind Tape to Beginning Reset CounterWhen Using the Video Capture Software Power on all devices System Communication error That power is onClose Check devices - ConfirmMaximum Memory full - 99 eventsEnter correct value Your selection is not validEN M Ajor Speci Fications Index GV-DS2