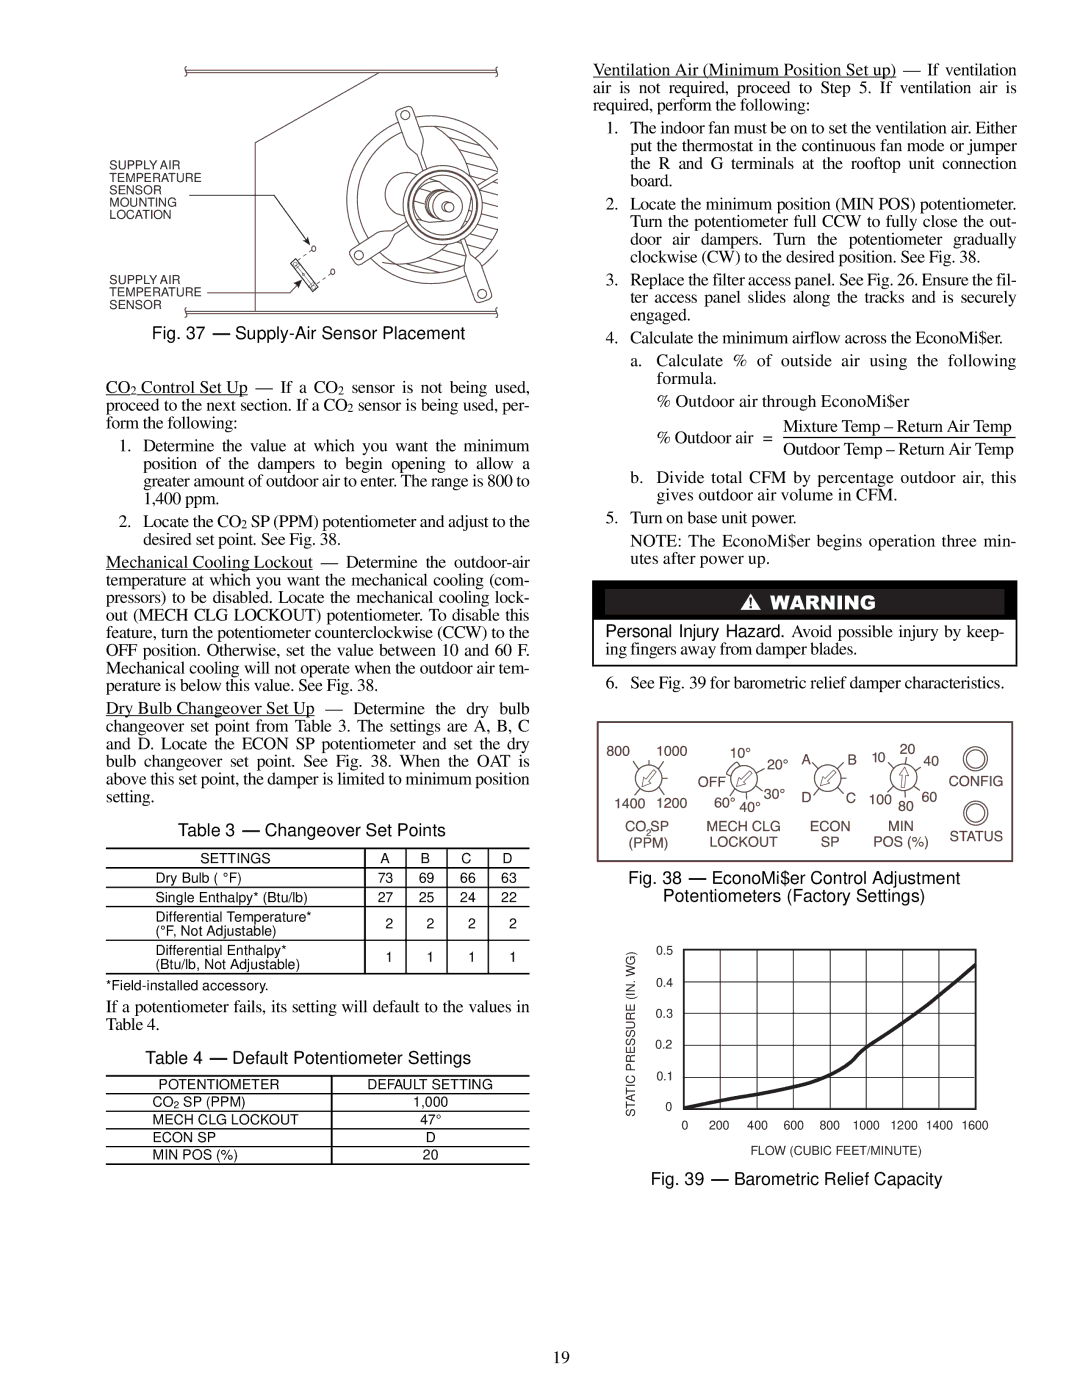
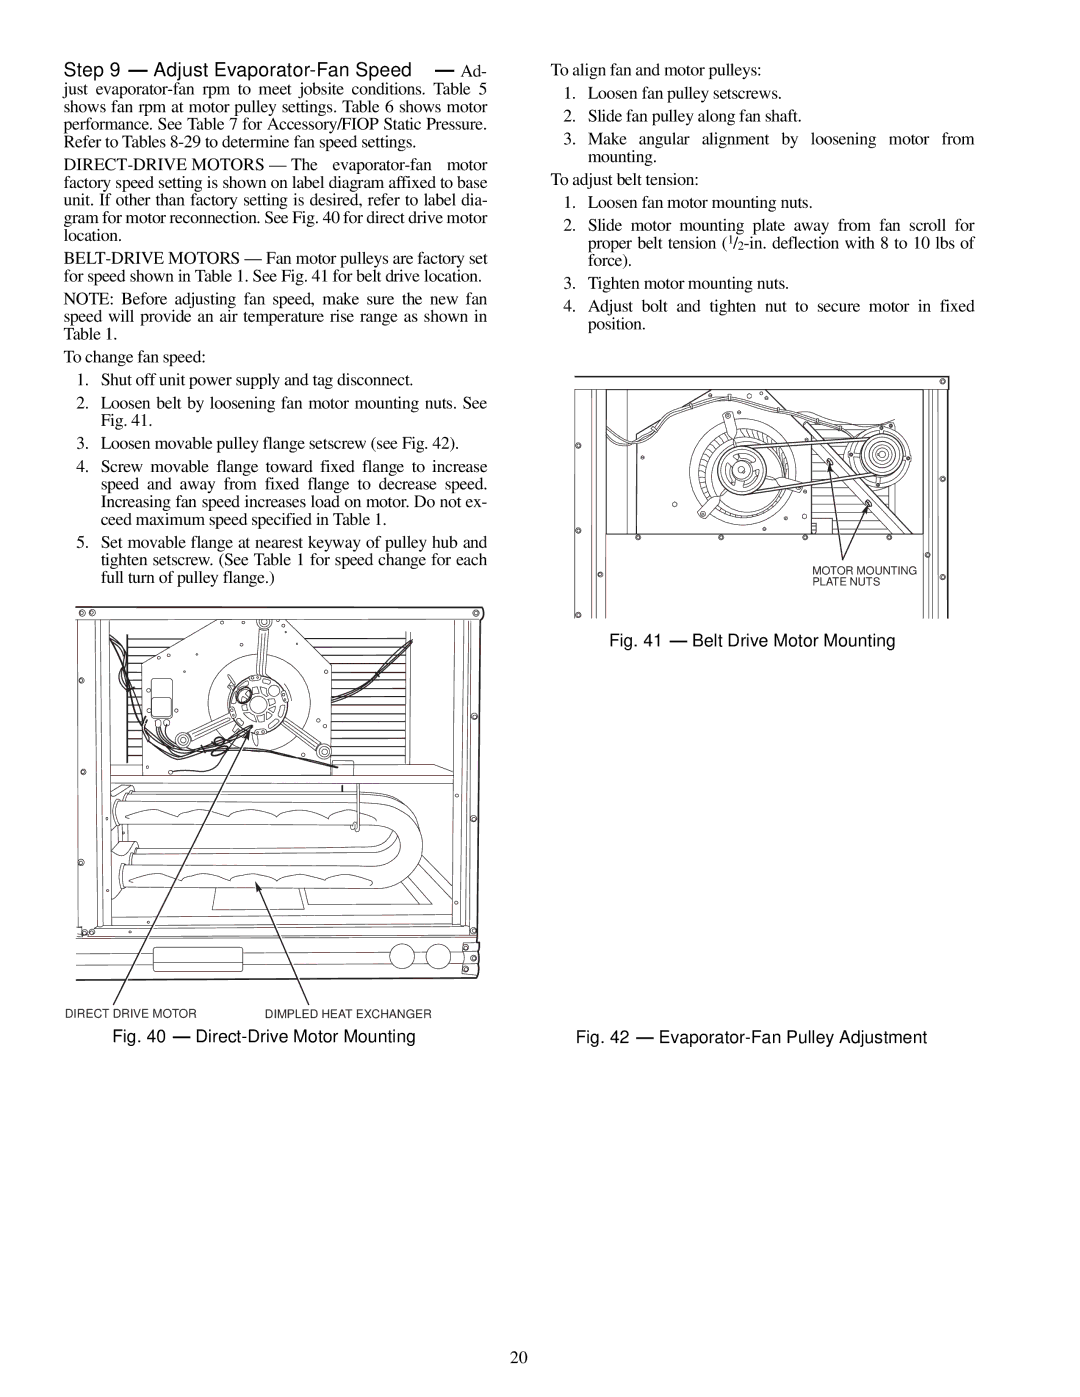
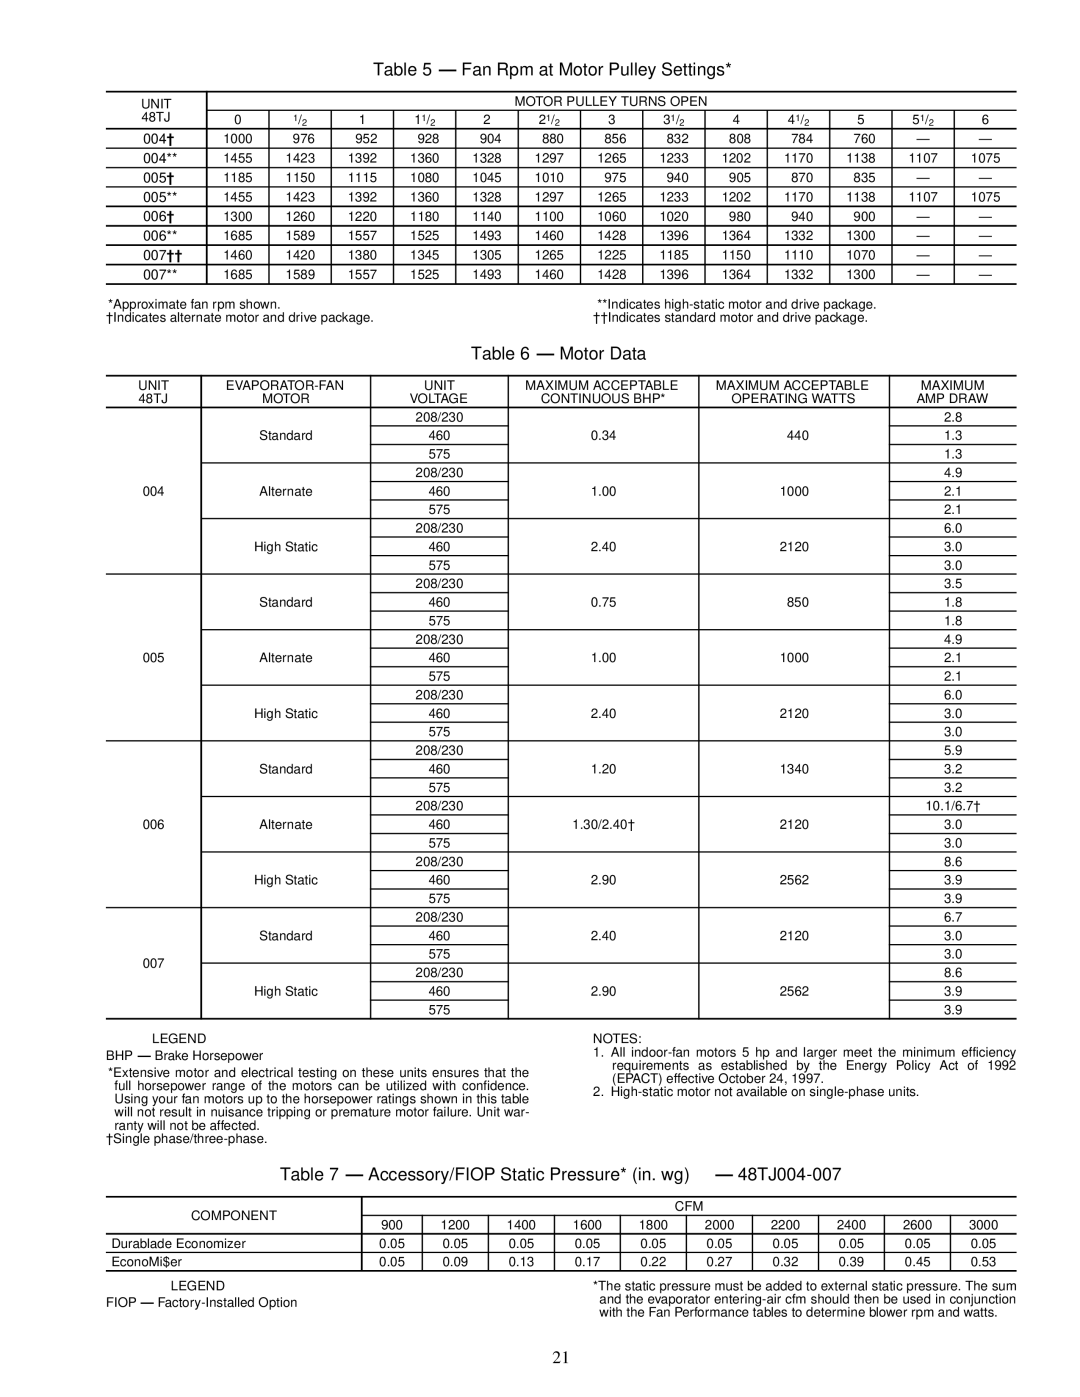
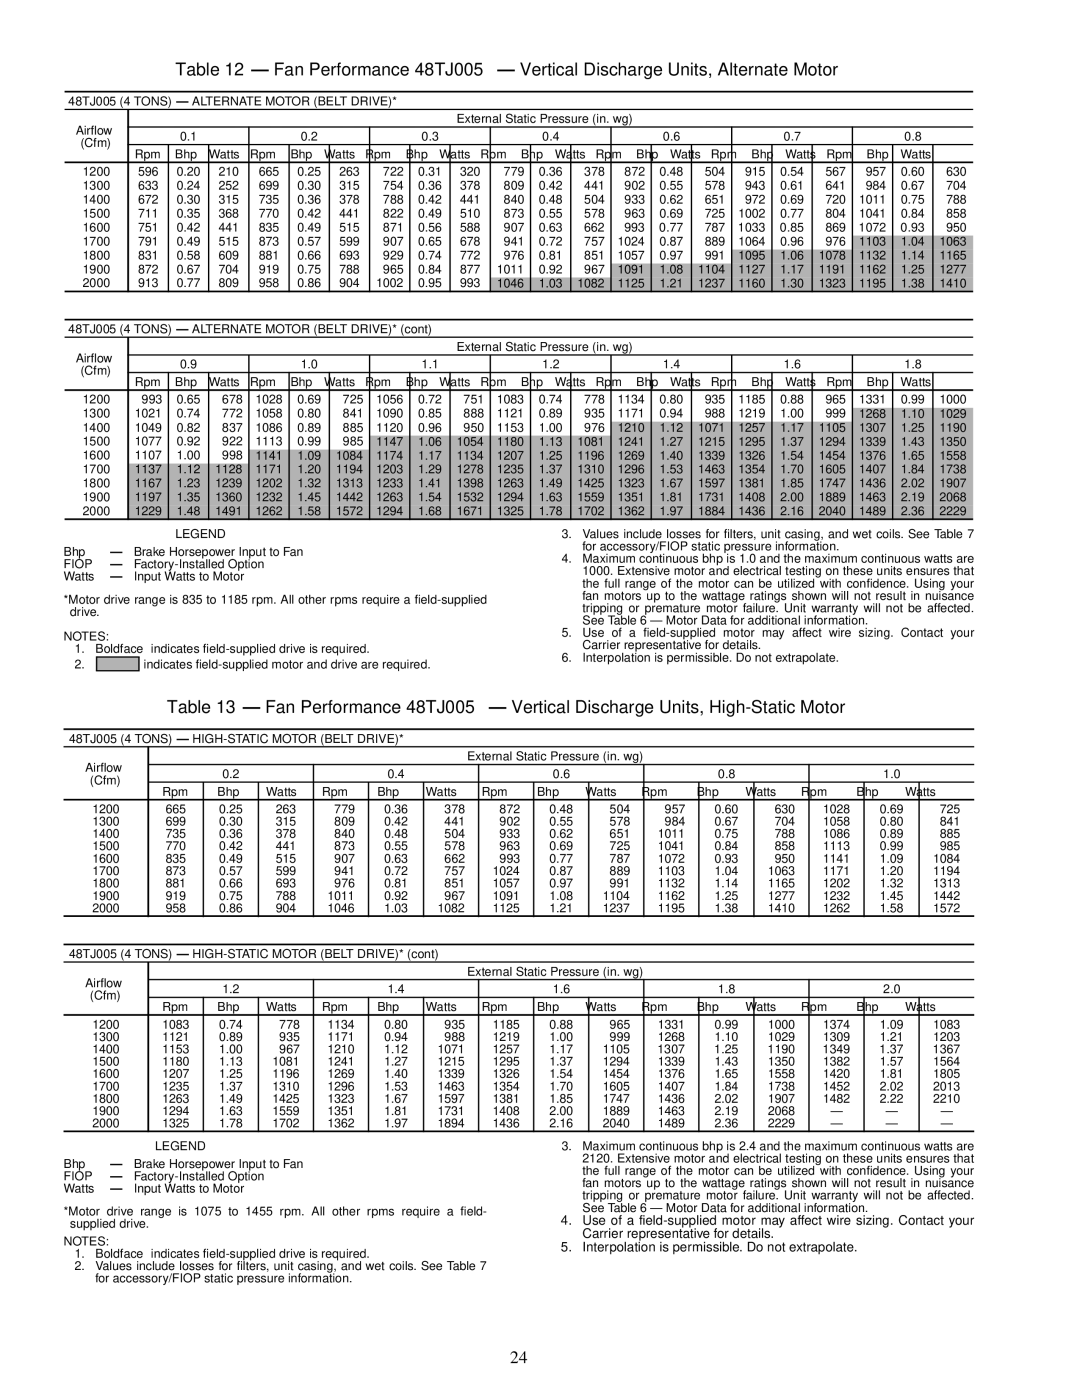
Carrier 48TJD, TJF004, TJF005-007, 48TJE specifications Typical Access Panel Locations

Page 13

OPTIONAL DURABLADE ECONOMIZER — The option- al economizer hood assembly is packaged and shipped in the fil- ter section. Damper blades and control boards are installed at the factory and the economizer is shipped in the vertical discharge position.

NOTE: Horizontal discharge block-off plate is shipped with the air hood package. If unit is to be used for vertical discharge application, discard this plate.

NOTE: Be sure to engage Durablade economizer flange under tabs in return-air opening of the unit base.

Assembly:

1.Determine if ventilation air is required in building. If so, determine the minimum amount to be supplied by each unit and record quantity of ventilation air needed for use in Step 6.

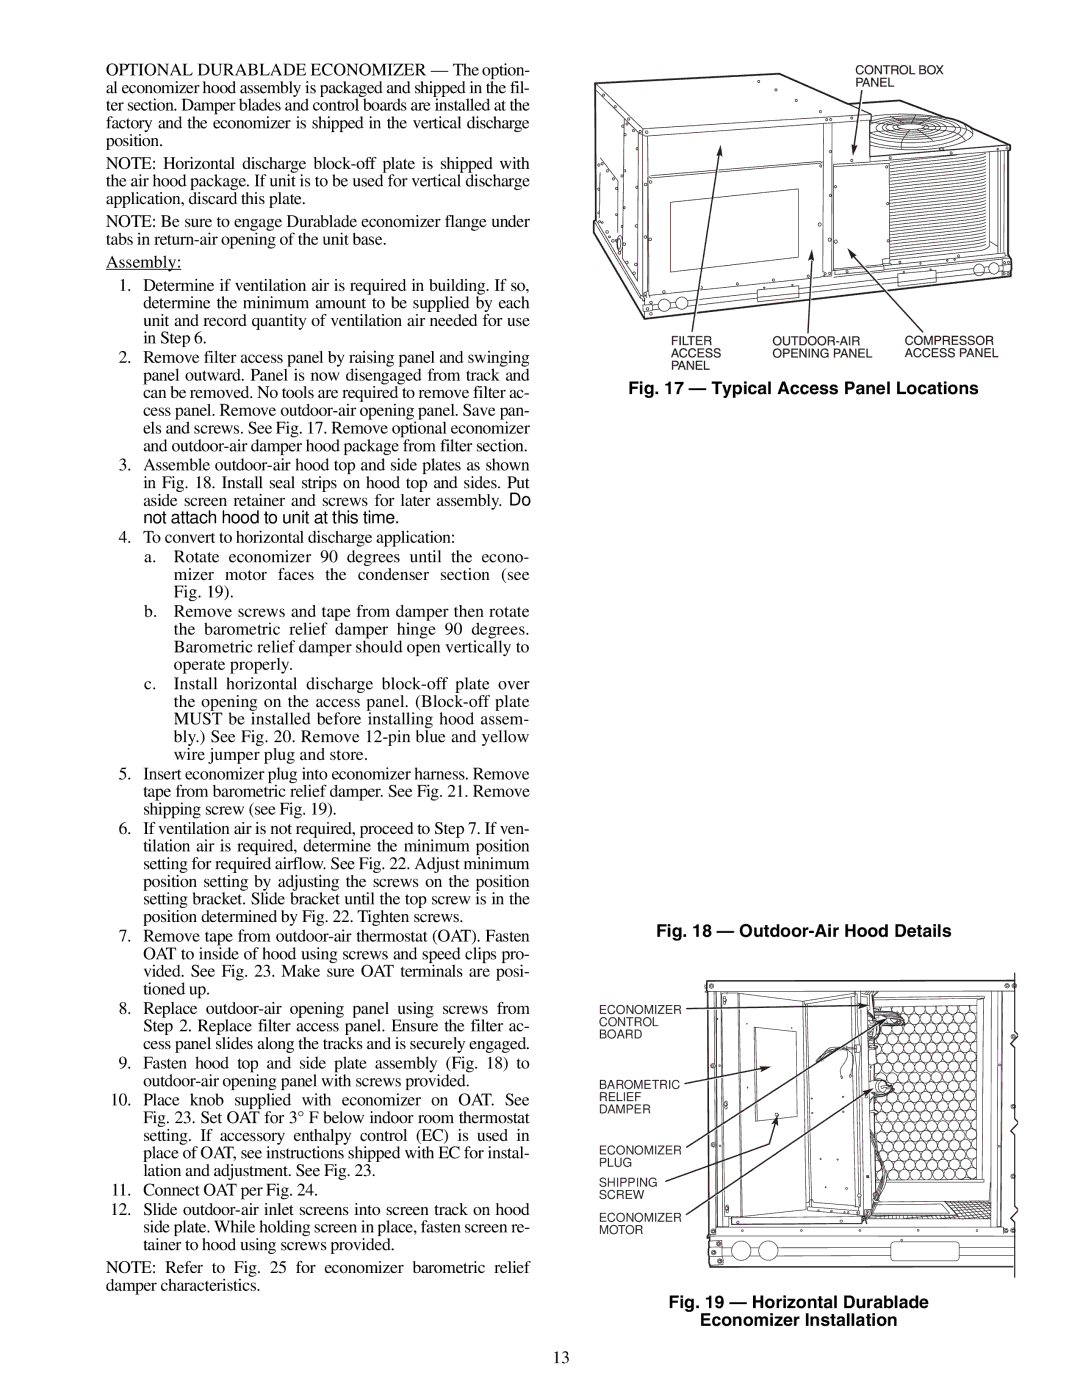
2.Remove filter access panel by raising panel and swinging panel outward. Panel is now disengaged from track and can be removed. No tools are required to remove filter ac- cess panel. Remove outdoor-air opening panel. Save pan- els and screws. See Fig. 17. Remove optional economizer and outdoor-air damper hood package from filter section.

3.Assemble outdoor-air hood top and side plates as shown in Fig. 18. Install seal strips on hood top and sides. Put aside screen retainer and screws for later assembly. Do not attach hood to unit at this time.

4.To convert to horizontal discharge application:

a.Rotate economizer 90 degrees until the econo- mizer motor faces the condenser section (see Fig. 19).

b.Remove screws and tape from damper then rotate the barometric relief damper hinge 90 degrees. Barometric relief damper should open vertically to operate properly.

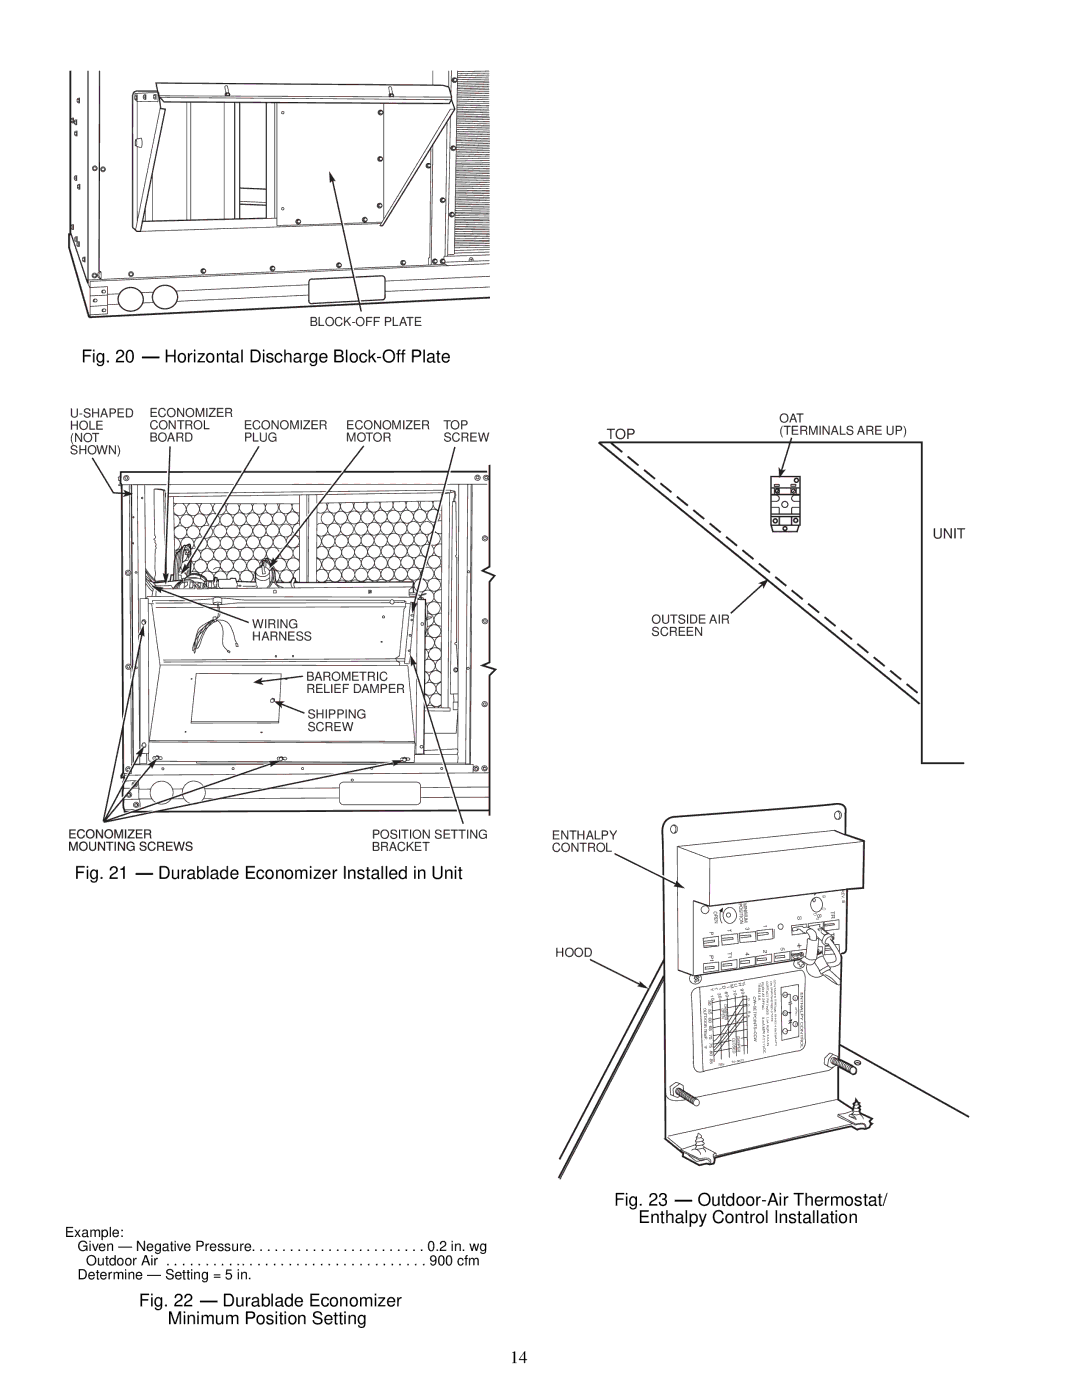
c.Install horizontal discharge block-off plate over the opening on the access panel. (Block-off plate MUST be installed before installing hood assem- bly.) See Fig. 20. Remove 12-pin blue and yellow wire jumper plug and store.

5.Insert economizer plug into economizer harness. Remove tape from barometric relief damper. See Fig. 21. Remove shipping screw (see Fig. 19).

6.If ventilation air is not required, proceed to Step 7. If ven- tilation air is required, determine the minimum position setting for required airflow. See Fig. 22. Adjust minimum position setting by adjusting the screws on the position setting bracket. Slide bracket until the top screw is in the position determined by Fig. 22. Tighten screws.

7.Remove tape from outdoor-air thermostat (OAT). Fasten OAT to inside of hood using screws and speed clips pro- vided. See Fig. 23. Make sure OAT terminals are posi- tioned up.

8.Replace outdoor-air opening panel using screws from Step 2. Replace filter access panel. Ensure the filter ac- cess panel slides along the tracks and is securely engaged.

9.Fasten hood top and side plate assembly (Fig. 18) to outdoor-air opening panel with screws provided.

10.Place knob supplied with economizer on OAT. See Fig. 23. Set OAT for 3° F below indoor room thermostat setting. If accessory enthalpy control (EC) is used in place of OAT, see instructions shipped with EC for instal- lation and adjustment. See Fig. 23.

11.Connect OAT per Fig. 24.

12.Slide outdoor-air inlet screens into screen track on hood side plate. While holding screen in place, fasten screen re- tainer to hood using screws provided.

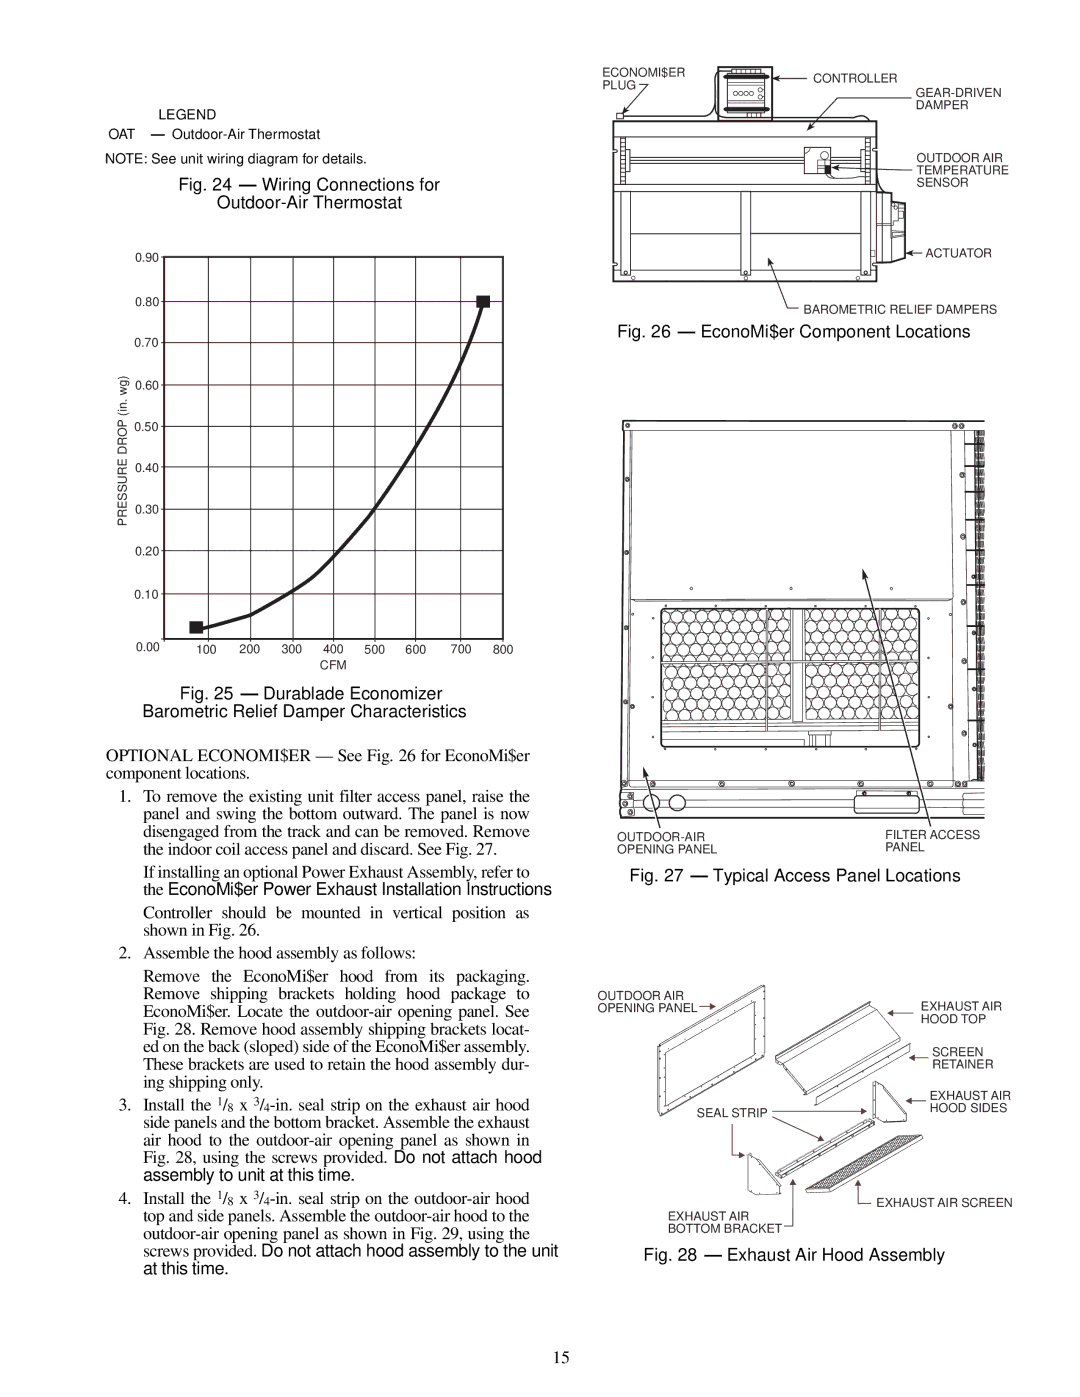
NOTE: Refer to Fig. 25 for economizer barometric relief damper characteristics.

Fig. 17 — Typical Access Panel Locations

Fig. 18 — Outdoor-Air Hood Details

ECONOMIZER

CONTROL

BOARD

BAROMETRIC

RELIEF

DAMPER

ECONOMIZER

PLUG

SHIPPING

SCREW

ECONOMIZER

MOTOR

Fig. 19 — Horizontal Durablade

Economizer Installation

13
Image 13
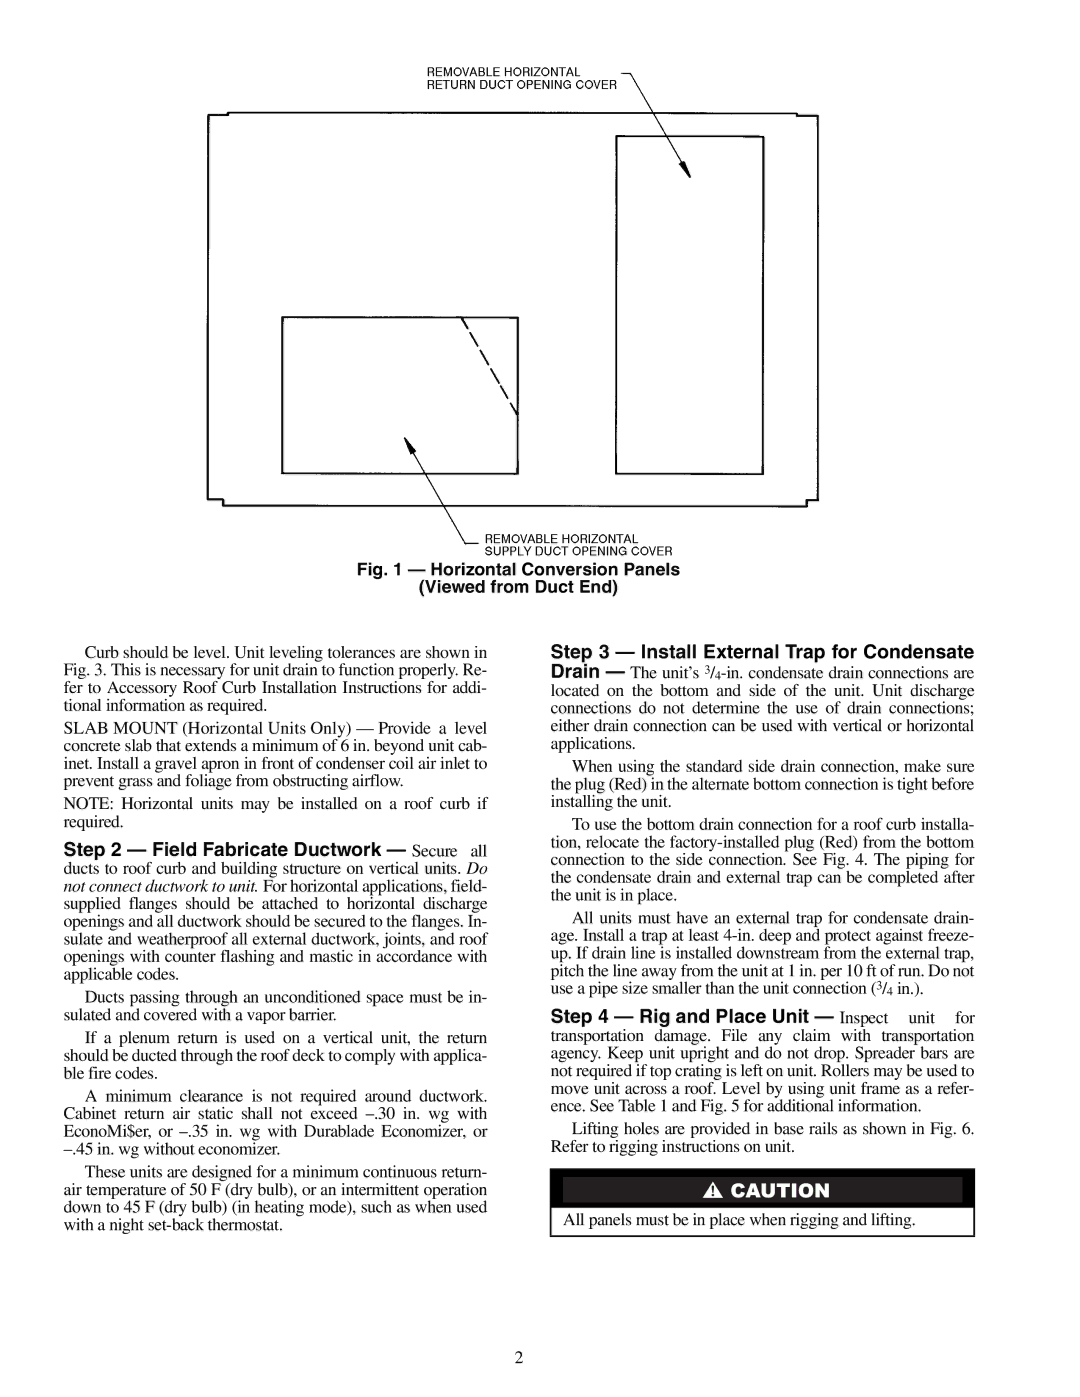
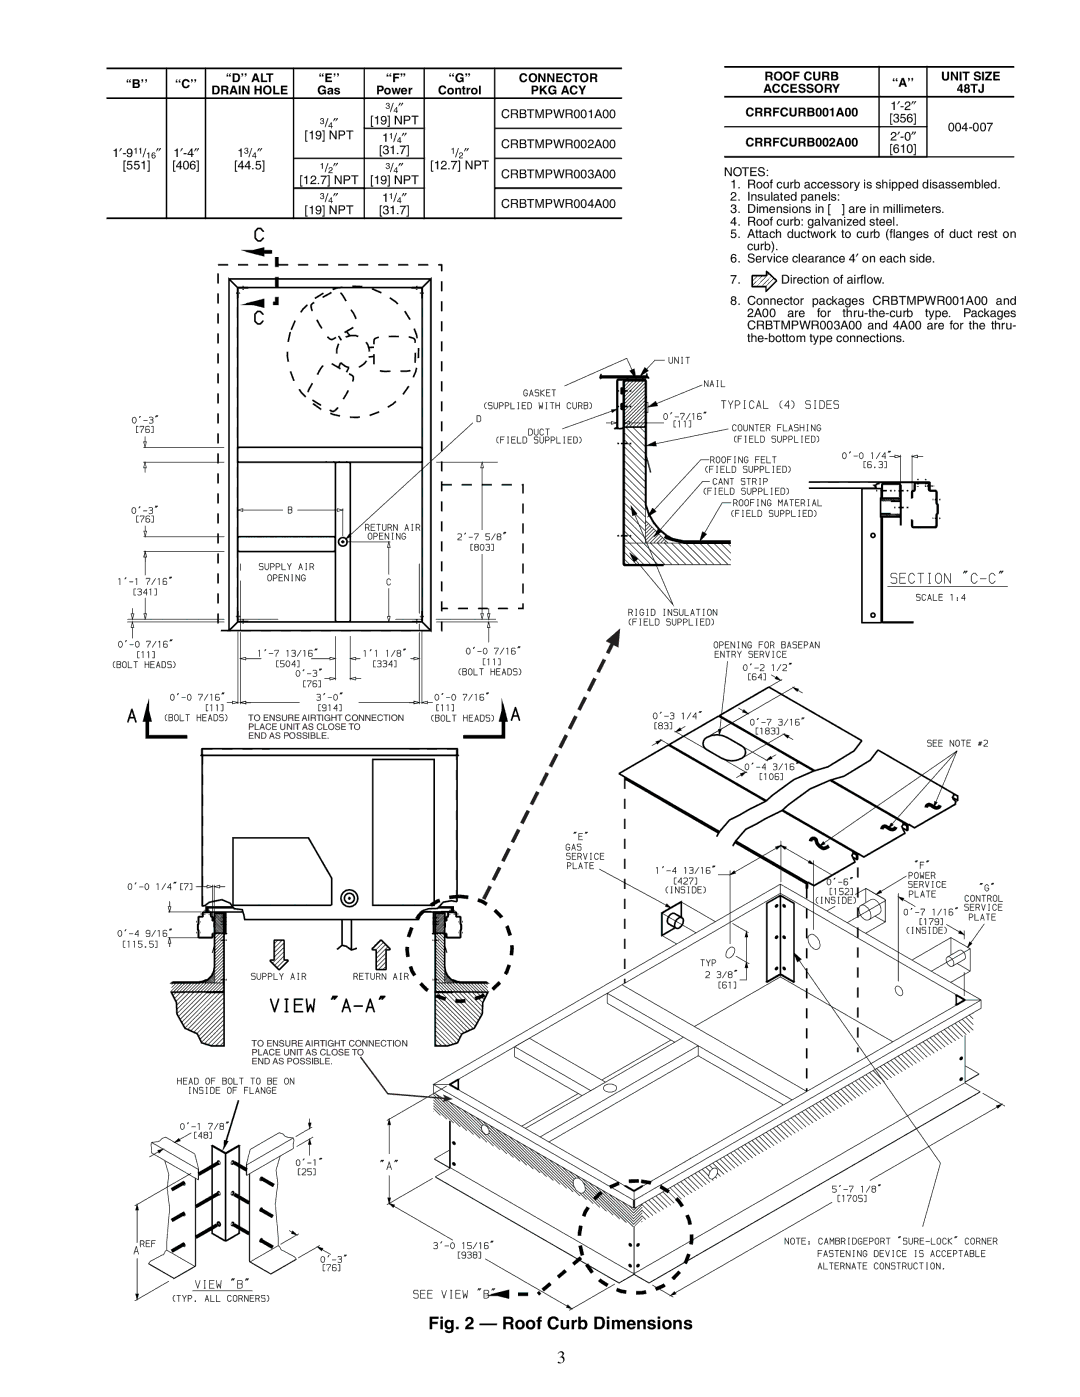
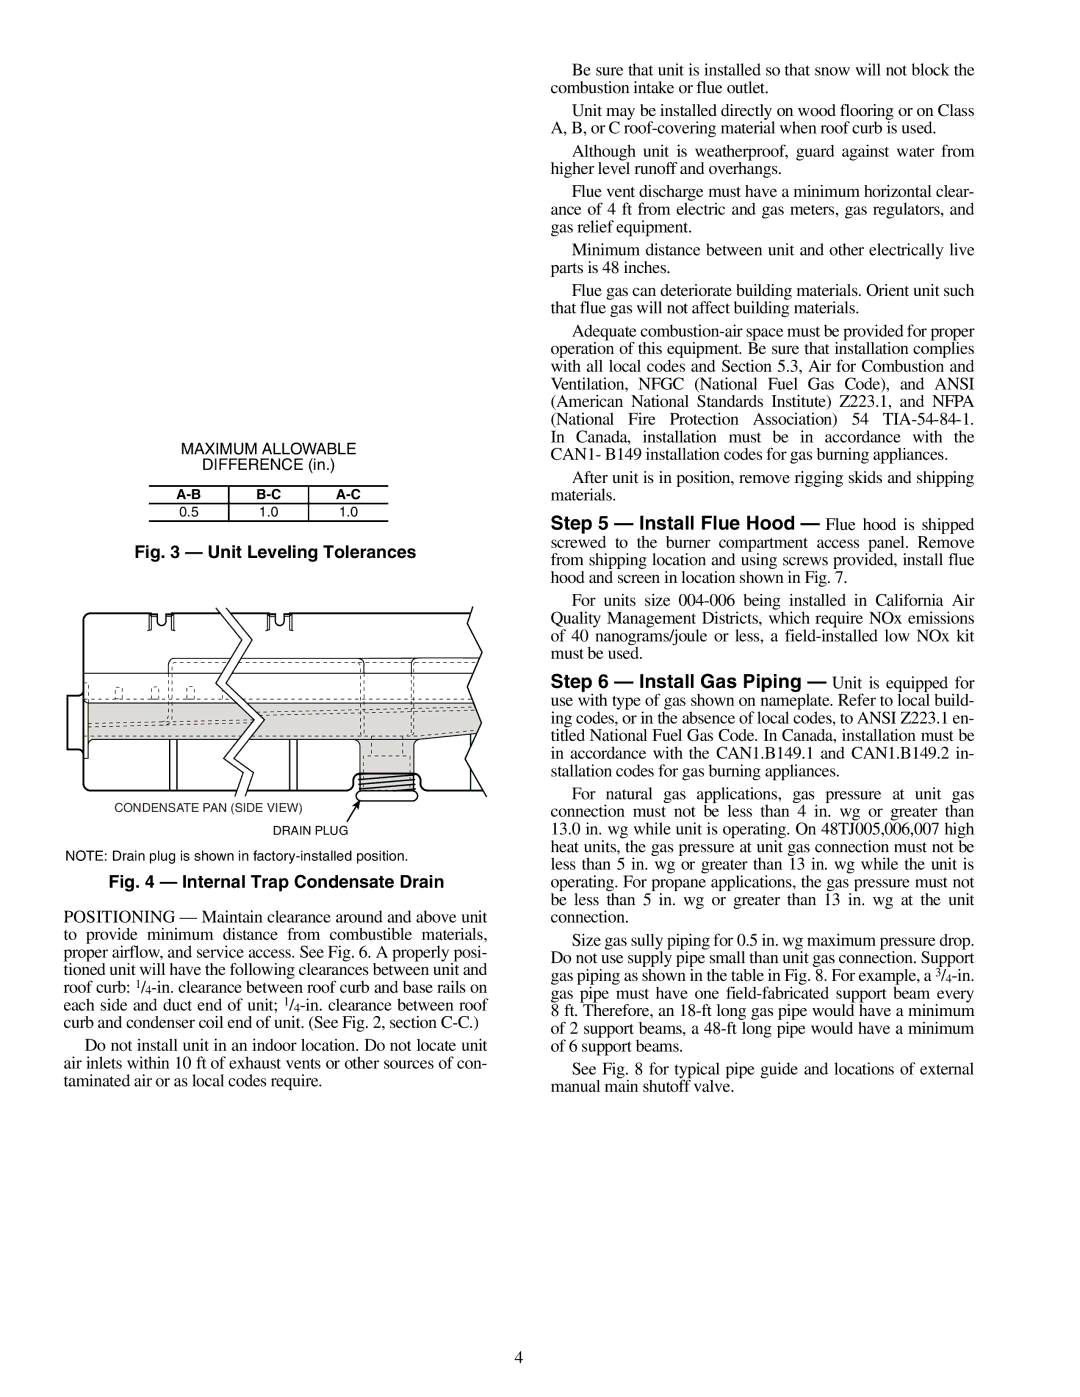
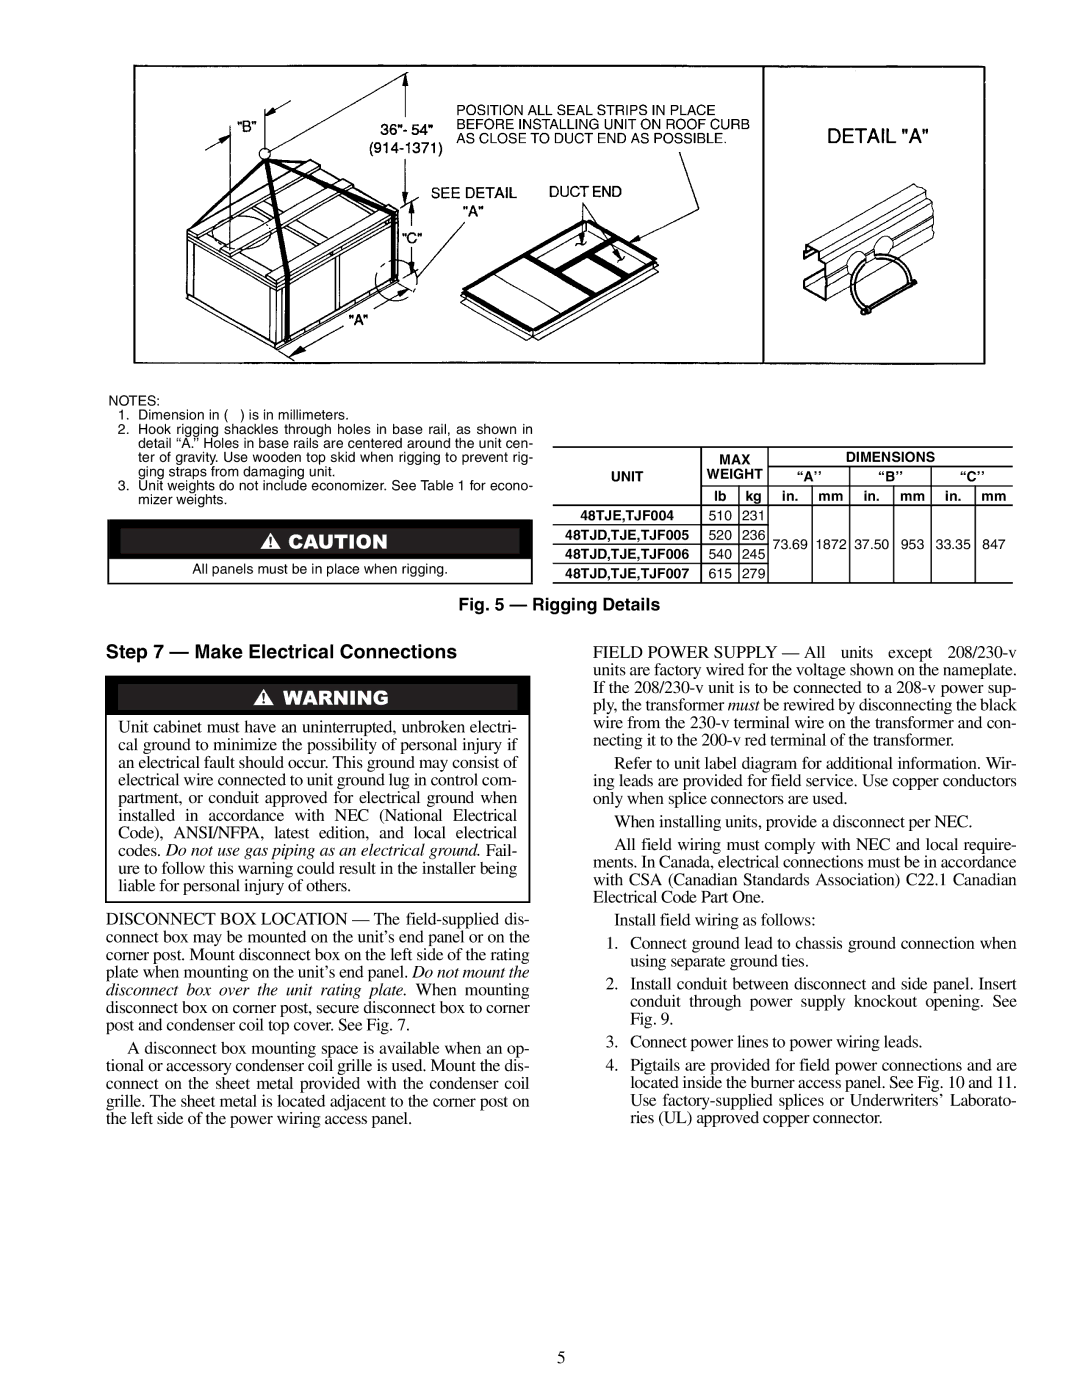
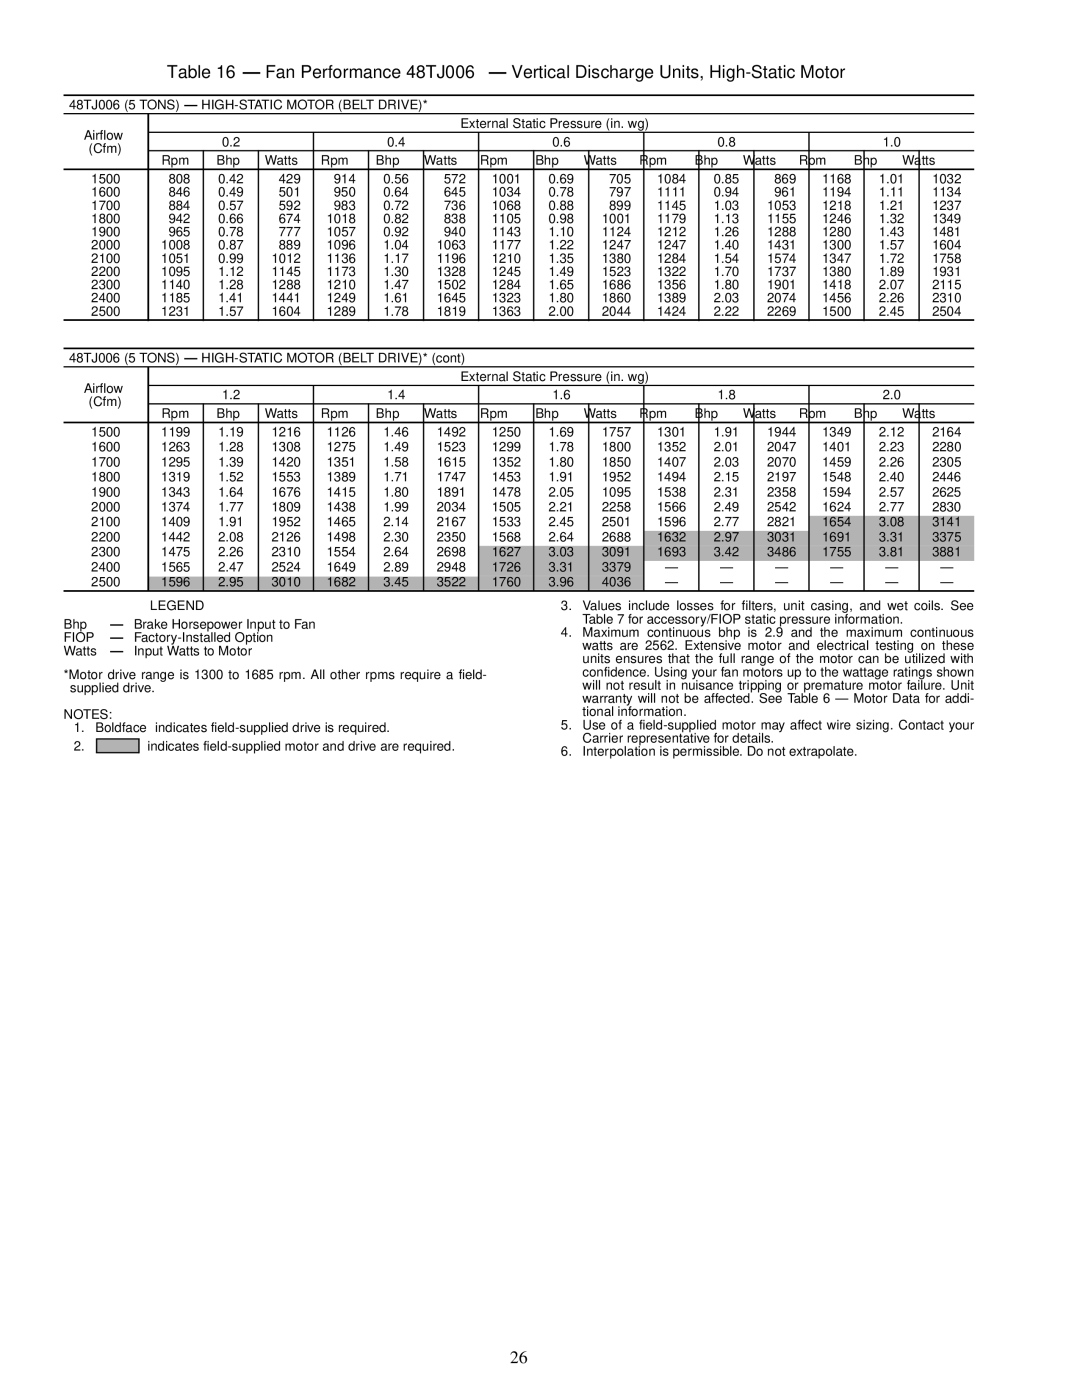
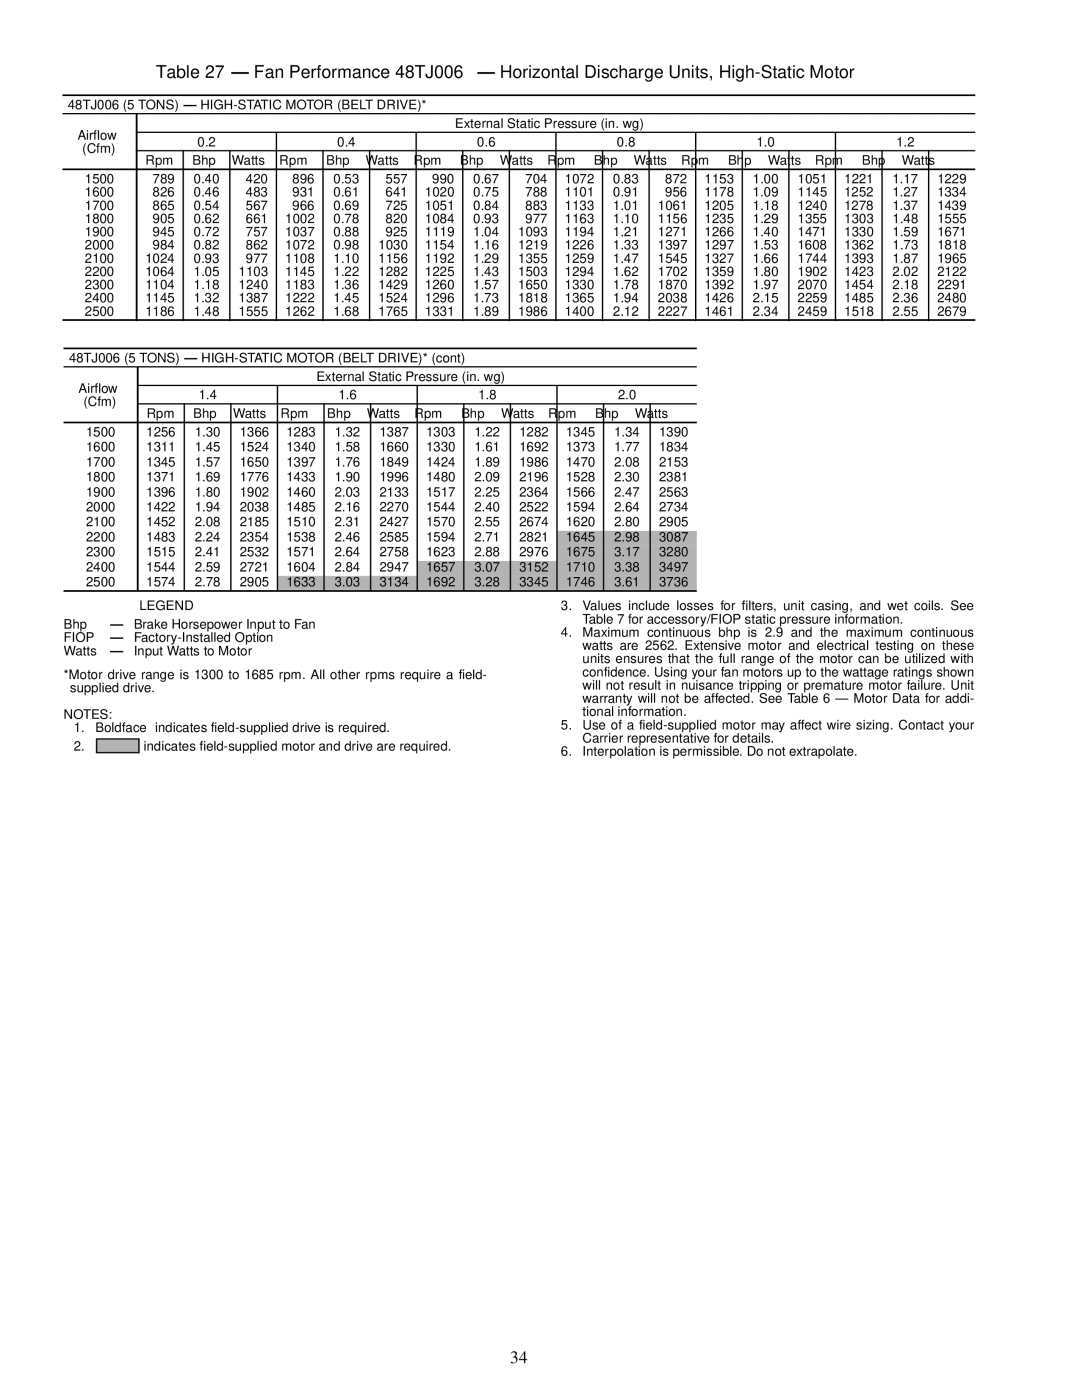
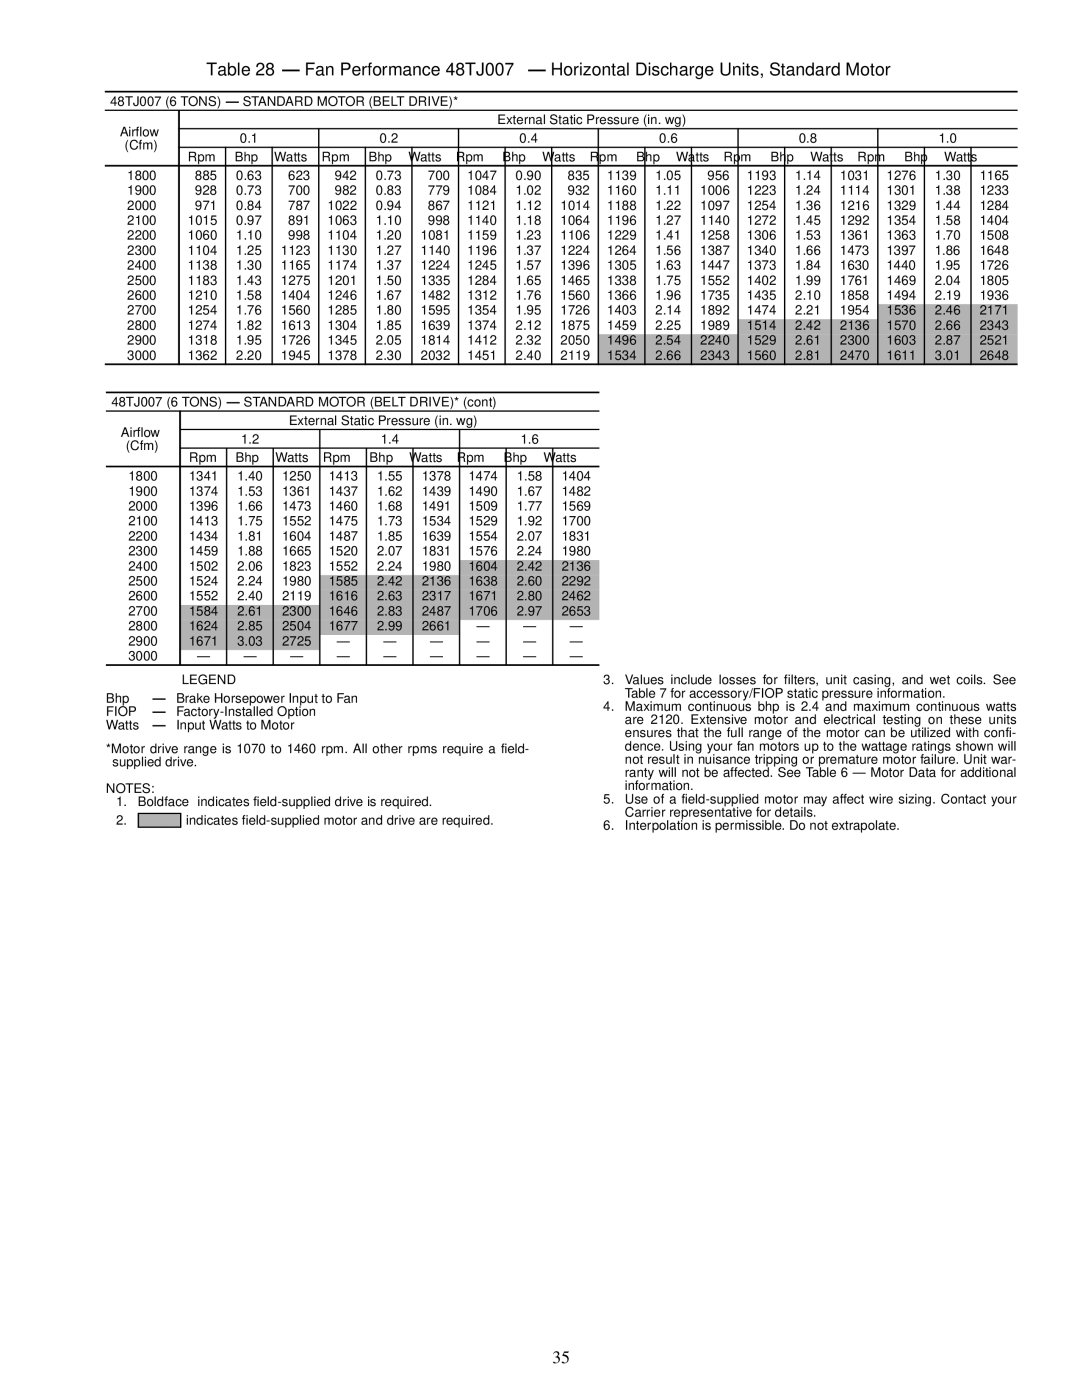
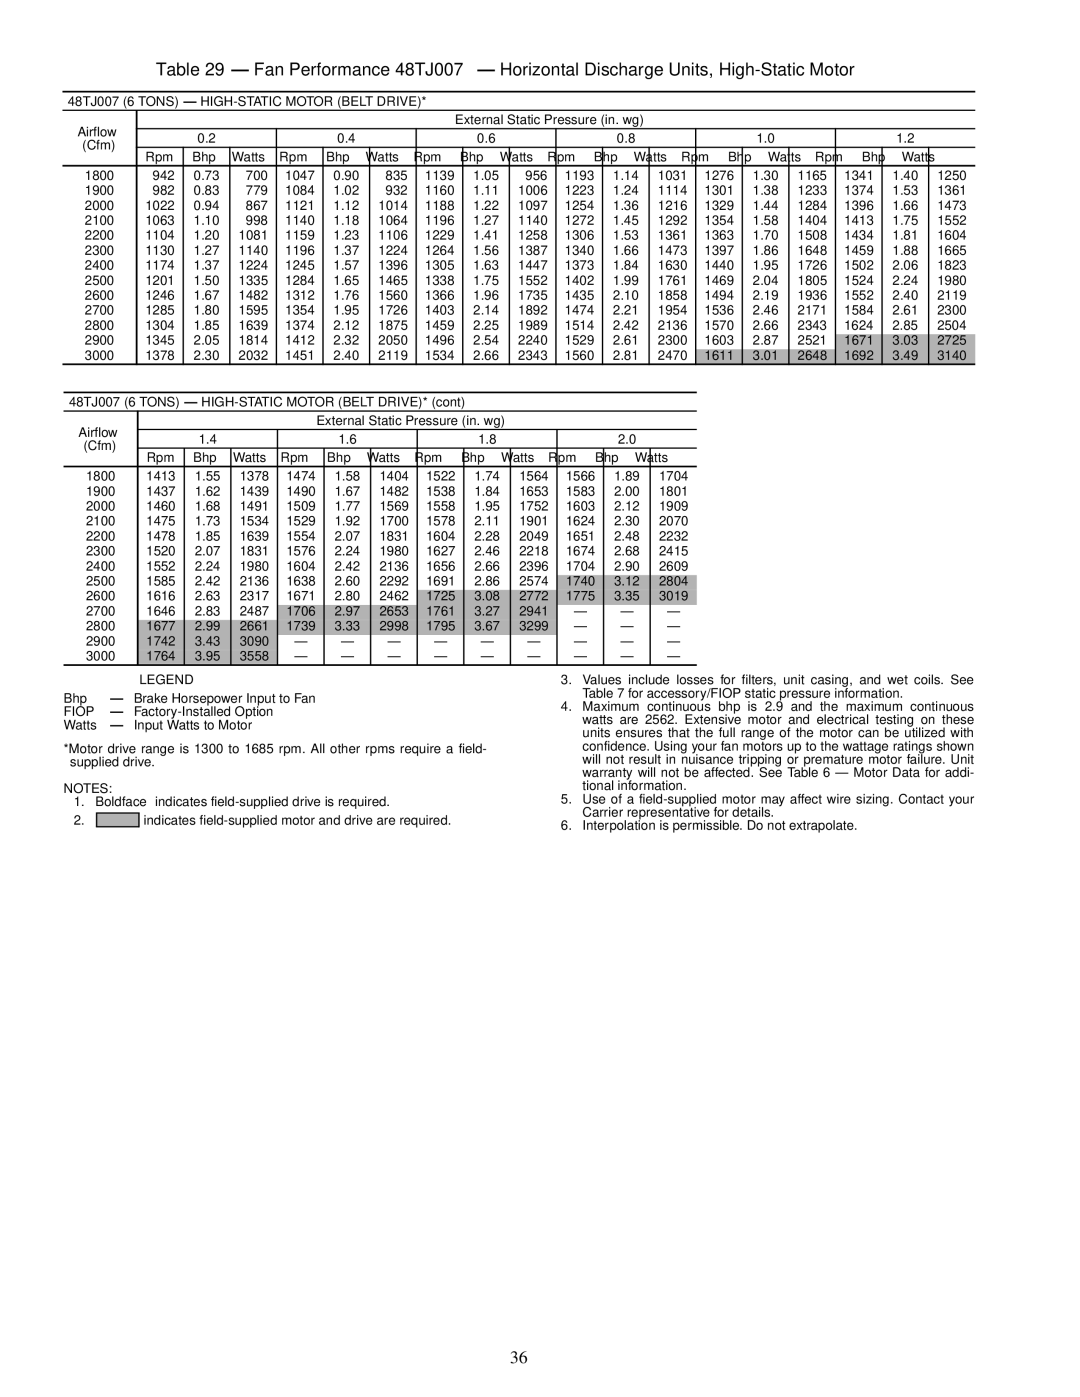
Contents Installation, Start-Up Service Instructions Horizontal Conversion Panels Viewed from Duct End Roof Curb Dimensions Unit Leveling Tolerances Make Electrical Connections Unit Size 48TJ Physical DataLOSS-OF-CHARGE LOW Pressure Base Unit Dimensions Flue Hood Details Conduit InstallationPower Wiring Connections Supply Size Electrical DataType FLA RLA LRAMake Outdoor-Air Adjustments and Install Outdoor-Air Hood Typical Access Panel Locations Horizontal Discharge Block-Off Plate Enthalpy Control InstallationWiring Connections for Outdoor-Air Thermostat Outdoor-Air Hood Assembly EconoMi$er Wiring Wiring Diagram for Power Exhaust System Changeover Set Points Default Potentiometer SettingsBelt Drive Motor Mounting Accessory/FIOP Static Pressure* in. wg 48TJ004-007 Fan Rpm at Motor Pulley SettingsMotor Data 48TJ004 3 Tons Alternate Motor Belt Drive 48TJ004 3 Tons Standard Motor Direct Drive48TJ005 4 Tons Standard Motor Direct Drive 48TJ004 3 Tons HIGH-STATIC Motor Belt Drive48TJ005 4 Tons Alternate Motor Belt Drive 48TJ006 5 Tons Alternate Motor Belt Drive 48TJ006 5 Tons Standard Motor Direct Drive48TJ006 5 Tons HIGH-STATIC Motor Belt Drive 48TJ007 6 Tons Standard Motor Belt Drive 48TJ007 6 Tons HIGH-STATIC Motor Belt Drive 149 109189 2291064 10281005 938817 48TJ005 4 Tons Alternate Motor Belt Drive1700 750 473 806 536 1900 826 63048TJ005 4 Tons HIGH-STATIC Motor Belt Drive 1700 811 494 865 567 1600 770 420 826 4831800 852 578 1900 894 5671600 826 483 931 641 1020 788 1101 956 1178 12211252 1700 865 567 966 725 1051 883 1133 1061 1205928 700 982 779 885 623 942 700971 787 1022 867 1015 891 1063 9982000 1022 867 1121 1014 1188 1097 1254 1216 1900 982 779 1084 932 1160 1006 1223 11142100 1063 998 1140 1064 1196 1272 1292 2200 1104 1081 1159 1106 1229 1258Elevation Altitude CompensationGas Propane Orifice Size† 000 Heating Page Service Lubrication Cooling Charging Chart, 48TJ004 Flash† LED Error Code DescriptionFlashes Burner Tray Details Heating Service Analysis LED Error Code Service AnalysisSymptom Cause Remedy Problem Cause RemedyCompressor operates continuously Cooling Service AnalysisDamper does not Durablade Economizer TroubleshootingProblem Potential Cause Remedy EconoMi$er TroubleshootingTypical Wiring Diagram and Component Arrangement SW4 Switch Max. Vent PositionPage START-UP Checklist