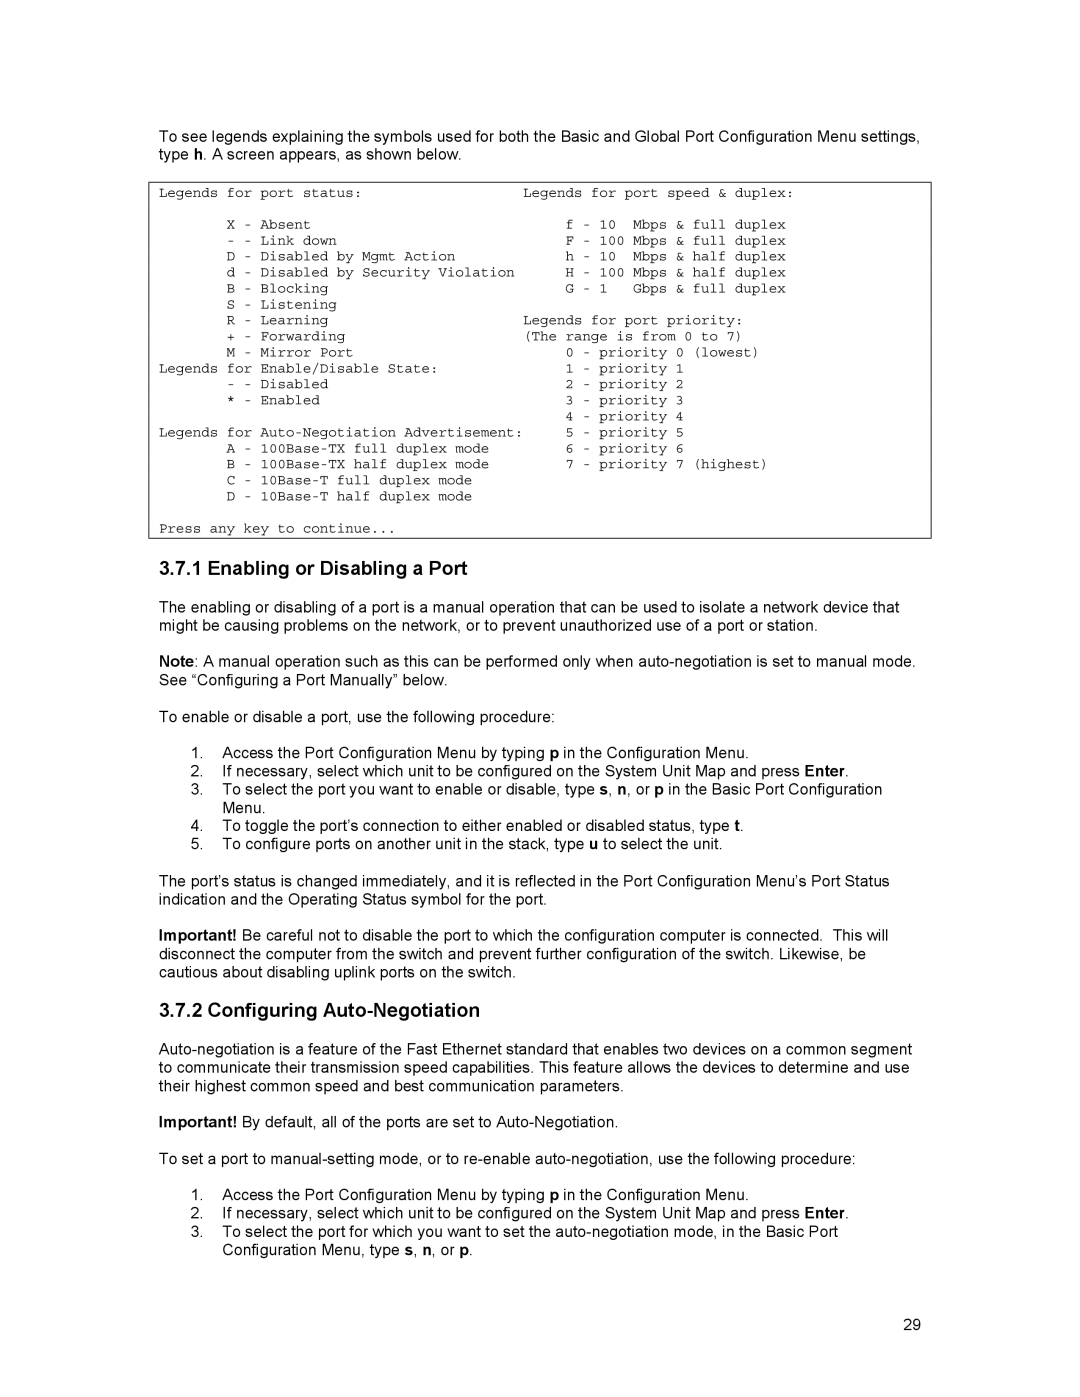
To see legends explaining the symbols used for both the Basic and Global Port Configuration Menu settings, type h. A screen appears, as shown below.
Legends for | port status: | Legends for port speed & duplex: | ||
X - | Absent | f - | 10 Mbps & full duplex | |
- - | Link down | F - | 100 Mbps & full duplex | |
D - | Disabled by Mgmt Action | h - | 10 Mbps & half duplex | |
d - | Disabled by Security Violation | H - | 100 Mbps & half duplex | |
B - | Blocking | G - | 1 Gbps & full duplex | |
S - | Listening |
|
|
|
R - | Learning | Legends for port priority: | ||
+ - | Forwarding | (The range is from 0 to 7) | ||
M - | Mirror Port | 0 | - priority 0 (lowest) | |
Legends for | Enable/Disable State: | 1 | - priority 1 | |
- - | Disabled | 2 | - priority 2 | |
* - Enabled | 3 | - priority 3 | ||
|
| 4 | - priority 4 | |
Legends for | 5 | - priority 5 | ||
A - | 6 | - priority 6 | ||
B - | 7 | - priority 7 (highest) | ||
C - |
|
|
| |
D - |
|
|
| |
Press any key to continue...
3.7.1 Enabling or Disabling a Port
The enabling or disabling of a port is a manual operation that can be used to isolate a network device that might be causing problems on the network, or to prevent unauthorized use of a port or station.
Note: A manual operation such as this can be performed only when
To enable or disable a port, use the following procedure:
1.Access the Port Configuration Menu by typing p in the Configuration Menu.
2.If necessary, select which unit to be configured on the System Unit Map and press Enter.
3.To select the port you want to enable or disable, type s, n, or p in the Basic Port Configuration Menu.
4.To toggle the port’s connection to either enabled or disabled status, type t.
5.To configure ports on another unit in the stack, type u to select the unit.
The port’s status is changed immediately, and it is reflected in the Port Configuration Menu’s Port Status indication and the Operating Status symbol for the port.
Important! Be careful not to disable the port to which the configuration computer is connected. This will disconnect the computer from the switch and prevent further configuration of the switch. Likewise, be cautious about disabling uplink ports on the switch.
3.7.2 Configuring Auto-Negotiation
Important! By default, all of the ports are set to
To set a port to
1.Access the Port Configuration Menu by typing p in the Configuration Menu.
2.If necessary, select which unit to be configured on the System Unit Map and press Enter.
3.To select the port for which you want to set the
29