Computerized Sewing and Embroidery Machine
Important Safety Instructions
For Users in the UK, EIRE, Malta and Cyprus only
Contents
Selecting Stitching
Stitch Setting Chart
Useful Functions
Useful Sewing Tips
Embroidering Neatly
Using the Memory Function
Sewing the Various Built-in Decorative Patterns
Designing a Pattern My Custom Stitch
Index
Care and Maintenance
Troubleshooting
Upgrading Your Machine’s Software
Introduction
Sewing Machine Features
Introduction / Sewing Machine Features
Gold colored
Accessories
Included accessories
Part code XC4489-051
Others
Accessories
Following are available as optional accessories
Optional accessories
Names of Machine Parts and Their Functions
Names of Machine Parts and Their Functions
Front view
Right-side/rear view
Needle and presser foot section
Start/stop button
Operation buttons
LCD liquid crystal display touch panel
Operation panel
Getting Ready
Turning the Machine On/Off
Power supply precautions
Turning off the machine
CUnplug the power supply cord from the electrical outlet
Unplug the power supply cord from the power supply jack
Turning on the machine
Stitch type selection screen
LCD Liquid Crystal Display Operation
Viewing the LCD
Utility stitch selection screen
LCD Liquid Crystal Display Operation
Changing the machine settings
LCD comes on
BPresspanel. Settings key on the operation
Settings screen appears
Turn on the sewing machine
BPress Sewing machine help key on the operation panel
Checking machine operating procedures
DWhen settings are complete, press Back key
ATurn on the sewing machine
Initial stitch screen appears again
DPressnext page. Next page key to switch to
EAfter you finish looking, press Back key two times
Winding the bobbin
Winding/Installing the Bobbin
Bobbin precautions
Winding/Installing the Bobbin
Best fits the size of spool being used. If
Place the spool of thread for the bobbin onto
Fthe spool pin Become tangled around the spool pin
Allowing you to choose a spool cap that
Spool net Spool cap Spool pin
Make sure that the thread passes under the pretension disk
Guide slit in bobbin winder seat with built-in cutter
Slide the bobbin cover latch to the right
Installing the bobbin
GReattach the bobbin cover
Upper Threading
Upper Threading
About the spool of thread
Threading the upper thread
Needle position button
DOpen the top cover
Pass the thread behind the needle bar thread Kguide
Thread is passed through the eye of the needle
This section describes how to thread the needle
Threading the needle
CLower the presser foot lever to lower the presser foot
BLower the presser foot lever
AThreadguide. the machine to the needle bar thread
For details, refer to Upper Threading
Thread should unroll from the top front of the spool
Using the twin needle
Threadeye. the upper thread for the left needle
KPress
Screen for setting the twin needle appears
Attach zigzag foot J
Turn on the sewing machine and select a stitch
AInsert the bobbin into the bobbin case
Pulling up the bobbin thread
MPress Back key
NStart sewing
Upper Threading
Replacing the Needle
Needle precautions
This section describes how to replace the needle
Replacing the Needle
Needle types and their uses
CLower the presser foot lever
Checking the needle
Replacing the needle
Install the twin needle in the same way
Replacing the presser foot
Presser foot precautions
This section describes how to replace the presser foot
Replacing the Presser Foot
Presser foot is attached
Replacing the Presser Foot
For details, refer to Replacing the presser foot
Removing and attaching the presser foot holder
Remove the presser foot
Sewing Cylindrical Pieces
Sewing Cylindrical Pieces
Free-arm sewing
Free-arm sewing makes sewing cylindrical pieces easy
Getting Ready
Sewing Basics
Refer to Positioning the fabric
General sewing procedure
Follow the basic procedures below to sew
Sewing
Attach the presser foot
Refer to Stitch Setting Chart
Selecting stitching
Sewing
Fabric is now positioned to be sewn
Positioning the fabric
CPlace the fabric under the presser foot
Starting to sew
HCut the threads
Machine stops sewing with the needle lowered in the fabric
Machine starts sewing in the normal sewing direction
Securing the stitching
For details, refer to Starting to sew Machine starts sewing
Machine stops sewing
Sewing stitches
When you have finished sewing, cut the threads
Cutting the thread
Release Start/stop button or foot controller
BRaise the presser foot lever
Using the thread cutter
Press to return the setting to its default
Setting the Stitch
Adjusting the stitch width
Correct thread tension
Adjusting the stitch length
Adjusting the thread tension
Setting the Stitch
Each press of makes the thread tension tighter
Upper thread is too loose
CPress on the LCD
Useful Functions
Useful Functions
BSelect a stitch
DSet the fabric in place, and press Start/ stop button once
Automatically cutting the thread
CPress on the screen
Press on the screen
Mirroring stitches
Select a stitch
Changing the sewing direction
Adjusting the presser foot pressure
Useful Sewing Tips
Trial sewing
Useful Sewing Tips
When you are finished sewing, reset the dial to 3 standard
Sewing thick fabrics
Sewing an even seam allowance
Sewing thin fabrics
Sewing stretch fabrics
Sewing leathers or vinyl fabrics
Hands-free raising and lifting of the presser foot
Presser foot is lowered
Using the knee lifter AStop the sewing machine
CRelease the knee lifter
Satin stitching using the sewing Speed controller
Stitch Setting Chart Utility stitches
Using overcasting foot G
Using zigzag foot J
Utility stitches
Stitch Setting Chart
Stitch
Stitch Setting Chart
7.0 4.0 Decorative stitching
7.0 1.0
Small Yes Not
Only Pattern for making adjustment
Other stitches
Stitches
Gothic font
Yes Small
Outline
Large Yes
BPresspanel. Utility stitch key on the operation
Selecting Stitching
Stitch types
Selecting Stitching
Selecting characters
CSelect the stitch type
Press the stitch selection
CSet the stitch length to 2.0 mm DPress
Saving stitch settings
Default stitch length is 2.5 mm
† Example Bus
Press
Attach overcasting foot G
Sewing overcasting stitches using overcasting foot G
Overcasting Stitches
Overcasting Stitches
Sewing overcasting stitches using zigzag foot J
Sewing overcasting stitches using the side cutter
Lowersewing.the presser foot lever, and then start
Basic Stitching
Basic Stitching
Basting
Basic stitching
2.0 5.5
When sewing is finished, cut the thread
For details, refer to Adjusting the stitch width
Changing the needle position
DSelect a stitch
Sew a blind hem according to the following procedure
Blind Hem Stitching
Blind Hem Stitching
If the needle does not catch the hem fold
If the needle catches too much of the hem fold
Needle is too far to the left
Hem
Buttonhole Stitching/Button Sewing
Buttonhole Stitching/Button Sewing
Buttonhole sewing
CAttach buttonhole foot a
If the button does not fit in the button guide plate
Size of the buttonhole is set
FPullpossible.down the buttonhole lever as far as
BIt fits into the grooves, and then loosely tie it
Sewing buttonholes on stretch fabrics
Button is held in place
Button sewing
Feed dogs are lowered
Attach button-sewing foot M
CCut off any excess thread
Do not press Thread cutter button
Attaching a shank to a button
For details, refer to Basic stitching
Zipper Insertion
Inserting a centered zipper
Zipper can be sewn in place
HSelect stitch
Zipper Insertion
Wrong side of fabric Mm 1/8 inch
Inserting a side zipper
Zipper Insertion
NTopstitch around the zipper
Left sewing position
Zipper/piping Insertion
Zipper and piping can be sewn in place
Zipper/piping Insertion
HTopstitch around the zipper
Inserting a piping
100
GSecurely tighten the positioning screw with a screwdriver
Sewing Stretch Fabrics and Elastic Tape
Sewing Stretch Fabrics and Elastic Tape
Stretch stitching
Elastic attaching
102
Stitch
Appliqué, Patchwork and Quilt Stitching
Appliqué, Patchwork and Quilt Stitching
Attach the open toe foot ESelect a stitch
Appliqué stitching
104
Select stitch 21 or
Patchwork crazy quilt stitching
Piecing
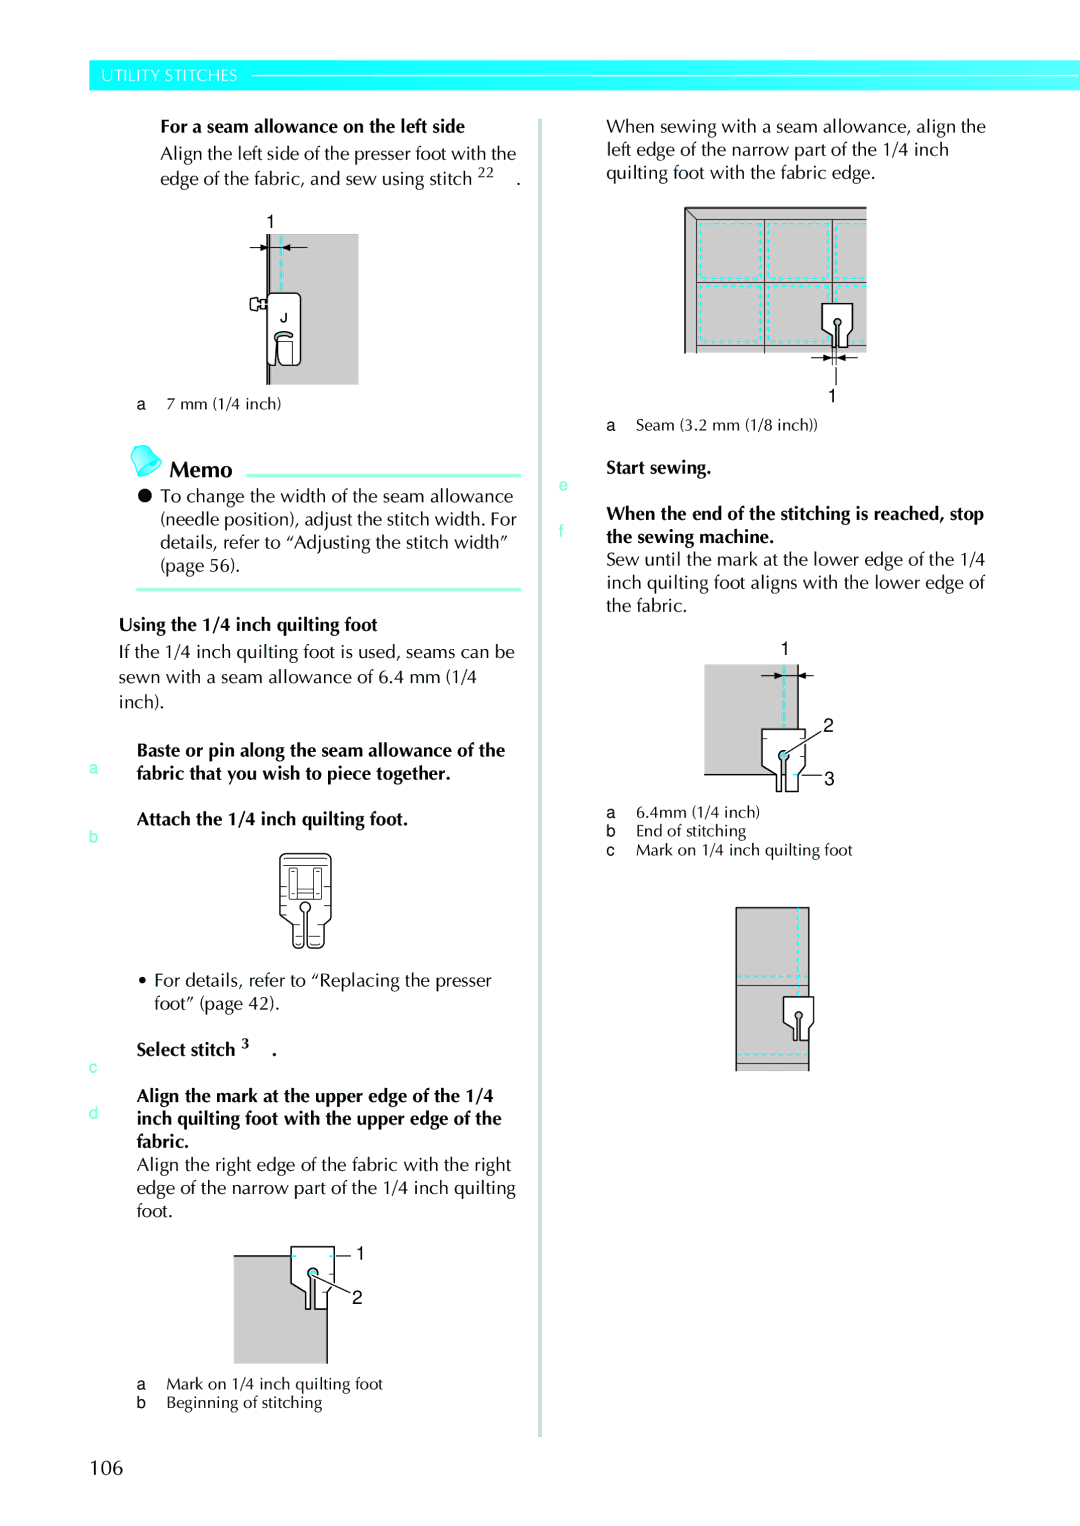
For a seam allowance on the left side
Using the 1/4 inch quilting foot
106
Walking foot is attached
Quilting
Baste the fabric to be quilted
108
Free-motion quilting
AConnect the foot controller
Satin stitching using the sewing speed controller
DPress on for stitch width control setting
Initial screen appears again
110
EPress Back key
Reinforcement Stitching
Reinforcement Stitching
Triple stretch stitching
Bar tack stitching
EPullpossible.down the buttonhole lever as far as
112
BAttach buttonhole foot a
Select stitch 58 or
Darning
114
Attach monogramming foot N
Eyelet Stitching
Eyelet Stitching
Eyelet stitch
Remove the flat bed attachment
Horizontal Stitching
116
Horizontal
Fabric is fed to the left
Horizontal Stitching
Fabric is fed forward
Start sewing
118
Decorative Stitching
Utility stitches contain the following decorative stitches
Decorative Stitching
Fagoting
120
Scallop stitching
Smocking
CSelecttension.stitch 20 , and then increase the thread
Shell tuck stitching
Select stitch 31 , 32 or
AFold the fabric along the bias BAttach zigzag foot J
Select stitch 28 , 29 or
Joining
122
Unfold the fabric, and then iron the tucks down to one side
DStart sewing
AInstall the wing needle
Heirloom stitching
BAttach monogramming foot N
Pattern displayed at the top of the screen is mirrored
124
DSew along the center of the unfrayed section
126
Sewing the Various Built-in Decorative Patterns
Sewing beautiful patterns
Sewing patterns
Select for coarser stitching, or select for finer stitching
Changing the pattern size
Changing the stitch density
Sewing the Various Built-in Decorative Patterns
BSelect a satin stitch pattern
Changing the length for satin stitches
128
It turns to and the pattern is longer
DSelect the same pattern
Shifting patterns
Next pattern selected is moved half a width to the right
BSelect the first pattern
Combining patterns
130
Examples of step patterns
AAfter.the patterns have been combined, press
CSelect the next pattern
Up to 70 patterns can be combined
Repeating patterns
APress
132
Mirroring a pattern image
Checking the pattern
Recalling a pattern APress Recall key
CCheck the contents, and then press
Storing patterns
BPresspanel. Memory key on the operation
134
Realigning the pattern
Check the sewn pattern
FPress Settings key on the operation panel
Press GTo adjust the vertical position, press For
Vertical pattern adjustment
136
Horizontal pattern adjustment
It returns to the screen for adjusting the pattern
Continue adjusting the pattern until it is sewn correctly
Prepare a grid sheet set
Designing a Pattern My Custom Stitch
Drawing a sketch of the pattern
Designing a Pattern My Custom Stitch
GAfter all points have been entered, press
Entering the pattern data
138
Patterns
To revise the pattern, press
Point
Examples of designs
140
Steps for embroidering are described in this chapter
Following is necessary for embroidering
Embroidering Neatly
What to prepare
142
Needle
Embroidering Neatly
144
Embroidery step by step
Attaching the Embroidery Foot
This section describes how to attach the embroidery foot
Attaching the Embroidery Foot
Attaching the embroidery foot
Set the embroidery foot perpendicular
146
Turn the screwdriver toward the back
Hold the embroidery foot with your right hand, as shown
For details, refer to Attaching the presser foot holder
Removing the embroidery foot
BTurn off the sewing machine CRaise the presser foot lever
Attach the presser foot holder
Attaching the embroidery unit
Embroidery unit precautions
This section describes how to attach the embroidery unit
Attaching the Embroidery Unit
Carriage moves to its initial position
Attaching the Embroidery Unit
Slide the embroidery unit onto the sewing machine arm
Press , and then press
Removing the embroidery unit
150
Remove the embroidery frame
Preparing the Fabric
† When it cannot be ironed or placed in the hoop
Preparing the Fabric
Attaching a stabilizer material to the fabric
Embroidery frame mediumoption
Setting the fabric in the embroidery frame
152
Embroidery frame large
Embroidery pattern Mark
We recommend stabilizer material for all embroidery
154
BPlace the embroidery sheet on the inner frame
For details, refer to
Attaching the Embroidery Frame
This section describes how to attach the embroidery frame
Attaching the Embroidery Frame
Attaching the embroidery frame
156
Removing the embroidery frame
Selecting Embroidery Patterns
Selecting Embroidery Patterns
Copyright information
Embroidery pattern types
Operation keys
LCD liquid crystal display operation
158
LCD button
Press this key again to cancel multi-color
If a wrong character was selected, press
Selecting characters
160
Specify the characters for embroidery
Embroidery patterns
Switch the screen using Previous Key and Next page key
Selecting an embroidery pattern
BSelect the frame shape
Selecting a frame pattern
162
Press the frame pattern
Operation is the same as in Selecting Embroidery Patterns
Using an embroidery card sold separately
ESelect a pattern
164
Embroidering
Sewing attractive finishes
Set the embroidery thread, and thread Bneedle
Embroidering a pattern
Embroidering
Prepareon the screen.embroidery thread of the color shown c
After progressing 5-6 stitches, press
166
DLower the presser foot lever
EPress Start/stop button
Applique will be displayed on the screen
Appliquéing
Applique Position will be displayed on the screen
Sewing machine stops
ILower the presser foot lever, and press Start/stop button
168
Editing Patterns
Adjusting the layout
CCheck and adjust the layout
Editing Patterns
Press to return to the previous screen
170
Press Back key to return to the previous screen
DPress Back key to return to the original screen
Forward one stitch increases the stitch number
Resewing
Thread runs out partway through a design
172
FTurnpattern.on the sewing machine and select GPress
Stopping while embroidering
CPress Embroidery key
ETurn off the sewing machine
KRestart the embroidery
174
Using the Memory Function
Using the Memory Function
Embroidery data precautions
BSelect the pattern you wish to recall
Switch screens using
176
Stored patterns are displayed
Data within folders cannot be recalled
USB port connector for computer USB cable connector
Recalling embroidery patterns from the computer
Select the pattern you wish to recall
Switch screens using Previous page key Next page key
GAdjust the pattern as desired, and then begin embroidering
178
Adjusting the LCD
Cleaning the machine surface
Cleaning the race
Error messages
180
Care and Maintenance
Cleaning the machine surface
Cleaning the race
Care and Maintenance
Presser foot lever is raised Lower the presser foot lever
Troubleshooting
Correctly install the needle
182
Neatly on
Troubleshooting
Is tangled or
184
Skipped
LCD
186
Needle may break and cause injury
Error messages
188
Machine is in embroidery mode and the combined character
When the embroidery unit is attached
190
Adjusting the LCD
Operation beep
Canceling the operation beep
192
AWhile holding Settings key pressed, turn on the machine
When the following screen appears, upgrading is completed
Upgrading Your Machine’s Software
Upgrading Your Machine’s Software / Index
Index
118
194
49, 68
Index
English 882-U11 XD1534-051

 Memo
Memo