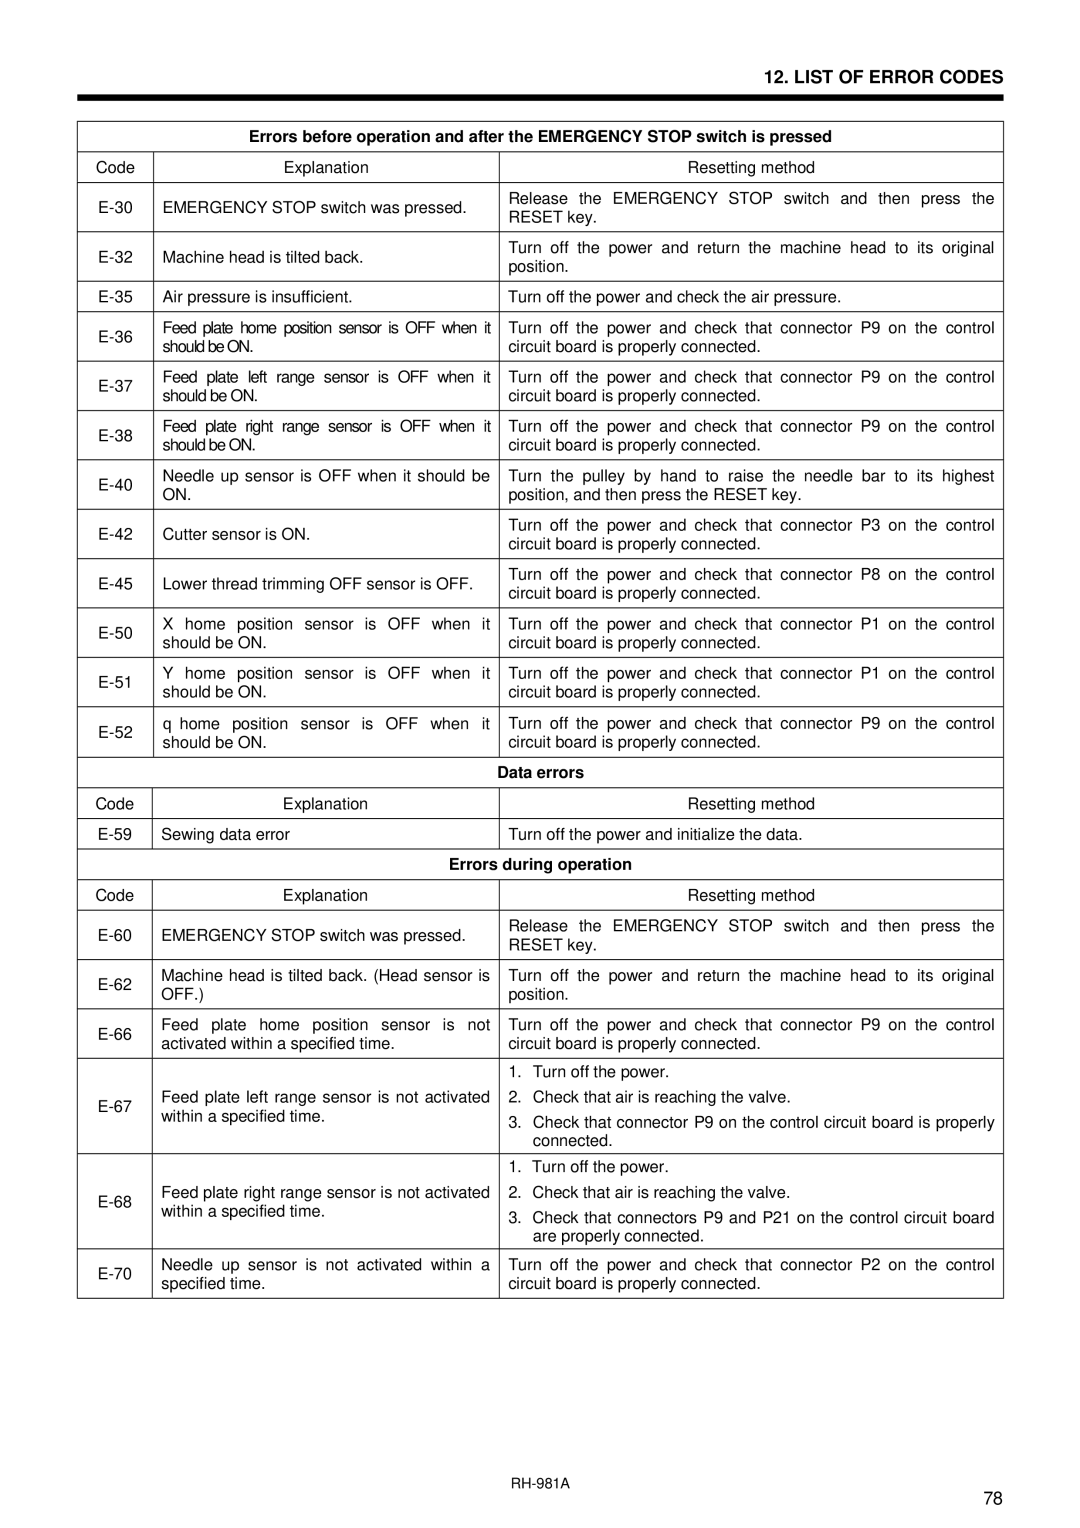
12. LIST OF ERROR CODES

Errors before operation and after the EMERGENCY STOP switch is pressed

Code


Explanation


Resetting method


E-30

EMERGENCY STOP switch was pressed.


Release the

EMERGENCY STOP

switch and then

press the


RESET key.


E-32

Machine head is tilted back.


Turn off the

power and return the

machine head to

its original


position.


E-35

Air pressure is insufficient.


Turn off the power and check the air pressure.


E-36

Feed plate home position sensor is OFF when it


Turn off the power and check that connector P9 on the control

should be ON.


circuit board is properly connected.


E-37

Feed plate left

range sensor

is OFF

when

it


Turn off the power and check that connector P9 on the control

should be ON.


circuit board is properly connected.


E-38

Feed plate right

range sensor is OFF when

it


Turn off the power and check that connector P9 on the control

should be ON.


circuit board is properly connected.


E-40

Needle up sensor is OFF when it should be


Turn the pulley by hand to raise the needle bar to

its highest

ON.


position, and then press the RESET key.


E-42

Cutter sensor is ON.


Turn off the power and check that connector P3 on the control


circuit board is properly connected.


E-45

Lower thread trimming OFF sensor is OFF.


Turn off the power and check that connector P8 on the control


circuit board is properly connected.


E-50

X home position

sensor

is

OFF

when

it


Turn off the power and check that connector P1 on the control

should be ON.


circuit board is properly connected.


E-51

Y home position

sensor

is

OFF

when

it


Turn off the power and check that connector P1 on the control

should be ON.


circuit board is properly connected.


E-52

θ home position

sensor

is

OFF

when

it


Turn off the power and check that connector P9 on the control

should be ON.


circuit board is properly connected.


Data errors


Code


Explanation


Resetting method


E-59

Sewing data error


Turn off the power and initialize the data.


Errors during operation


Code


Explanation


Resetting method


E-60

EMERGENCY STOP switch was pressed.


Release the

EMERGENCY STOP

switch and then

press the


RESET key.


E-62

Machine head is tilted back. (Head sensor is


Turn off the

power and return the

machine head to

its original

OFF.)


position.


E-66

Feed plate home

position

sensor

is not


Turn off the power and check that connector P9 on the control

activated within a specified time.


circuit board is properly connected.


1. Turn off the power.


E-67

Feed plate left range sensor is not activated


2.

Check that air is reaching the valve.


within a specified time.


3.

Check that connector P9 on the control circuit board is properly


connected.


1. Turn off the power.


E-68

Feed plate right range sensor is not activated


2. Check that air is reaching the valve.


within a specified time.


3.

Check that connectors P9 and P21 on the control circuit board


are properly connected.


E-70

Needle up sensor is not activated within a


Turn off the power and check that connector P2 on the control

specified time.


circuit board is properly connected.


RH-981A

78

Page 85
Image 85
Brother rh-918a manual Errors during operation

rh-918a specifications

The Brother RH-918A is a versatile and innovative machine tailored for both personal and professional use. As a robust electronic sewing machine, it combines functionality and user-friendly features that cater to a wide range of sewing enthusiasts, from beginners to advanced users.

One of the standout features of the Brother RH-918A is its extensive stitch selection. With over 100 built-in stitches, including decorative stitches, utility stitches, and heirloom stitches, users have ample options to choose from, allowing for creativity and customization in every project. The machine also incorporates an easy-to-use stitch selector dial, making it simple for sewists to navigate and find the perfect stitch for their needs.

Another key characteristic of the RH-918A is its automatic needle threader. This time-saving feature allows users to thread the needle effortlessly, reducing eye strain and frustration, especially for those who may struggle with manual threading. Additionally, the top-loading bobbin system facilitates quick bobbin changes and ensures smooth feeding, enhancing overall sewing efficiency.

The machine is equipped with a powerful motor that provides consistent and strong stitches, able to handle various fabric types, from lightweight cotton to heavier materials like denim and canvas. This capability is critical for crafting garments, home décor items, and more intricate projects.

The Brother RH-918A also boasts several convenient features to enhance the user experience. An LED light illuminates the sewing area, making it easier to work on detailed projects, particularly in low-light environments. Furthermore, the machine includes multiple presser feet, such as a zipper foot, buttonhole foot, and walking foot, to expand its functionality and accommodate different sewing techniques.

For enhanced stability, the Brother RH-918A comes with a sturdy metal frame, ensuring durability and precision. Its intuitive interface, comfortable handwheel, and adjustable stitch length and width settings add to the overall ease of use, making sewing enjoyable for everyone.

In summary, the Brother RH-918A combines a wide range of stitches, user-friendly technologies, and robust build quality, making it an excellent choice in the world of sewing machines. Whether for basic repairs or elaborate creations, this machine stands out for its performance and reliability, appealing to a diverse audience of sewing enthusiasts.