TROUBLESHOOTING

Refer to Tables 17-21 for troubleshooting information.

Run Test Troubleshooting — The automatic run test is a diagnostic tool used during unit start-up. Table 17 describes troubleshooting specifically for the automated run test.

Table 17 — Run Test Troubleshooting

PROBLEM

POSSIBLE CAUSE

Control modules do not have lights when unit power on.

Transformer open. Circuit breaker open. Power wiring open. Module failure.

Control display does not light up when unit power on.

Connection location. Interface cable open. Display failure.

Run test will not start.

Pre-existing ALARM (red)? Not “Logged in” with password.


Switch not in Local.

WARN (yel) does not light during run test.

Wiring open. Lamp failure. Control module failure.

ALARM (red) does not light during run test.

Wiring open. Lamp open. Control module failure.

Run test stops, ALARM (red) light is lit after it blinks once.

Bypass switch to LINE. Mode switch to OFF. Duct high


pressure switch open. Fire shutdown input or jumper open.


Supply air temp out of range. Duct static pressure sensor out of range.


Compressor resistor board wiring error or failure.

Fan does not start/ALARM (red) blinks 2 times.

Fan relay failure.

Run test stop, ALARM (red) light is lit after blinking 3 times.

Wiring open. VFD connection error. VFD setup error. Fan relay failure.


Current isolator failure. Control module failure.

Run test stop, ALARM (red) is lit after it blinks 4 times.

VFD connection error. VFD setup error.

Fan does not increase speed.

Current isolator load adjustment too low.

Fan does not stop after ALARM (red) blinks 5 times.

Fan relay failure.

Fan rotation is backwards.

VFD to motor wiring sequence error. VFD setup error.

Run test stop, ALARM (red) is lit after blinking 6 times.

Wiring open. Compressor resistor board wiring error or failure.

Compressor 1 does not start.

High-pressure switch, low-pressure switch, coil frost switch,


or compressor protection module open. Compressor relay failure.


Contactor failure. Control module failure. No refrigerant charge.

Run test stop, ALARM (red) is lit after blinking 7 times.

Wiring open. Compressor resistor board wiring error or failure.

Compressor 2 does not start.

High-pressure switch, low-pressure switch, coil frost switch,


or compressor protection module open. Compressor relay failure.


Contactor failure. Control module failure. No refrigerant charge.

Run test stop, ALARM (red) is lit after blinking 8 times.

Wiring open. Compressor resistor board wiring error or failure.

Compressor 3 does not start.

High-pressure switch, low-pressure switch, coil frost switch,


or compressor protection module open. Compressor relay failure.


Contactor failure. Control module failure. No refrigerant charge.

Run test stop, ALARM (red) is lit after blinking 9 times.

Wiring open. Compressor resistor board wiring error or failure.

Compressor 4 does not start.

High-pressure switch, low-pressure switch, coil frost switch,


or compressor protection module open. Compressor relay failure.


Contactor failure. Control module failure. No refrigerant charge.

Compressor rotation is backwards.

Field power wiring sequence error. Compressor power wiring sequence error.

“C” message in I/O status display.

No input signal/communication failure.

“Service” message in I/O status display.

Value is forced from 6400 keypad entry.

“Supervisor” message in I/O status display.

Value is forced from network communication (i.e., PC).

ALARM (red) always on, will not enter run test.

SAT, DSP, CSMUX, DHS, or PHASE input values out of range. Mode switch OFF.

Forcing and Clearing an Input or Output — Dur- ing unit operation and/or troubleshooting, it may be necessary or desirable to clear an input or output. Tables 18 and 19 describe the procedure for clearing inputs and outputs.

Table 18 — Forcing an Input or Output


STEP # INSTRUCTION/ACTION

RESULT

1. Press 3, SET, ENTER

“Controller Password”

2. Press ENTER

“Log in to Controller” “Enter Password”

3. Press 1111, ENTER

“Log in to Controller” “Logged in”

4. Press STAT

“Hardware Points”

5. Press ENTER

“Supply Air Temperature”

6.

Press down arrow to obtain desired item

(NOTE: order is PCB1 I/O, PCB2 I/O, PCB3 I/O)

7.

Key in force value (1=on/start, 0 = off/stop), ENTER

force value/status “Service”

Table 19 — Clearing a Forced Input or Output

STEP # INSTRUCTION/ACTION

RESULT

1. Press 3, SET, ENTER

“Controller Password”

2. Press ENTER

“Log in to Controller” “Enter Password”

3. Press 1111, ENTER

“Log in to Controller” “Logged in”

4. Press STAT

“Hardware Points”

5. Press ENTER

“Supply Air Temperature”

6. Press down arrow to obtain desired item

(NOTE: order is PCB1 I/O, PCB2 I/O, PCB3 I/O)

7. Press CLEAR, ENTER

auto value/status (NOTE “Service” must be gone)

27

Page 27
Image 27
Carrier 50XJ064-104 specifications Run Test Troubleshooting, Forcing an Input or Output, Clearing a Forced Input or Output

50XJ064-104 specifications

The Carrier 50XJ064-104 is a high-efficiency rooftop air conditioning system designed to deliver exceptional cooling and heating capabilities for diverse commercial applications. One of the standout features of this model is its robust cooling capacity of 64,000 BTUs, making it suitable for mid to large-sized spaces. The 50XJ064-104 is engineered using advanced technologies to ensure energy efficiency and reliable performance, contributing to reduced operational costs and environmental sustainability.

One of the primary technologies employed in the Carrier 50XJ064-104 is the high-efficiency scroll compressor. This component plays a pivotal role in optimizing energy usage while delivering consistent cooling output. The system also incorporates an economizer that allows for enhanced energy savings by utilizing outdoor air for cooling when conditions are favorable. This not only decreases reliance on the compressor but also improves indoor air quality.

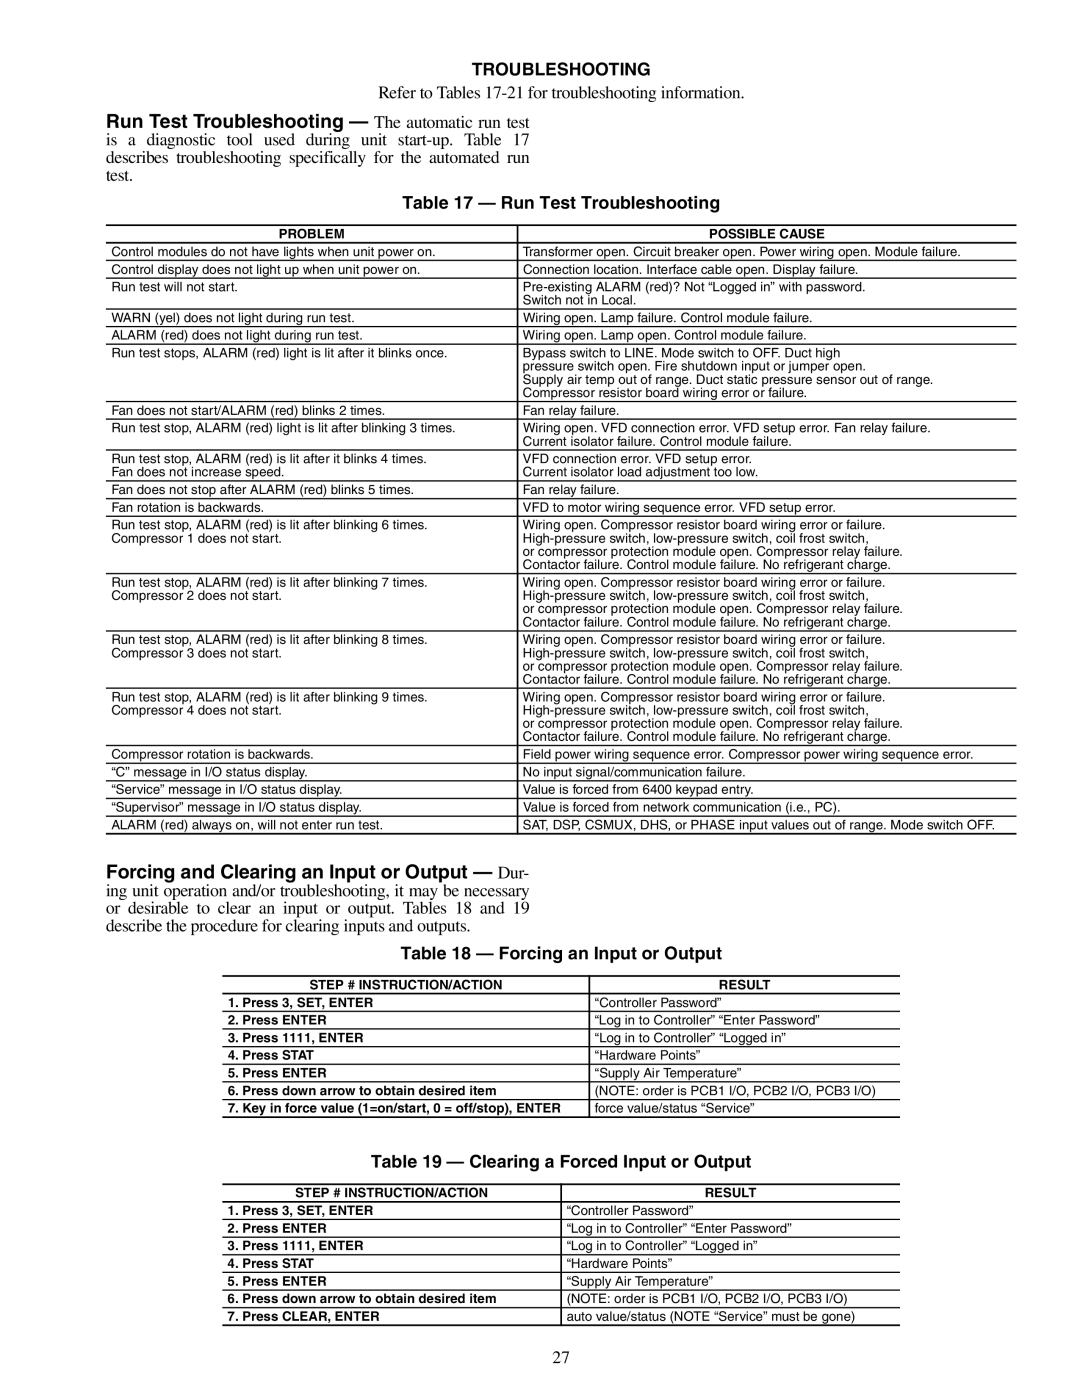
The microprocessor-based controls in the 50XJ064-104 provide precise temperature regulation, ensuring optimal comfort levels in various applications. These controls allow for easy programming and can be integrated into building management systems for centralized oversight. Additionally, the unit features a built-in fault detection and diagnostic system that aids in identifying potential issues before they escalate, minimizing downtime and maintenance costs.

The Carrier 50XJ064-104 is designed with durability in mind. It features a weather-resistant cabinet, designed to withstand harsh outdoor conditions and prolong service life. The high-quality insulation within the unit not only enhances energy efficiency but also minimizes noise levels, making it an ideal choice for urban environments where sound control is critical.

Another important characteristic is its environmentally friendly R-410A refrigerant, which has a lower impact on ozone depletion compared to older refrigerants. This aligns with Carrier's commitment to creating sustainable HVAC solutions that comply with current environmental regulations.

Overall, the Carrier 50XJ064-104 stands out for its combination of efficiency, advanced technologies, and durable construction. Whether for commercial buildings, retail spaces, or industrial applications, this rooftop air conditioning unit is designed to provide reliable performance and comfort year-round.