Welcome to the Maintenance & Service Guide MSG
Presario 1800 Series
Using this Guide
Viewing a Chapter
Expanding & Hiding Topics
Maintenance and Service Guide
privacy and legal statement
Before You Begin
Presario 1800 Series
Technician Notes
Symbols
Preface
Presario 1800 Series
Serial Number
Locating Additional Information
Presario 1800 Series
Product Description
PRESARIO NOTEBOOK MAINTENANCE AND SERVICE GUIDE 1800 SERIES
Presario 1800 Series
Models XL180, XL181, XL182, XL183, XL185 and XL190, XL191, XL192
Feature Display Processor Hard Drive
Models and Features
Modem Networking Battery System Memory
Feature Display Processor Hard Drive
PRESARIO NOTEBOOK MAINTENANCE AND SERVICE GUIDE 1800 SERIES
Front of Unit
Presario 1800 Series
Models XL180, XL181, XL182, XL183, XL185 and XL190, XL191, XL192
Presario 1800 Series
Internet Zone Buttons and Lights
Models XL180, XL181, XL182, XL183, XL185 and XL190, XL191, XL192
# Description
Presario 1800 Series
Front Bezel Components
Models XL180, XL181, XL182, XL183, XL185 and XL190, XL191, XL192
# Description
PRESARIO NOTEBOOK MAINTENANCE AND SERVICE GUIDE 1800 SERIES
Right-Side Components
Presario 1800 Series
Models XL180, XL181, XL182, XL183, XL185 and XL190, XL191, XL192
PRESARIO NOTEBOOK MAINTENANCE AND SERVICE GUIDE 1800 SERIES
Left-Side Components
Presario 1800 Series
Models XL180, XL181, XL182, XL183, XL185 and XL190, XL191, XL192
PRESARIO NOTEBOOK MAINTENANCE AND SERVICE GUIDE 1800 SERIES
Underneath the Unit
Presario 1800 Series
Models XL180, XL181, XL182, XL183, XL185 and XL190, XL191, XL192
PRESARIO NOTEBOOK MAINTENANCE AND SERVICE GUIDE 1800 SERIES
Rear Connectors
Presario 1800 Series
Models XL180, XL181, XL182, XL183, XL185 and XL190, XL191, XL192
Connectors
Optional QuikDock
Presario 1800 Series
Components
Specifications
Physical and Environmental
Specification
Presario 1800 Series
System DMA
System Interrupts
Presario 1800 Series
Models XL180, XL181, XL182, XL183, XL185 and XL190, XL191, XL192
System Function Shipping Configuration
System I/O Address
Presario 1800 Series
Models XL180, XL181, XL182, XL183, XL185 and XL190, XL191, XL192
System Function Shipping Configuration
System Memory Catalog
Presario 1800 Series
I/O Address
Specifications
Display Information
Presario 1800 Series
Models XL180, XL181, XL182, XL183, XL185 and XL190, XL191, XL192
Diskette Drive
Memory Expansion
Presario 1800 Series
Models XL180, XL181, XL182, XL183, XL185 and XL190, XL191, XL192
CD or DVD Drive
Hard Drive
Specification
Specification
Battery Pack
Battery Pack
Presario 1800 Series
Models XL180, XL181, XL182, XL183, XL185 and XL190, XL191, XL192
Signal
Parallel Connector
Signal
Signal is active low
Keyboard/Mouse Connector
Serial Connector
Signal
Signal
Game Port Connector
Modem Connector
Signal
Signal
External VGA Monitor Port
S-Video Connector
Pin Signal
Signal
Univeral Serial Bus USB
TV-Out Composite Video Connector
Signal
Signal
Signal
QuikDock Connector
Signal
Pin Signal
Hibernation
Power Modes
Standby
Battery and Power Management
Full Off
Summary of Power Modes
Shut down
Presario 1800 Series
Power Settings
Power Schemes
Presario 1800 Series
Alarms
SpeedStep Technology
Presario 1800 Series
Rebooting After a Lockup
Recovering From a Loss of Electrical Power
Presario 1800 Series
Minimizing the Energy Required
Increasing Battery-Operating Life
Maximizing the Energy Stored
Presario 1800 Series
Conditioning a Battery Pack
Disposing of a Used Battery Pack
Presario 1800 Series
Troubleshooting
Models XL180, XL181, XL182, XL183, XL184, XL185
and XL190, XL191, XL192
2. Run Compaq Diagnostics
Preliminary Steps
Presario 1800 Series
3. Remove the battery 4. Remove the Palmrest cover
Clearing the Power-On Password
5. Remove the keyboard 6. Remove the Heatspreader
Presario 1800 Series
Power-On Self Test POST
POST Error Messages
Presario 1800 Series
301-Keyboard Error
XX000YZZ 201-Memory Error
304-Keyboard or System Unit Error
601-Diskette Controller Error
Compaq Diagnostics
Checkup TEST View System Information INSPECT
Presario 1800 Series
Checkup TEST
5. Select View System Information INSPECT from the Diagnostics menu
View System Information INSPECT
Presario 1800 Series
Diagnostic Error Codes
Error Code
Processor Test Error Codes
Memory Test Error Codes
Error Code Description
Keyboard Test Error Codes
Parallel Printer Test Error Codes
Error Code Description
Diskette Drive Test Error Codes
Serial Test Error Codes
Error Code Description
Hard Drive Test Error Codes
ECC = Error Correction Code
Presario 1800 Series
Error Code Description
Video Test Error Codes
2. Replace the display assembly and retest
Presario 1800 Series
Error Code Description
Video Test Error Codes Continued
2. Replace the display assembly and retest
Presario 1800 Series
Error Code Description
Video Test Error Codes Continued
3. Replace the display assembly and retest
Presario 1800 Series
Error Code
Audio Test Error Codes
TouchPad Interface Test Error Codes
Error Code Description
Troubleshooting without Diagnostics
Before Replacing Parts
Presario 1800 Series
Audio Solutions
Solving Minor Problems
Battery Pack/Gauge Solutions
Presario 1800 Series
Problem
Battery Pack/Gauge
Solutions
Replace the battery pack Replace the RTC battery
Problem
Battery Pack/Gauge
Solutions
Presario 1800 Series
CD and DVD Drive Solutions
Diskette Drive Solutions
Presario 1800 Series
Display Solutions
Solutions
Problem
2. Replace the display assembly Replace the display assembly
Replace the display assembly Replace the display assembly
Solutions
Problem
2. Replace the display assembly Replace the display assembly
Replace the display assembly Replace the system board
Hard Drive Solutions
Hardware Installation Solutions
Presario 1800 Series
Keyboard/Numeric Keypad Solutions
Memory Solutions
Presario 1800 Series
Problem
PC Card Solutions
Solutions
Presario 1800 Series
Solutions
Problem
Presario 1800 Series
Models XL180, XL181, XL182, XL183, XL184, XL185
Power
Power Solutions
Problem
Solutions
Problem
Printer Solutions
Solutions
Presario 1800 Series
Problem
TouchPad/Pointing Device Solutions
Solutions
Presario 1800 Series
Contacting Compaq Support
Shipping Preparation
Presario 1800 Series
Electrostatic Discharge
Removal and Replacement
Presario 1800 Series
Tool and Software Requirements
Connectors and Plastic Parts
Screws
Presario 1800 Series
ZIF Connector
Presario 1800 Series
Cables
Removing the Hard Drive
Hard Drive Ribbon Cable
PRESARIO NOTEBOOK MAINTENANCE AND SERVICE GUIDE 1800 SERIES
REMOVAL AND REPLACEMENT
Removing the CD/DVD Drive
CD/DVD Ribbon Cable
6 REMOVAL AND REPLACEMENT
PRESARIO NOTEBOOK MAINTENANCE AND SERVICE GUIDE 1800 SERIES
Removing the Diskette Drive
Diskette Drive Ribbon Cable
PRESARIO NOTEBOOK MAINTENANCE AND SERVICE GUIDE 1800 SERIES
REMOVAL AND REPLACEMENT
Removing the Speaker Assembly
Speaker Assembly Cable
8 REMOVAL AND REPLACEMENT
PRESARIO NOTEBOOK MAINTENANCE AND SERVICE GUIDE 1800 SERIES
Removing the Modem
Modem Cable
PRESARIO NOTEBOOK MAINTENANCE AND SERVICE GUIDE 1800 SERIES
REMOVAL AND REPLACEMENT
Removing the Keyboard
Keyboard Ribbon Cable
10 REMOVAL AND REPLACEMENT
PRESARIO NOTEBOOK MAINTENANCE AND SERVICE GUIDE 1800 SERIES
1. Disconnect the AC power source and any external devices
Preparing the Notebook for Disassembly
4. Remove the battery pack pg
Presario 1800 Series
12 REMOVAL AND REPLACEMENT
Disconnecting the QuikDock
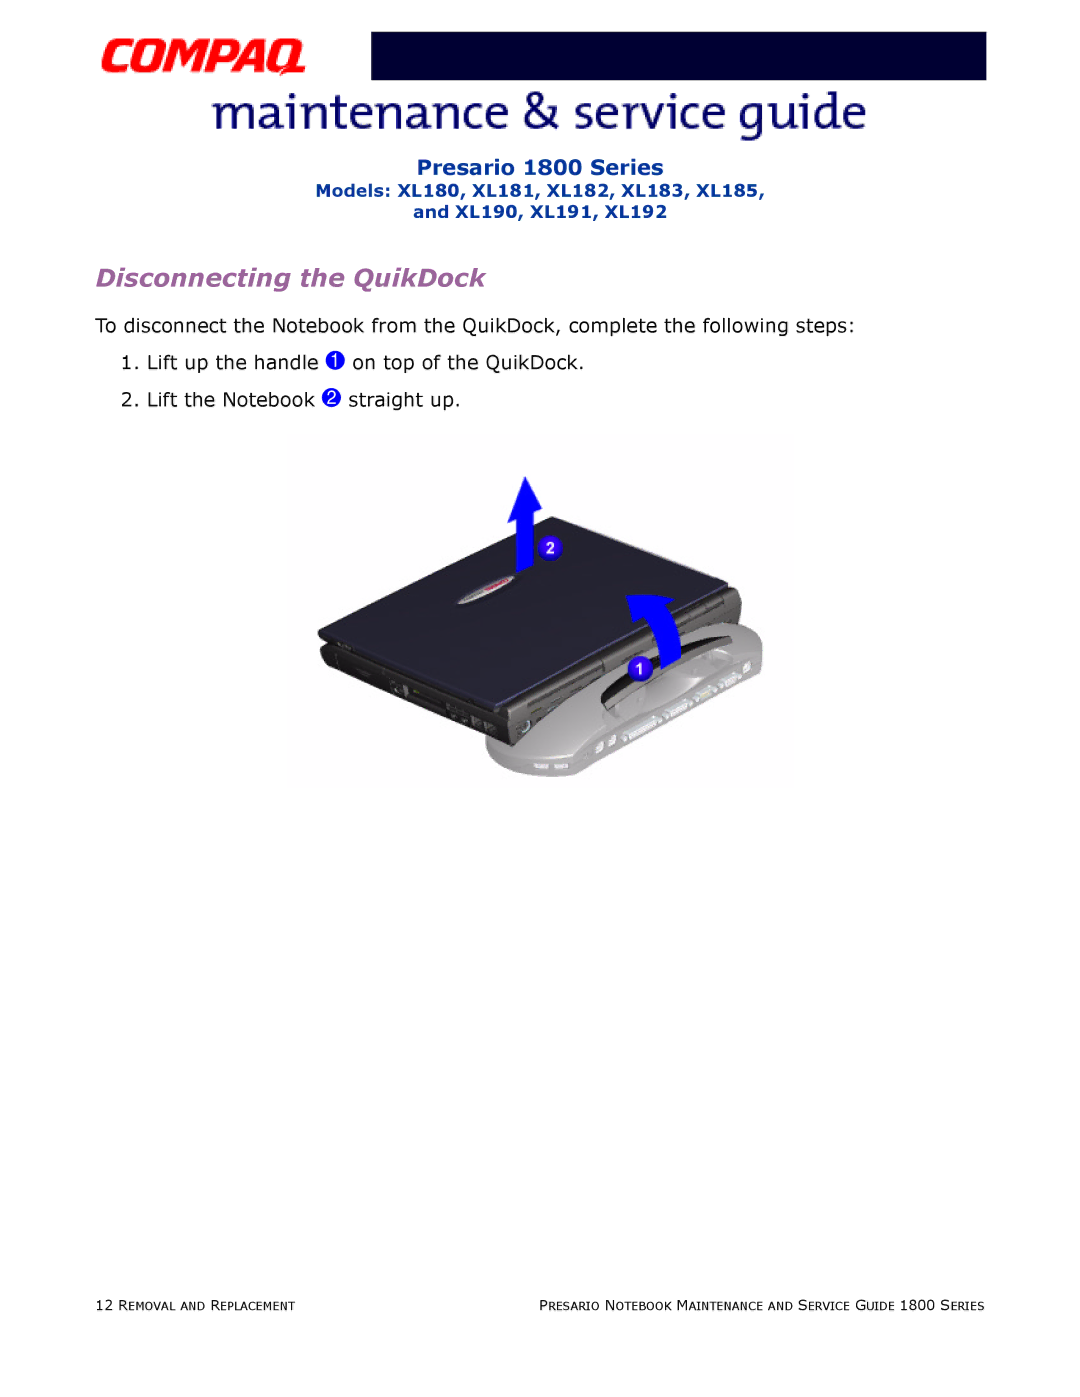
PRESARIO NOTEBOOK MAINTENANCE AND SERVICE GUIDE 1800 SERIES
Presario 1800 Series
To remove the battery pack, complete the following steps
Removing the Battery
To replace the battery, reverse these procedures
Presario 1800 Series
Removing the Palmrest Cover with TouchPad
REMOVAL AND REPLACEMENT
PRESARIO NOTEBOOK MAINTENANCE AND SERVICE GUIDE 1800 SERIES
Presario 1800 Series
4. Turn the Notebook over right side up
16 REMOVAL AND REPLACEMENT
To replace the Palmrest cover, reverse these procedures
PRESARIO NOTEBOOK MAINTENANCE AND SERVICE GUIDE 1800 SERIES
Presario 1800 Series
Removing the Keyboard
Removing the Internet Zone Cover
Status Panel Assembly
Presario 1800 Series
5. Turn the unit over right side up and open the display
Presario 1800 Series
Removing the Internet Button Board
22 REMOVAL AND REPLACEMENT
To replace the Internet button board, reverse these procedures
PRESARIO NOTEBOOK MAINTENANCE AND SERVICE GUIDE 1800 SERIES
Presario 1800 Series
Removing the Heatspreader
Presario 1800 Series
Removing the Modem
Presario 1800 Series
Removing the Hard Drive
Presario 1800 Series
Removing the Hard Drive Mounting Brackets
Presario 1800 Series
Removing the DisqPlay Module
Presario 1800 Series
Removing the Processor
To replace the processor, complete the following
Presario 1800 Series
Removing the CD/DVD Drive
Presario 1800 Series
To replace the CD/DVD drive, reverse these procedures
Presario 1800 Series
Removing the Display Panel Assembly
To replace the display panel, reverse these procedures
5. Remove the display assembly from the chassis
PRESARIO NOTEBOOK MAINTENANCE AND SERVICE GUIDE 1800 SERIES
REMOVAL AND REPLACEMENT
Presario 1800 Series
Removing the Upper CPU Cover
Presario 1800 Series
Removing the Fan Assembly
36 REMOVAL AND REPLACEMENT
To replace the fan assembly and gasket, reverse these procedures
PRESARIO NOTEBOOK MAINTENANCE AND SERVICE GUIDE 1800 SERIES
Presario 1800 Series
Removing the Real Time Clock Battery
Presario 1800 Series
9. Locate the RTC battery on the system board behind the CD/DVD drive near the back of the unit
Presario 1800 Series
Removing the Diskette Drive
Presario 1800 Series
To replace the diskette drive, reverse these procedures
Removing the Battery Charger Board
Presario 1800 Series
Voltage Converter Board
Presario 1800 Series
Removing the Speaker Assembly
PRESARIO NOTEBOOK MAINTENANCE AND SERVICE GUIDE 1800 SERIES
To replace the speaker assembly, reverse these procedures
REMOVAL AND REPLACEMENT
Presario 1800 Series
Removing the System Board
REMOVAL AND REPLACEMENT
PRESARIO NOTEBOOK MAINTENANCE AND SERVICE GUIDE 1800 SERIES
Presario 1800 Series
Models XL180, XL181, XL182, XL183, XL185 and XL190, XL191, XL192
46 REMOVAL AND REPLACEMENT
To replace the system board, reverse these procedures
PRESARIO NOTEBOOK MAINTENANCE AND SERVICE GUIDE 1800 SERIES
Presario 1800 Series
Removing the Memory Module
PRESARIO NOTEBOOK MAINTENANCE AND SERVICE GUIDE 1800 SERIES
48 REMOVAL AND REPLACEMENT
Presario 1800 Series
Models XL180, XL181, XL182, XL183, XL185 and XL190, XL191, XL192
Presario 1800 Series
Illustrated Parts Catalog
Presario 1800 Series
System Units
Models XL180, XL181, XL182, XL183, XL185 and XL190, XL191, XL192
# Description
Presario 1800 Series
System Boards
Models XL180, XL181, XL182, XL183, XL185 and XL190, XL191, XL192
# Description
Mass Storage Devices
Display Panel Assembly
Presario 1800 Series
Models XL180, XL181, XL182, XL183, XL185 and XL190, XL191, XL192
PRESARIO NOTEBOOK MAINTENANCE AND SERVICE GUIDE 1800 SERIES
Miscellaneous Cables
Presario 1800 Series
Models XL180, XL181, XL182, XL183, XL185 and XL190, XL191, XL192
PRESARIO NOTEBOOK MAINTENANCE AND SERVICE GUIDE 1800 SERIES
Miscellaneous Hardware Kit
Presario 1800 Series
Models XL180, XL181, XL182, XL183, XL185 and XL190, XL191, XL192
Presario 1800 Series
Miscellaneous Plastics
Models XL180, XL181, XL182, XL183, XL185 and XL190, XL191, XL192
Description
Documentation and Software
Miscellaneous Parts
Presario 1800 Series
Models XL180, XL181, XL182, XL183, XL185 and XL190, XL191, XL192
Presario 1800 Series
Configure To Order CTO Parts
Models XL180, XL181, XL182, XL183, XL185 and XL190, XL191, XL192
Description Display
Presario 1800 Series
PRESARIO NOTEBOOK MAINTENANCE AND SERVICE GUIDE 1800 SERIES
Models XL180, XL181, XL182, XL183, XL185 and XL190, XL191, XL192
Description Hard Drive 06.0-GB 12.0-GB 18.0-GB 30.0-GB