ENGLISH
Names and Functions of Remote Control Unit Buttons
2Buttons not explained here function in the same way as the corresponding buttons on the main unit.
2Buttons marked “✽” function regardless of the function selector switch.
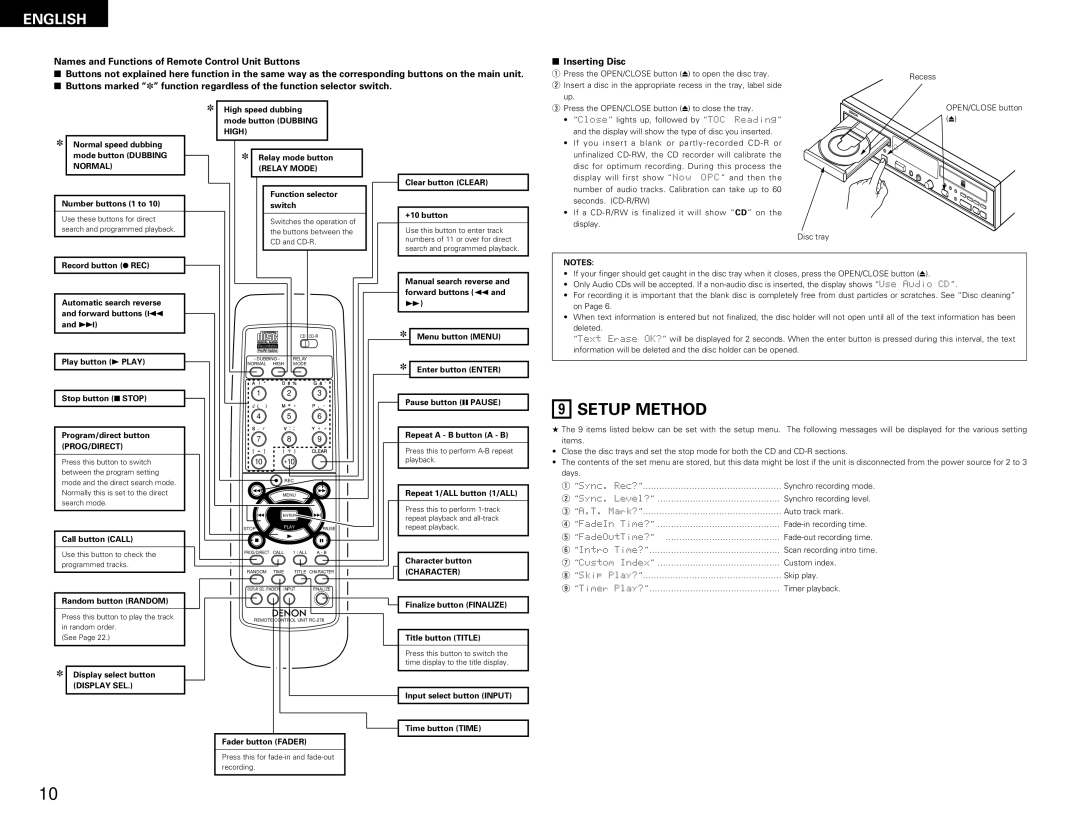
2Inserting Disc
q Press the OPEN/CLOSE button (5) to open the disc tray. |
w Insert a disc in the appropriate recess in the tray, label side |
up. |
Recess
✽Normal speed dubbing mode button (DUBBING NORMAL)
Number buttons (1 to 10)
Use these buttons for direct search and programmed playback.
✽High speed dubbing mode button (DUBBING HIGH)
✽Relay mode button
(RELAY MODE)
Function selector switch
Switches the operation of the buttons between the CD and
Clear button (CLEAR)
+10 button
Use this button to enter track numbers of 11 or over for direct search and programmed playback.
e Press the OPEN/CLOSE button (5) to close the tray. |
• “Close” lights up, followed by “TOC Reading” |
and the display will show the type of disc you inserted. |
• If you insert a blank or
•If a
Disc tray
OPEN/CLOSE button (5)
Record button (4 REC)
Automatic search reverse and forward buttons (8 and 9)
Play button (1 PLAY)
Stop button (2 STOP)
Program/direct button (PROG/DIRECT)
Press this button to switch between the program setting mode and the direct search mode. Normally this is set to the direct search mode.
Call button (CALL)
Use this button to check the programmed tracks.
Random button (RANDOM)
Press this button to play the track in random order.
(See Page 22.)
✽Display select button (DISPLAY SEL.)
CD
_ DUBBING _ |
| RELAY |
|
NORMAL HIGH | MODE |
| |
A ! " | D # % | G & ' | |
1 |
| 2 | 3 |
J ( )� | M *�+�P , -� | ||
4 |
| 5 | 6 |
S . /� | V : ; | Y < >� | |
7 |
| 8 | 9 |
[ = ] | { | ? } | CLEAR |
10 +10
REC
67
MENU
8 | ENTER 9 |
|
STOP | PLAY | PAUSE |
23 ![]()
PROG/DIRECT | CALL | 1 / ALL | A - B |
RANDOM | TIME | TITLE CHARACTER | |
DISPLAY SEL. FADER INPUT | FINALIZE | ||
B
REMOTE CONTROL UNIT
Fader button (FADER)
Press this for
Manual search reverse and forward buttons (6 and 7)
✽Menu button (MENU)
✽Enter button (ENTER)
Pause button (3 PAUSE)
Repeat A - B button (A - B)
Press this to perform
Repeat 1/ALL button (1/ALL)
Press this to perform
Character button
(CHARACTER)
Finalize button (FINALIZE)
Title button (TITLE)
Press this button to switch the time display to the title display.
Input select button (INPUT)
Time button (TIME)
NOTES:
•If your finger should get caught in the disc tray when it closes, press the OPEN/CLOSE button (5).
•Only Audio CDs will be accepted. If a
•For recording it is important that the blank disc is completely free from dust particles or scratches. See “Disc cleaning” on Page 6.
•When text information is entered but not finalized, the disc holder will not open until all of the text information has been deleted.
“Text Erase OK?” will be displayed for 2 seconds. When the enter button is pressed during this interval, the text information will be deleted and the disc holder can be opened.
9SETUP METHOD
★The 9 items listed below can be set with the setup menu. The following messages will be displayed for the various setting items.
•Close the disc trays and set the stop mode for both the CD and
•The contents of the set menu are stored, but this data might be lost if the unit is disconnected from the power source for 2 to 3 days.
q “Sync. Rec?”…………………………………………… Synchro recording mode. w “Sync. Level?” ……………………………………… Synchro recording level. e “A.T. Mark?”…………………………………………… Auto track mark.
r “FadeIn Time?” ………………………………………
t“FadeOutTime?” ……………………………………
y“Intro Time?”………………………………………… Scan recording intro time.
u“Custom Index” ……………………………………… Custom index.
i“Skip Play?”…………………………………………… Skip play.
o “Timer Play?”………………………………………… Timer playback.
10