VigorPro 5500 Series Unified Security Firewall User’s Guide
Instructions
Safety Instructions and Approval
Regulatory Information
European Community Declarations
Table of Contents
100
211
171
Trouble Shooting 235
Page
LED Indicators and Connectors
Web Configuration Buttons Explanation
LED
For VigorPro
Wlan
For VigorPro 5500G
Isdn
For VigorPro 5500Gi
Interface Description
Internet
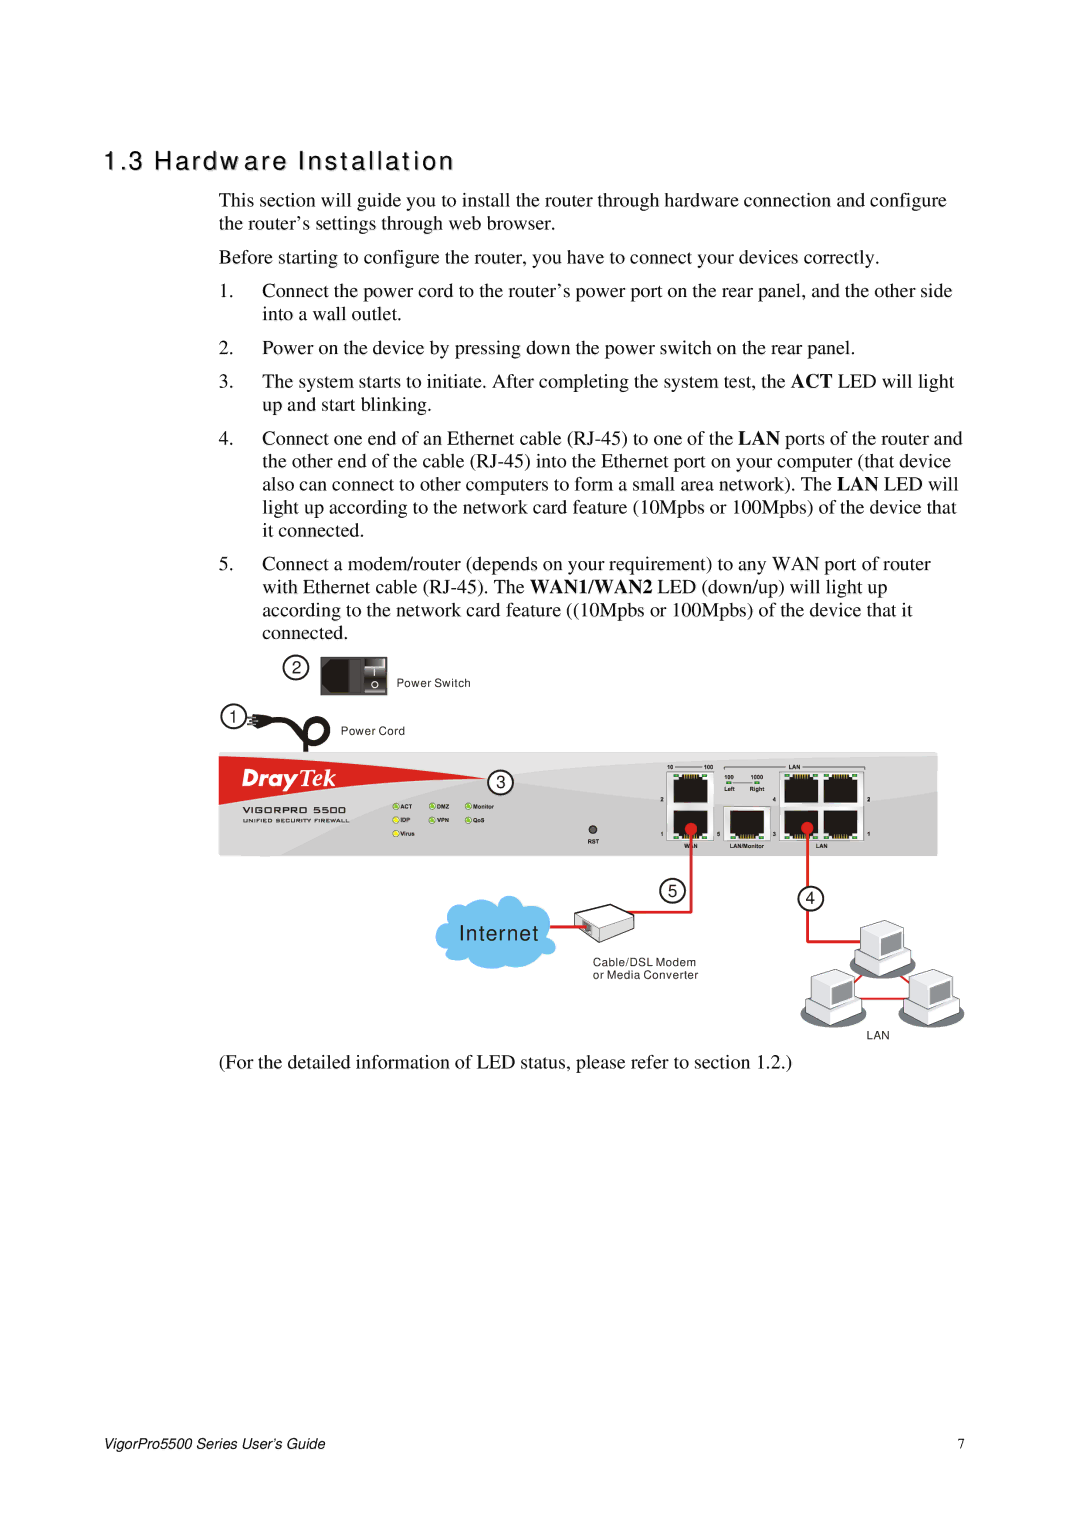
Hardware Installation
VigorPro5500 Series User’s Guide
Changing Password
Configuring Basic Settings
Now, the Main Screen will pop up
Quick Start Wizard
PPPoE
VigorPro5500 Series User’s Guide
Pptp
Static IP
Dhcp
Online Status
Online status for Dhcp
Displays the IP address of the default gateway
Saving Configuration
This page is left blank
Get Your Public IP Address from ISP
WAN
Basics of Internet Protocol IP Network
What are Public IP Address and Private IP Address
Display Name
General Setup
Enable
Physical Mode
Negotiation for determined by the system
Load Balance Mode
Active Mode
Physical Type
Details
Internet Access
Access Mode
Index
Details Page for PPPoE
Details Page for Static or Dynamic IP
Connection
Settings
Dhcp Client
Keep WAN
Address
DNS Server IP
Assignment
Pptp Setup
PPP Setup
Details Page for Pptp
MAC address for the router
Load-Balance Policy
WAN
Protocol
Binding WAN
Interface Src IP Start
Dest Port End
Basics of LAN
LAN
What is Routing Information Protocol RIP
What is Static Route
What are Virtual LANs and Rate Control
Subnet
1st IP Address 1st Subnet Mask For IP Routing Usage
Configuration
Dhcp Server
Relay Agent 1st subnet/2nd subnet Specify which subnet that
DNS Server
Static Route
Add Static Routes to Private and Public Networks
VigorPro5500 Series User’s Guide
Vlan
ARP Table
Disable
Bind IP to MAC
Strict Bind
NAT
Port Redirection
Service Name
Public Port
Private IP
Active
Private Port
True…
DMZ Host
Choose PC
Local IP Address
Open Ports
Comment
WAN Interface
End Port
Enable Open Ports
Local Computer
Start Port
Objects Settings
Set to Factory Default Clear all profiles
IP Object
Start IP Address
Allowed
Interface Choose a proper interface WAN, LAN or Any
Address Type
IP Group
Available IP Objects
Selected IP Objects
Service Type Object
Service Type Group
CSM Profile
Name Available Service Type Objects Selected Service Type
Profile Name
Firewall
Basics for Firewall
Firewall Facilities
Stateful Packet Inspection SPI
IP Filters
Content Security Management CSM
Denial of Service DoS Defense
Content Filtering
Anti-Virus and Anti-Intrusion
Web Filtering
Filter
Content Security
Call Filter
Data Filter
Next Filter Set
Filter Setup
Filter Rule
Move Up/Down
Source/Destination IP
Check to enable
Filter Rule Comments
Direction
Service Type
Example
VigorPro5500 Series User’s Guide
DoS Defense
Block trace router
Block IP options
Block Land
Block Smurf
VigorPro5500 Series User’s Guide
Matching keyword
URL Content Filter
Control
White List pass those
Files downloading from web pages. Accordingly, files with
Zip, rar, .arj, .ace, .cab, .sit
Exe, .com, .scr, .pif, .bas, .bat, .inf, .reg
Inside to outside world to protect the local users privacy
Web Content Filter
Basic Setup
Service
Anti-Intrusion
Advanced Setup
Severity
Here and enable the SysLog Access Setup from System
Maintenance Syslog/Mail Alert
Type links
Action
Anti-Virus
Profile Setting
Enable Virus Scan
Enable Log
Syslog/Mail Alert
Virus List
Detailed View for Anti-Virus
File Pattern List
Name is over length
Default Action
Enable Syslog/Mail Alert
Destroy the file if the file
For Default Action For default action
Service Activation
Anti-Spam
Message
Spam
Timeout or Network
Problem
Choose Protocol to Scan
Clear
Cancel
Bandwidth Management
Activating Anti-Spam
Sessions Limit
Set in that web
Default TX limit
Default RX limit
Bandwidth Limit
Quality of Service
TX limit
RX limit
General Setup for WAN Interface
Bandwidth to downstream speed
Enable UDP Bandwidth
Reserved Bandwidth Ratio
Reserved bandwidth to upstream speed and reserved
Edit the Class Rule for QoS
ManagementQuality of Service
Local Address
Remote Address
DiffServ CodePoint
Edit the Service Type for Class Rule
Port Configuration
Index WAN Interface
Enable the Function and Add a Dynamic DNS Account
Applications
Dynamic DNS
Login Name
Force Update
Enable Dynamic
Service Provider
Delete a Dynamic DNS Account
Disable the Function and Clear all Dynamic DNS Accounts
Set to Factory Default
Schedule
Start Time hhmm
Enable Schedule Setup
Idle Timeout
Start Date yyyy-mm-dd
Shared Secret
Radius
Server IP Address
Destination Port
UPnP
Cant work with Firewall Software
Wake Up
Wake On LAN
Wake by
MAC Address
Remote Access Control
VPN and Remote Access
PPP General Setup
IPSec General Setup
IPSec Security Method
IPSec Peer Identity
107
User
Remote Dial-in User
Enable this account
IPSec Tunnel
Specify Remote Node
User Name
Medium -Authentication Header AH means data will be
Check to enable Callback function -Enables the callback
Check to enable callback budget control -By default,
LAN to LAN
Enable this profile
VPN Connection Through
Call Direction
Ping to the IP
Enable Ping to keep alive
Enable Ping to Keep Alive is used to handle abnormal
PPP Authentication
3DES without Authentication -Use triple DES encryption
IKE Authentication
VPN and Remote Access IPSec Peer Identity
Medium AH Authentication Header means data will be
Perfect Forward Secret PFS- The IKE Phase 1 key will be
For i models only
Provide Isdn Number to Remote- In the case that
Allowed Dial-In Type
VPN Gateway
Profiles set in the VPN and Remote Access IPSec Peer
Check to enable Callback function-Enables the callback
Specify Clid or Remote
From first subnet to remote network, you have to do
Change default route to this VPN tunnel
Connection Management
Dial
Refresh Seconds
Certificate Management
Local Certificate
Generate
View
Import
Trusted CA Certificate
Certificate Backup
Isdn
Basic Concept
General Settings
Call Control
PPP/MP Setup
Dial to Single/Dual ISPs
Require ISP Callback Cbcp If your ISP supports
Function. Require ISP Callback Cbcp If your ISP
Common Settings
Method Ipcp
Check Yes and enter the IP address in the field of Fixed IP
Your ISP
Primary ISP Setup ISP Name Enter your ISP name
Password Enter the password provided by your ISP
Secondary ISP Setup ISP Name Enter the secondary ISP name
Virtual TA
Install a Virtual TA Client
Virtual TA Server
Virtual TA User Profiles
Configure a Virtual TA Client/ Server
MSN Configuration
User Profile
Call Control
Call Control Setup
Basic Setup
Wireless LAN
Basic Concepts
Security Overview
Example
Mixed 11b+11g+SuperG The radio can support
Enable Wireless LAN
Channel
Hide Ssid
Long Preamble
Security
Enable Access Control
Access Control
MAC Address Filter
Attribute
Clear All
14.5 WDS
Choose the mode for WDS setting. Disable mode will not
AP Discovery
Station List
Into Access Control
Wired Vlan
Vlan
Station Rate Control
Wireless Vlan
P1 P4
VLAN0-3
Wvlan
Login ID
How can you wireless client access into Internet?
Vlan Cross Setup
WVLAN0-15
Wireless Rate Control
Upload Rate
Download Rate
System Status
System Maintenance
New Password
Administrator Password
Default Gateway
Old Password
Backup the Configuration
Configuration Backup
Syslog/Mail Alert
Restore Configuration
Authentication
Mail To
Return-Path
Time and Date
Management
Trap Community
Reboot System
Trap Timeout
Manager Host IP
Firmware Upgrade
License
Signature Upgrade
Authentication/downl
Oad message Upgrade Manually
Signature
Automatically
Address, the protocol and length of the package
Diagnostics
Dial-out Trigger
Decoded Format
ARP Cache Table
Routing Table
Dhcp Table
NAT Sessions Table
Leased Time
Wireless Vlan Online Station Table
Ping Diagnosis
Ping through
Ping to
Order by
Data Flow Monitor
Sessions
Traffic Graph
TX rate kbps
RX rate kbps
Trace through
Trace Route
Creating and Activating an Account from VigorPro Website
Registration for the Router
172
173
174
175
176
177
178
179
Registering Your Vigor Router
From System Maintenance Signature Upgrade
181
182
From Anti-SpamProfile Setting
184
For Anti-Virus and Anti-Intrusion Service
Activating Anti-Virus/Anti-Intrusion/Anti-Spam Service
186
187
Rename
Transfer
Back
189
Getting 30 Days of Free Charge
For Anti-Spam Service
191
192
193
Upgrade License for Anti-Spam
195
196
197
Applying a New License for Anti-Intrusion/Anti-Virus
199
200
201
202
Add License
204
Backup and Upgrade Signature for Anti-Intrusion/Anti-Virus
Time for Import
Switching between DT-DT and DT-KL
Time for Backup
Time for Download
207
208
Enabling Anti-Virus/Anti-Intrusion/Anti-Spam
210
Application and Examples
212
213
214
215
216
217
Settings in VPN Router in the enterprise office
219
Settings in the remote host
221
Go to Bandwidth ManagementQuality of Service
QoS Setting Example
223
224
LAN Created by Using NAT
226
Upgrade Firmware for Your Router
228
Request a certificate from a CA server on Windows CA Server
Go to Certificate Management and choose Local Certificate
231
232
233
Time and Date to reset current time of the router first
Checking If the Hardware Status Is OK or Not
Trouble Shooting
For Windows
For MacOs
For MacOs Terminal
Pinging the Router from Your Computer
For PPPoE Users
Checking If the ISP Settings are OK or Not
For Static/Dynamic IP Users
Backing to Factory Default Setting If Necessary
Software Reset
For Pptp Users
Contacting Your Dealer
Hardware Reset