Contents
Instructions
Important Safety Instructions
Contents
II 2 G
Smart Display Standard Display
FIRE, EXPLOSION, and Electric Shock Hazard
Skin Injection Hazard
Equipment Misuse Hazard
How the Electrostatic AA Spray Gun Works
Gun Overview
See Spray Tip Selection
Chart, page 62, for avail
Setup Checklist,
Description Purpose
Smart Guns
Operating Mode Bar Graph
Error Display
Key for Figs Description Purpose
Description Purpose
Diagnostic Mode
Alternator Speed Hertz Screen
Ventilate the Spray Booth
Installation
Air Supply Line
Fluid Supply Line
Hose
NON-HAZARDOUS Area
Typical Installation Key Description
Gun Setup Checklist
Gun Setup
Gun Setup
Pressure Drop
LED Indicator Colors Description
Grounding
Key to Figs
Ground the Operator
Ground the Gun
Check Gun Electrical Grounding
Fluid Resistivity Levels Megohms-cm
Flush Before Using Equipment
Check Fluid Resistivity
Check Fluid Viscosity
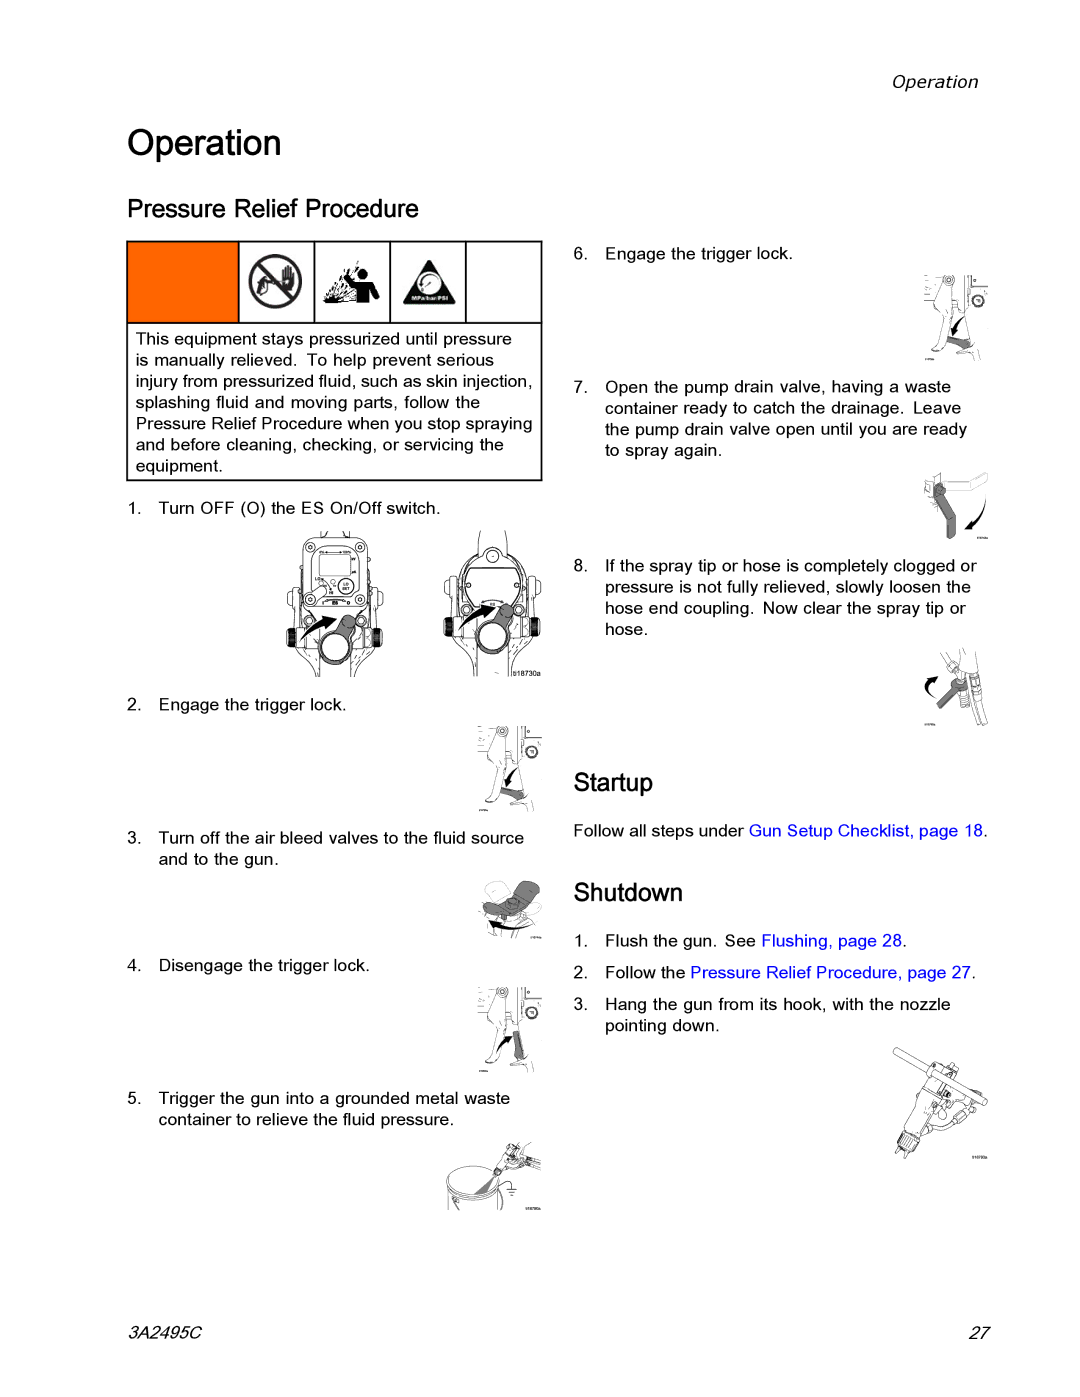
Shutdown
Pressure Relief Procedure
Operation
Startup
Flushing
Maintenance
Clean the Gun Daily
Maintenance
Check Gun Electrical Grounding,
Daily System Care
Test Gun Resistance
Electrical Tests
Alternator Removal and Replacement,
Test Power Supply Resistance
Test Gun Barrel Resistance
Clean the Gun Daily,
Troubleshooting
Spray Pattern Troubleshooting
Problem Cause Solution
Gun Operation Troubleshooting
Test Gun Resistance,
Replacement,
Power Supply Removal
Replacement, page 45
Replacement, page 52
See Clean the Gun Daily,
Repair
Prepare the Gun for Service
See Prepare the Gun for Service,
Air Cap, Spray Tip, and Fluid Seat Housing Replacement
See Test Gun Resistance,
Electrode Replacement
Fluid Tube Removal and Replacement
Fluid Filter Replacement
Gun Barrel Removal
Gun Barrel Installation
Remove Cap and Springs
Fluid Needle Replacement
See Prepare the Gun for Service, See Gun Barrel Removal,
Power Supply Removal and Replacement
Alternator Removal and Replacement
Alternator
Fan Air Adjustment Valve
Fan Air Adjustment Valve Repair
Atomizing Air Adjustment Valve Repair
ES On-Off Valve Repair
Air Valve Repair
See Gun Barrel Installation,
Smart Module
Smart Module Replacement
Air Inlet Fitting and Air Exhaust Valve
Air Swivel and Exhaust Valve Replacement
Parts
Standard Air-Assisted Spray Gun Assembly
Description Qty
Smart Air-Assisted Spray Gun Assembly
See Smart Module Assembly
Part No N664 Alternator Assembly
Alternator Assembly
Part No N632 ES On-Off Valve Assembly
ES On-Off Valve Assembly
Part No N634 Fan Air Valve Assembly
Fan Air Valve Assembly
Air Cap Assembly Smart Module Assembly
AEM Fine Finish Spray Tips
Spray Tip Selection Chart
41 bar MPa Bar Spray Tip
AEF Fine Finish Pre-Orifice Spray Tips
Orifice Fluid Output
Oz/min l/min
Test Equipment
Repair Kits, Related Manuals, and Accessories
Gun Accessories
System Accessories
Hoses
Operator Accessories
Gun Model In. mm Weight, oz g
Dimensions
Technical Data
Graco Information
Graco Pro Xp Warranty

