DZ-BD10HA
English
Important Information
Identifications of caution marks
Sdhc logo is a trademark. SD logo is a trademark
Important Safety Instructions
Table of Contents
Dubbing on BD/DVD/Card
This camcorder makes all of the following possible
Stills Movies
Card
Cable AV Cable View on LCD monitor
„ Choosing a disc to suit your purpose
HDD/Card
VF mode One-time recording
YES no
About media descriptions
Card capacity required for recording
Before Using the Product Be sure to read this information
How to hold a disc For correct recording
Conduct test recording
Recording surface
Using BD/DVD with other equipment
Hitachi will not compensate for recorded images
Copyright
Checking Provided Accessories
Introduction
About Hdmi cable
Names of Parts Power switch side
Display button p.31, 37 Guide button p.7
Lens hood Stereo microphone
Do not block the microphone with your hand during recording
Cooling fan outlet
Remote control
Adjusting the hand strap
Release the Velcro strap
Tighten the Velcro strap
How to Open and Use the LCD Monitor
„ How to change the LCD brightness
You can use the LCD monitor as follows
„ Setting up the battery pack
Charge status of the battery pack
Charge indicator
Terminal at bottom
Turn on the power Open the LCD monitor
„ Turning on the power
„ Setting the date and time
„ Changing the display language
„ About HDD/BD/DVD
Function
Unusable Discs
„ About cards
„ Cautions for discs and cards
When a new BD-RE, BD-R, or DVD-RW is inserted, see p.24
Close the lid before setting the disc securely into place
„ Inserting a BD or DVD
„ When loading a new BD-RE/BD-R/DVD-RW
When using a DVD-RW
Removing the disc
Open the LCD monitor
Battery Pack „ Charge lamp status and charging time
„ Connecting the camcorder to a wall outlet
„ Efficient use of the battery
AC Plug Adapter not supplied
Turn the power switch to Mode until HDD indicator lights
When handling a disc
Hint
„ When recording movies „ When recording stills
Press the record OFF
Button
Press Photo
Hints
On-Screen Information
See the next page for details
Recording mode p.27
„ Efficient use Battery pack
Opening the LCD monitor
Press
Press the confirmation button
„ Choosing and playing back multiple scenes
„ Jumping to the designated scene
Select the desired point by time by pressing f/ e / d / c
All selected scenes
Position of currently Played back image
„ Adjusting speaker volume during movie playback
When playing movies
„ Information display during playback
SD memory card Movie/Stills
Movies During playback
Movies During playback pause
Still pictures During card playback
„ Playing still pictures on a card automatically Slide Show
„ Capturing a still picture from a movie Photo Capture
„ Playing back scenes repeatedly Repeat Play
Press the confirmation button to begin playback
How to Operate the Menu
Example
„ About the LCD setup and initial setup
Default See 1st level Setting
Menu While Recording
Menu items
Setting the date and time
Changing the date format
„ About the demonstration function
Setting the digital zoom
Magnified Recording Optical Zoom Digital Zoom
Recording at Close Range Macro Recording
Recording at close range
Adjusting the Focus Manually Manual Focus
Focusing range
Attaching the separately sold lenses
Conversion lens
How to focus manually
Adjusting Brightness Image Exposure
Adjust the focus by pressing
Manual focus icon
Recording mode
Adjust the exposure by pressing d/c
Compensating for backlight
Exposure Bar
Selecting a recording mode
White balance mode
Select Camera Functions Setup Program AE a recording mode
During recording pause, press
Selecting a white balance mode
„ Setting the white Balance manually Set
Press C to end, or to redo, repeat step
Infrared sensor
Using the Optical
Using the Face Detection
Setup OIS On/Off
Turning OIS Off/On
Select Camera Functions Setup Auxiliary Line On/Off
Displaying Recording Guidelines Auxiliary Line
Turning the MIC. filter On/Off
Face Detection is not available for recording on a DVD disc
Default Full Auto
Using the Flash
Flash mode
Select Camera Functions Setup MIC. Filter On/Off
Selecting a flash mode
Turning Off Recording Indicator Beneath the Lens
Turning Off/On the recording indicator
Select Camera Functions Setup Flash a flash mode
Switching Movie Quality
TV Wide Mode
Setting the Wide Mode
Changing the Movie Quality
Using the Self-Timer
Select Record Functions Setup Self Timer On
Menu
Dubbing options
Discs and picture quality for dubbing
Time required for dubbing
Before you begin
When the dubbing is not completed on one disc or card
Hints for dubbing
About the playlist p.63 for dubbing
With auto divide
Turn the power switch to Mode until its indicator lights
Dubbing
Press Dubbing
When you select Date in step
Select With auto divide or
For BD or DVD only
Select Execute, then press Confirmation button
Category Settings
To set Category
DisplayingonlyDubbedor Not Dubbed Scenes Category
Press SELECT, then press
Menu Items for the Disc Navigation
DVD
When using HDD/BD-RE/DVD-RAM/DVD-RW VR mode/Card Movies
When using BD-R/DVD-RW VF Video mode/DVD-R
When using a card Stills
„ Menu flows for the disc navigation
Playlist „ What is Playlist?
„ Creating a new Playlist Create Playlist
Press , then press Menu
Select Scene Edit
„ Adding scenes to a Playlist Edit
„ Deleting scenes from Playlist Edit
„ Arranging the order of scenes in the Playlist Edit
Scene you wish to delete by pressing d/ c
Scene to be
„ Deleting a Playlist Delete
Combining Multiple Scenes Edit Combine
Division, press Select
Locked scenes Stills on a card cannot be deleted p.69
Selected scene is played
Adding Special Effects Edit Fade
Choose more than one scene p.35
Display returns to the disc navigation screen
Fade screen appears
Go To
Locking Scenes on a Card Lock
Press , then Menu
Select Scene Lock
When using HDD/BD/DVD Card Movies
When using a card Stills
To unlock the scene
Press C to quit
When using the HDD/BD DVD/Card Movies
Formatting the HDD
Format
All movies and still pictures will be deleted from the card
Checking Remaining Recording Capacity
Insert a disc you want to protect
Information of the chosen medium appears on the screen
„ Connecting to a TV
Connecting the camcorder to your TV’s Hdmi terminal
Connecting the camcorder to your TV’s component input
Connecting the camcorder to your TV or video terminals
Volume can be adjusted on your TV
„ Viewing on your TV
About DVD-RW VR Mode Discs
Before finalizing a disc
After finalizing a disc
Playing Back a DVD
To power the camcorder p.25
Set the power switch to BD/ DVD PressMENU. , and then press
Finalizing a Disc
Unfinalizing a Disc
Select YES, then press the confirmation button
Finalized BD/DVD
About the software included
PC requirements
Others
„ Software installation
„ Connecting the camcorder to your PC
Turn on the camcorder power
USB terminal on the PC To USB Terminal
Camcorder indications on the PC
Removing SD memory
Card
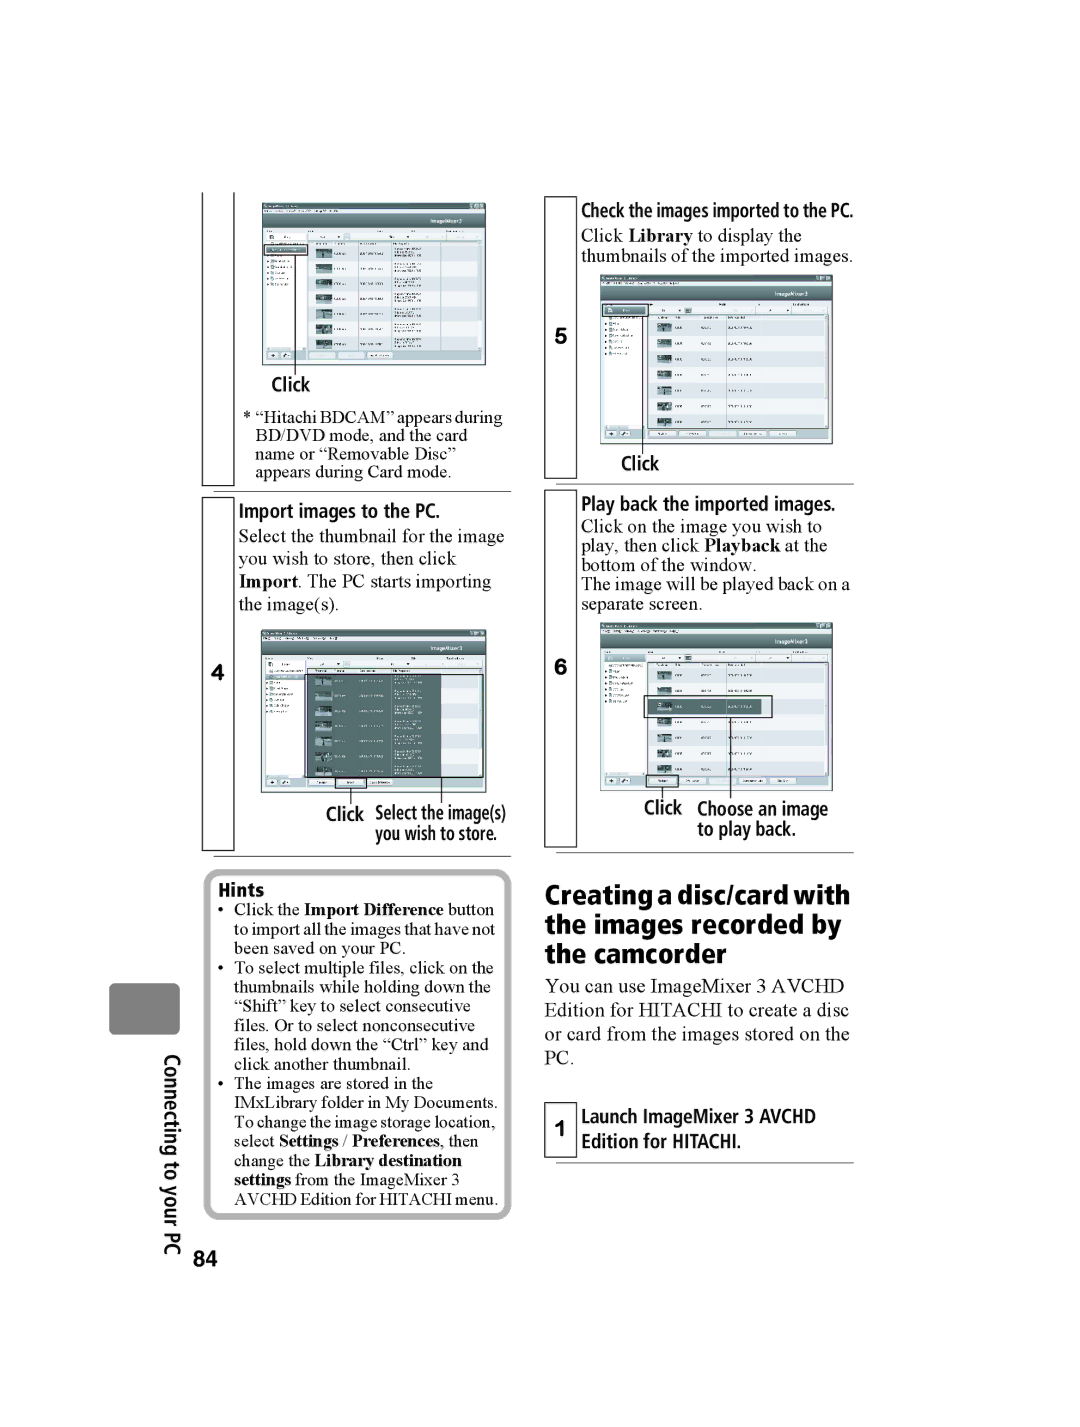
Click
Confirm the device again Click OK
Select Hitachi Bdcam HDD
Drive name E, etc. will differ according to your PC
Import images to the PC
Click Play back the imported images
Change the Library destination
Set up the disc you are creating
ClickConnecting toyour PC
Insert a disc into the disc drive or a card slot
Create a creation list
„ Uninstalling Software
Write to the media
ClickClick
Precautions When Connecting to a PC
Optional Accessories
Battery DZ-BP14SW Battery DZ-BP21SW
Error Messages
Message Cause & Troubleshooting
Message Cause & Troubleshooting
Information
Message Cause & Troubleshooting
Message Cause & Troubleshooting
Additional
25, 56
Additional Information
Troubleshooting
Power supplies
Symptom Cause and Correction
During recording
Camcorder to make repairs
100
During playback
Additional Information 101
When the camcorder is connected to a PC
Disc Eject
Miscellaneous
BD-R/DVD-RW VF
104
Save the data recorded on HDD
Do not place this camcorder near a magnet or magnetic field
Do not subject the camcorder to impacts
This camcorder is not intended for professional-use
Be careful of ambient temperature
Do not use a generally available 8 cm CD lens cleaner
Do not point directly at the sun
No sand or dust
Cleaning
Cleaning the surface of the camcorder
Using HDD/discs
Handling HDD/Discs/Card
Disc Cleaning
Storing discs
Momentary stop of playback image
− Recording/Playback is not possible
System Reset
Menu
End User License Agreements for Operating System Software
Operating System License Information
Major Specifications
„ Movie Storage capacity of HDD/BD/DVD/Card 8GB
Recordable time on DVD
Recording quality Movie recordable time
„Stills
Recordable number of stills per card
File size
Recording media
Glossary
1080i1125i/480i525i
Additional Information 115
Index
Insert/remove
117
Guarantee and Immunity
License Agreement
Grant of License
Prohibition
To Order in the United States
Hitachi Way
Tel
Only
Limited Warranty