•For better system performance, use physical drives that are attached to different ports on the controller.
•In RAID 5 configurations, keep the risk of logical drive failure low by assigning no more than 14 physical drives to the array.
Each time that you add a physical drive to the array, the configuration view is updated to show how much free space remains on the array.
4.Click Next when you have finished adding physical drives to the array.
5.If a spare or unassigned physical drive of the appropriate capacity is available, ACU asks you whether you want to assign a spare drive to the array.
•If you do not want this array to have a spare, click No, and then click Next.
•To assign spare drives to the array, click Yes, and then click Next. On the next screen, select the drives that you want to assign as spares, and then click Next.
IMPORTANT: Assigning one or more spare drives to an array enables you to postpone replacement of faulty drives, but it does not increase the
NOTE: An array can have several spares, and any spare can be shared by several arrays.
6.Click through the remaining screens to confirm the configuration.
Create a logical drive
1.Click Create a logical drive, and then click Begin.
2.Select an array that has unused space, and then click Next. (The array must have unused space for logical drive creation to be possible.)
The screen displays a list of the
3.Select a
4.Select a stripe size, and then click Next.
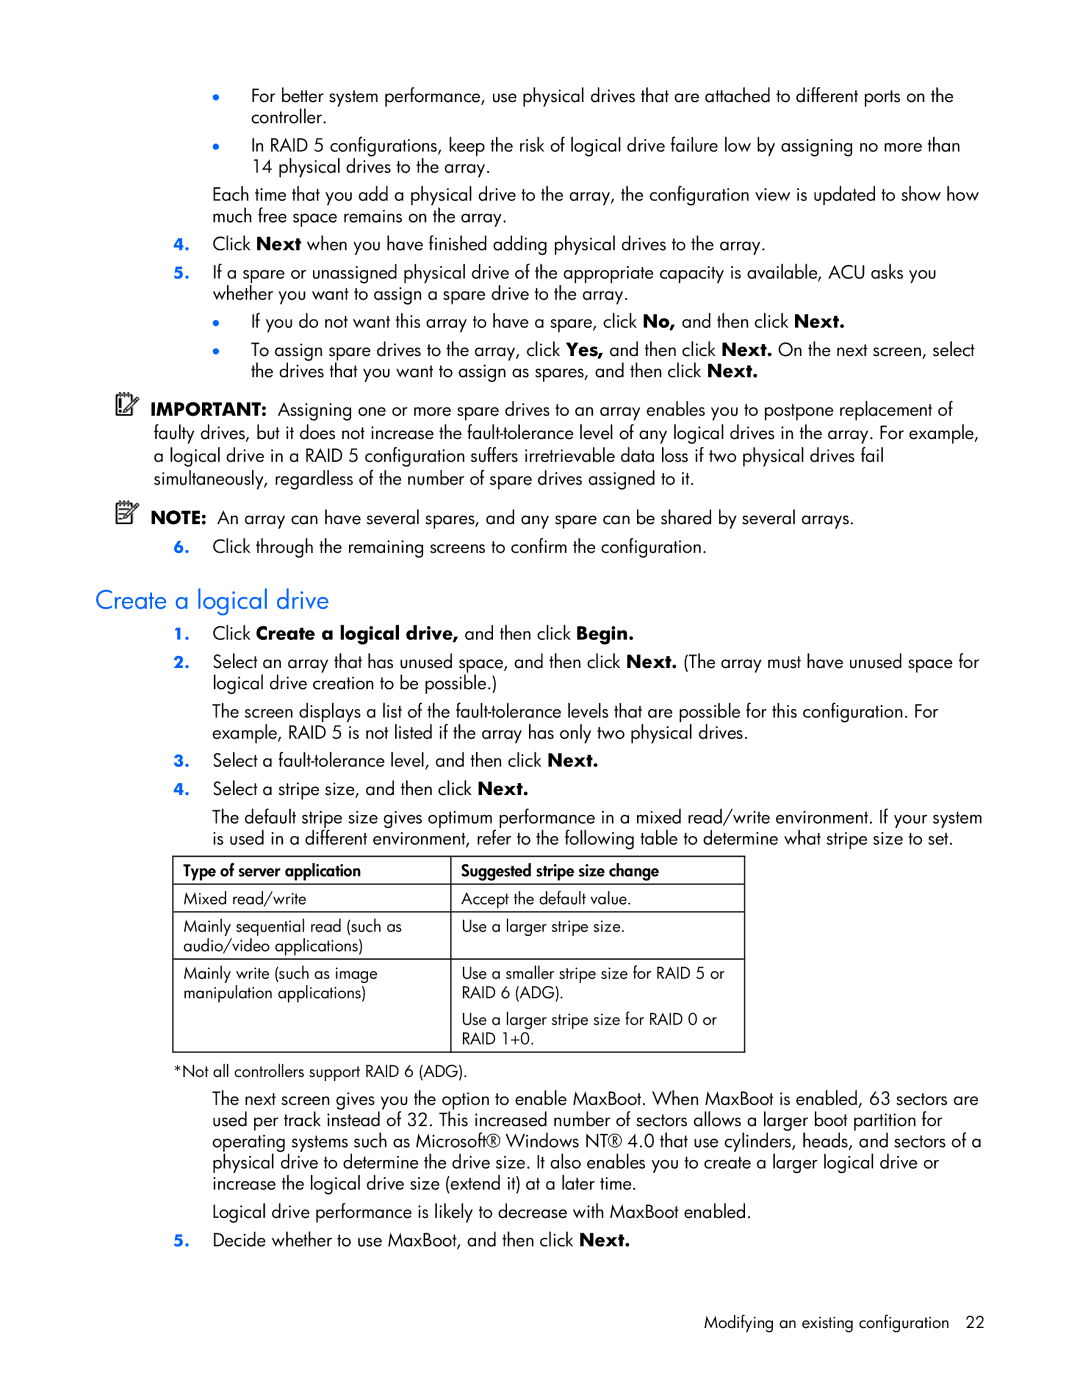
The default stripe size gives optimum performance in a mixed read/write environment. If your system is used in a different environment, refer to the following table to determine what stripe size to set.
Type of server application | Suggested stripe size change |
|
|
Mixed read/write | Accept the default value. |
|
|
Mainly sequential read (such as | Use a larger stripe size. |
audio/video applications) |
|
Mainly write (such as image | Use a smaller stripe size for RAID 5 or |
manipulation applications) | RAID 6 (ADG). |
| Use a larger stripe size for RAID 0 or |
| RAID 1+0. |
|
|
*Not all controllers support RAID 6 (ADG).
The next screen gives you the option to enable MaxBoot. When MaxBoot is enabled, 63 sectors are used per track instead of 32. This increased number of sectors allows a larger boot partition for operating systems such as Microsoft® Windows NT® 4.0 that use cylinders, heads, and sectors of a physical drive to determine the drive size. It also enables you to create a larger logical drive or increase the logical drive size (extend it) at a later time.
Logical drive performance is likely to decrease with MaxBoot enabled.
5.Decide whether to use MaxBoot, and then click Next.
Modifying an existing configuration 22