Users Guide
IBM 16X Max RAM-Read DVD-ROM Drive
First Edition April
Safety read first
Antes de instalar este producto lea la información de seguridad
Pred inštaláciou tohto zariadenia si pečítaje Bezpečnostné predpisy
Läs säkerhetsinformationen innan du installerar den här produkten
Antes de instalar este produto, leia as Informações sobre Segurança
Registering your option
Contents
vi IBM 16X Max RAM-Read DVD-ROM Drive Users Guide
Appendix E. Product warranty and notices
Part 2 Appendixes
Part 1 Installation and users guide
About this book
Registering your option
viii IBM 16X Max RAM-Read DVD-ROM Drive Users Guide
Installation and users guide
Installation requirements
Product description
Before you begin
Handling precautions
«3¬Emergency eject hole
Drive controls and connectors
«2¬Busy indicator
Front view of the drive «1¬Disc drawer
«4¬Power connector
Installing the drive
«1¬Audio-out connector
«2¬Configuration pins
Step 3. Setting the configuration jumpers
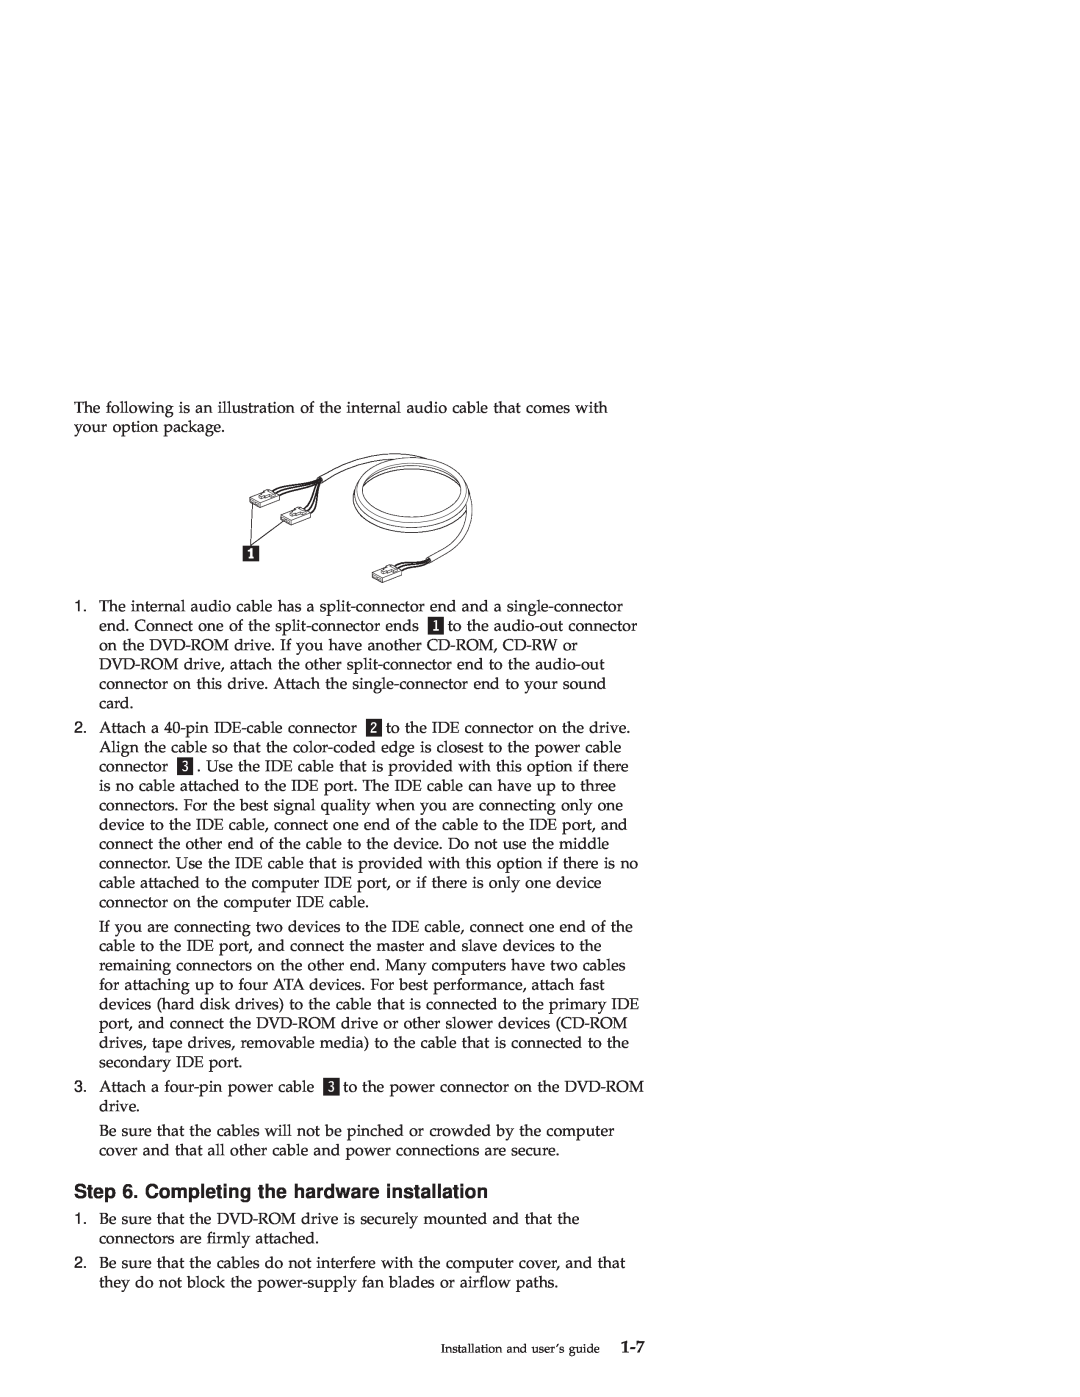
Step 5. Attaching the cables to the drive
Step 4. Mounting the drive in the bay
Step 6. Completing the hardware installation
What to do next
Step 7. Setting up your computer for DVD video playback
Enabling the DMA settings
Step 8. Installing the MPEG Decoding Software
2. Click DVD Region
Viewing a DVD movie
DVD region codes
2. Click Mediamatics DVD Player
Removing the disc from the Type II cartridge
Using the DVD-RAM Read function
Using single-and double-sided DVD-RAM media
Removing the disc from the cartridge
Returning the disc to the Type II cartridge
Care and maintenance
Precautions for handling
Caring for a CD or DVD
Manually ejecting a disc
Caring for the DVD-ROM drive
1-13
Guide dinstallation et dutilisation
Configuration minimale
Description de produit
Précaution s pour la manipulation
Avant de commencer
«2¬Voyant dactivité
Boutons de contrôl e et connecteurs de lunité
1-15
Vue avant «1¬Plateau du disque
Etape 2. Déballag e de lunité
Installation de lunité
«2¬Broches de configuration
Etape 1. Ouverture de lordinateur
1-17
Etape 3. Positionnement des cavaliers de configuration
Etape 5. Connexion des câble s à lunité
Etape 4. Montage de lunité dans la baie
1-19
Etape 6. Fin de linstallation matérielle
Etapes suivantes
Etape 7. Configuration de lordinateur pour la lecture de DVD vidéo
Etape 8. Installation des logiciels de décompressio n MPEG
Activation des paramètre s DMA
2. Cliquez sur Mediamatics DVD Player
Visualisation dun film DVD
Codes régionaux
1-21
Retrait du disque dune cartouche de type
Utilisation de la fonction de lecture de DVD-RAM
Utilisation de supports DVD-RAM à simple et à double face
Retrait du disque de la cartouche
Précaution s de manipulation
Entretien
Entretien dun CD ou dun DVD
Remise en place du disque dans une cartouche de type
Ejection manuelle dun disque
Entretien de lunité de DVD-ROM
Guía del usuario y de instalación
Descripció n del producto
1-25
Requisitos de la instalación
Antes de empezar
Precauciones de manejo
«2¬Indicador de ocupado
Controles y conectores de la unidad
1-27
Vista frontal de la unidad «1¬Bandeja del disco
Paso 2. Desembalaje de la unidad
«2¬Patillas de configuración
Instalació n de la unidad
Paso 1. Operació n de abrir el sistema
1-29
Paso 3. Configuració n de los puentes de configuración
Paso 4. Montaje de la unidad en la bahía
Paso 5. Conexió n de los cables a la unidad
1-30 Unidad de DVD-ROM RAM-Read Max de 16X Guía del usuario
1-31
Paso 6. Finalizació n de la instalació n de hardware
Paso 8. Instalació n del Software de decodificació n MPEG
Paso 7. Configuració n del sistema para la reproducció n de vídeo DVD
1. Pulse Inicio y luego pulse Configuración y Panel de control
Habilitació n de los valores DMA
1. Pulse Inicio y luego pulse Programas y Mediamatics DVD Express
Visualizació n de una película DVD
Código s de regió n de DVD
1-33
Cóm o extraer el disco del cartucho Type
Utilizació n de la funció n DVD-RAM Read
Utilizació n de soportes DVD-RAM de una y dos caras
Cóm o extraer el disco del cartucho
Precauciones durante el manejo
Cuidados y mantenimiento
Cuidado de un CD o DVD
Cóm o guardar el disco en el cartucho Type
Expulsió n manual de un disco
Cuidado de la unidad de DVD-ROM
1-37
Guida per lutente e allinstallazione
Requisiti di installazione
Descrizione del prodotto
Prima di iniziare
Precauzioni per la manutenzione
1-38 unità DVD-ROM con lettura RAM a 16X IBM Guida per lutente
Vista anteriore dellunità «1¬Cassetto del disco
«2¬Indicatore di segnale occupato
Connettori e controlli dellunità
1-39
Passo 2. Disimballaggio dellunità
Installazione dellunità
«2¬Piedini di configurazione
Passo 1. Apertura dellelaboratore
1-41
Passo 3. Impostazione dei cavallotti di configurazione
Passo 5. Collegamento dei cavi allunità
Passo 4. Fissaggio dellunità nel vano
1-43
Passo 6. Completamento dellinstallazione dellhardware
Operazioni necessarie
Passo 8. Installazione del software di decodifica MPEG
Passo 7. Impostazione dellelaboratore per la riproduzione video DVD
Abilitazione delle impostazioni DMA
2. Fare clic su Mediamatics DVD Player
Visualizzazione di un filmato DVD
Codice regione DVD
1-45
Rimozione del disco dalla cartuccia Tipo
Utilizzo della funzione di lettura DVD-RAM
Utilizzo di supporti DVD-RAM con singolo o doppio lato
Rimozione del disco dalla cartuccia
Precauzioni
Manutenzione
Manutenzione di un CD o DVD
Riposizionamento del disco nella cartuccia Tipo
Espulsione manuale di un disco
Manutenzione dellunità DVD-ROM
1-49
Guia de Instalaçã o e do Usuário
Descriçã o do Produto
Requisitos de Instalação
Tomando Precauções
Antes de Começar
«4¬Botão Abrir/Fechar
Controles e Conectores da Unidade
Vista frontal da unidade «1¬Gaveta do disco
«3¬Orifício de ejeção de emergência
Etapa 2. Desempacotando a Unidade
«2¬Pinos de configuração
Instalando a Unidade
Etapa 1. Abrindo o Computador
Etapa 3. Definindo os Jumpers de Configuração
Etapa 4. Montando a Unidade no Compartimento
Etapa 5. Conectando os Cabos à Unidade
1-54 Unidade de DVD-ROM de Leitura RAM 16X Max da IBM Guia do Usuário
2. Conecte o conector do cabo IDE de 40 pinos «2¬ ao conector IDE da
Etapa 8. Instalando o Software de Decodificaçã o MPEG
Etapa 7. Configurando o Computador para Reproduçã o de Vídeo em DVD
Etapa 6. Concluindo a Instalaçã o do Hardware
Ativando as Definiçõe s DMA
Exibindo um Filme de DVD
Código s de Regiã o do DVD
2. Clique em Mediamatics DVD Player
Removendo o disco do cartucho Tipo
Utilizando a Funçã o Leitura de DVD-RAM
Utilizando Mídia de DVD-RAM de Face Simples e Dupla Face
Removendo o Disco do Cartucho
Precauçõe s de Manuseio
Cuidados e Manutenção
Cuidados com um CD ou DVD
Retornando o disco ao cartucho Tipo
Ejetando um Disco Manualmente
Cuidados com a Unidade de DVD-ROM
w ΓU
1-61
Page
w ΓU
≈ ε P Y
1-64 IBM 16X Max RAM-Read DVD ≈ ΓU
IDE s ≡
Step 3. wtm⌡
BJ 4. N
≈ J ≈
1-66 IBM 16X Max RAM-Read DVD ≈ ΓU
BJ 7. w∩ DVD v ±wqú
¿wΘw @
DMA w
BJ 8. w
MPEG
q Type II dXñ
DVD-RAM ¬ \α
DVD-RAM CΘ
qdXñ
N ± Type II dX
@ DVD
Page
1-72 IBM 16X Max RAM-Read DVD ≈ ΓU
\qN+K*W7gs&QC18KO!NJ\,l9# v 1 fN IBM b? 16 \. DVD-ROM Ii$V
1-73
v RAM 32 MB JeGk3H
3NImo,G#9/rP7~l9kljG9# HQf=i$H
Ii$VN5L G#9/&Imo
Ws / /m&\?s 3N\?sr!9HG#9/&Imo,+D79#
NOIi$VNf!=H3M/?NLV*hS!=r7?bNG 9#
IDE H
Ii$VrV/,W,klgKOoJIN?iJLKSEIrV -=NeKIi$VrV-9#
NNh&K1VkrIi$VK\379#
3. 4 TsE1Vk r DVD-ROM Ii$VNE3M/?K\37 9#
8. MPEG
7. DVD
2. VMediamatics DVD PlayerWr/jC/79#
DVD-RAM DVD-RAM
DVD-RAM
CD DVD
DVD-ROM
Appendix A. Product specifications
Physical specifications
Power requirements
Nonoperational
Read speeds2
Specification
Operational
Transporting data with DVD-RAM Media
Appendix B. Problem solving
B-2 IBM 16X Max RAM-Read DVD-ROM Drive User’s Guide
3. Click the Device Manager tab 4. Double-click View Devices by Type
v You receive a common error message
v The disc cannot be read. Take the following actions
v There is no sound from the disc
v Video appears to be choppy or is dropping frames
b. Check Auto Insert Notification
Page
Changing the Windows 2000 DMA parameter setting
Appendix C. Customizing the device-driver configuration settings
5. Click Control Panel
Enabling DMA for Windows NT
Telephone technical support
Appendix D. Help and service information
Warranty information on the World Wide Web
Online technical support
v Computer manufacturer, model, serial number if IBM, and manual
Extent of Warranty
Appendix E. Product warranty and notices
IBM Statement of Limited Warranty Part 1 - General Terms
The IBM Warranty for Machines
Items Not Covered by Warranty
OF ANY KIND Warranty Service
E-2 IBM 16X Max RAM-Read DVD-ROM Drive Users Guide
Limitation of Liability
NORTH AMERICA
Part 2 - Country-unique Terms
Governing Law
AMERICAS BRAZIL
CAMBODIA, LAOS, AND VIETNAM
CANADA
UNITED STATES
ASIA PACIFIC AUSTRALIA
E-6 IBM 16X Max RAM-Read DVD-ROM Drive Users Guide
HONG KONG AND MACAU
INDIA
JAPAN
EUROPE, MIDDLE EAST, AFRICA EMEA
Warranty Service
NEW ZEALAND
PEOPLES REPUBLIC OF CHINA PRC
1 an IBM reseller approved to perform warranty service or 2 from IBM
THE FOLLOWING TERMS APPLY TO THE COUNTRY SPECIFIED
AUSTRIA AND GERMANY
EGYPT
FRANCE
IRELAND
ITALY
E-11
Trademarks
Industry Canada Class B emission compliance statement
Federal Communications Commission FCC statement
Tested To Comply With FCC Standards FOR HOME OR OFFICE USE
E-13
Union Européenne - Directive Conformité électromagnétique
Avis de conformite a la reglementation dIndustrie Canada
Deutsche EMV-Direktive electromagnetische Verträglichkeit
European Union - emission directive
E-15
Unione Europea - Directiva EMC Conformidad électromagnética
Union Europea - Normativa EMC
E-16 IBM 16X Max RAM-Read DVD-ROM Drive Users Guide
Page
71P7285
IBMR
Part Number 71P7285