20
 EN
EN


 RECORDING


Advanced
 Features
 (cont.)

MODE MENU
DATE/TIME
SYSTEM
|
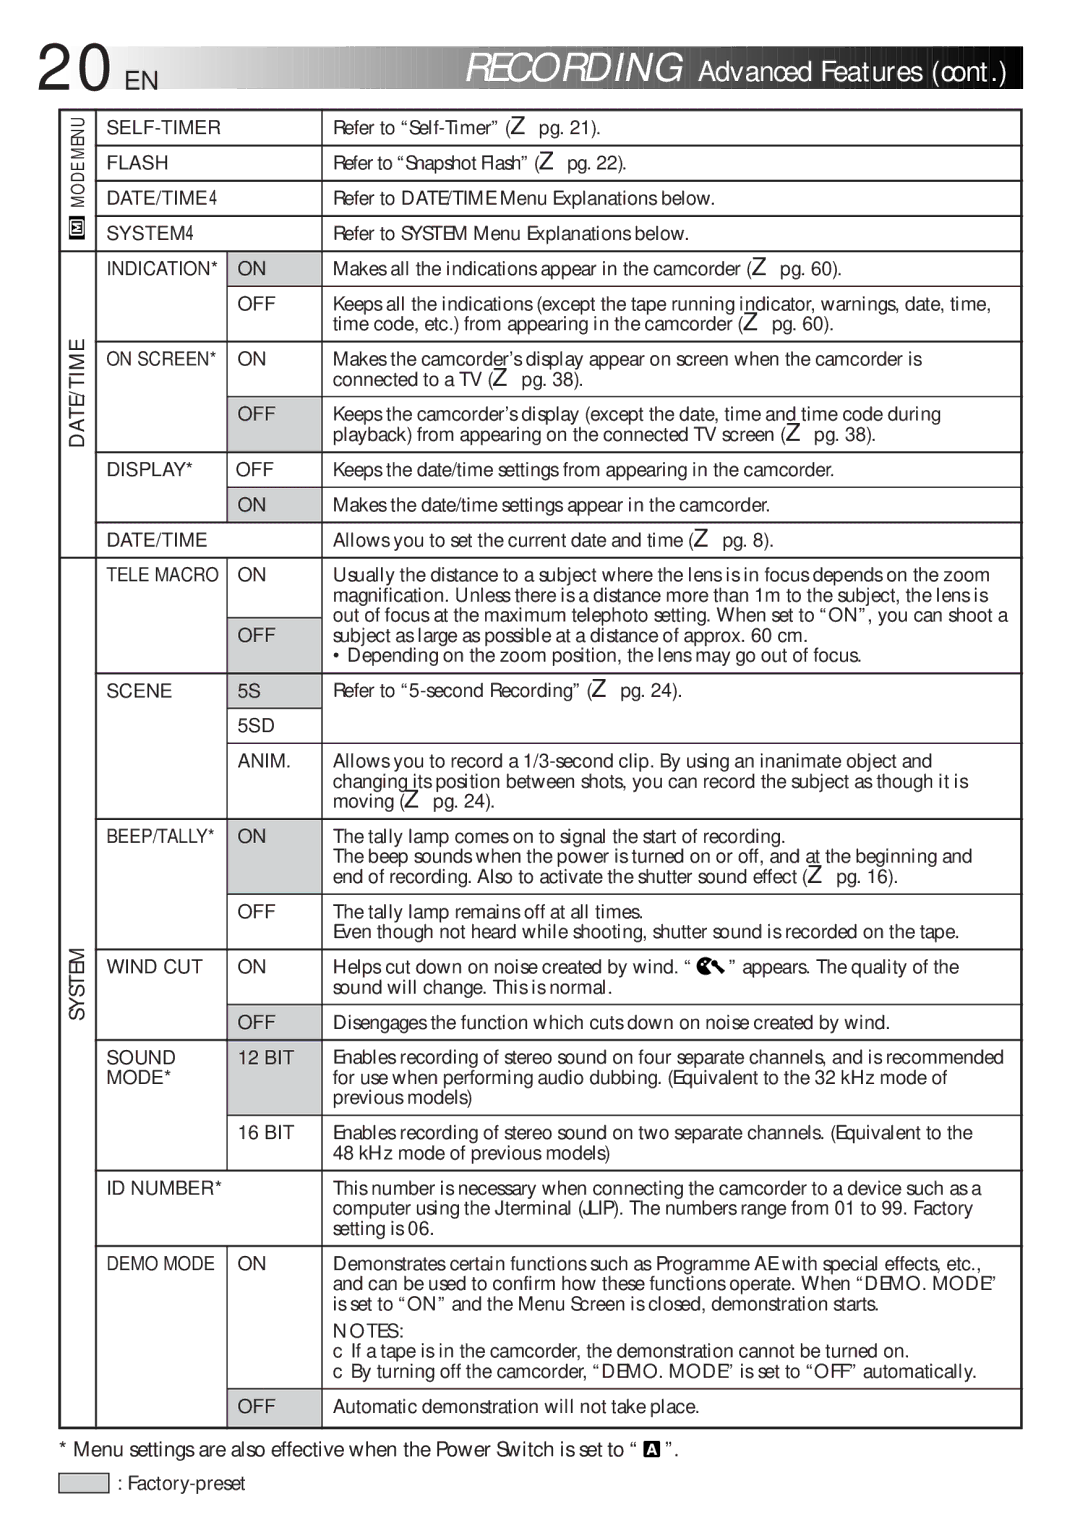
| Refer to |
| |
|
|
|
|
|
FLASH |
|
| Refer to “Snapshot Flash” (☞ pg. 22). |
|
|
|
|
|
|
DATE/TIME4 |
|
| Refer to DATE/TIME Menu Explanations below. |
|
|
|
|
|
|
SYSTEM4 |
|
| Refer to SYSTEM Menu Explanations below. |
|
|
|
| Makes all the indications appear in the camcorder (☞ pg. 60). | |
INDICATION* |
| ON | ||
|
| OFF | Keeps all the indications (except the tape running indicator, warnings, date, time, | |
|
|
| time code, etc.) from appearing in the camcorder (☞ pg. 60). | |
|
|
|
| |
ON SCREEN* |
| ON | Makes the camcorder’s display appear on screen when the camcorder is | |
|
|
| connected to a TV (☞ pg. 38). |
|
|
|
|
| |
|
| OFF | Keeps the camcorder’s display (except the date, time and time code during | |
|
|
| playback) from appearing on the connected TV screen (☞ pg. 38). | |
DISPLAY* |
| OFF | Keeps the date/time settings from appearing in the camcorder. | |
|
|
|
| |
|
| ON | Makes the date/time settings appear in the camcorder. | |
DATE/TIME |
|
| Allows you to set the current date and time (☞ pg. 8). | |
TELE MACRO |
| ON | Usually the distance to a subject where the lens is in focus depends on the zoom | |
| ||||
|
|
| magnification. Unless there is a distance more than 1m to the subject, the lens is | |
|
|
| out of focus at the maximum telephoto setting. When set to “ON”, you can shoot a | |
|
| OFF | ||
|
| subject as large as possible at a distance of approx. 60 cm. | ||
|
|
| • Depending on the zoom position, the lens may go out of focus. | |
SCENE |
| 5S | Refer to |
|
|
| 5SD |
|
|
|
|
|
| |
|
| ANIM. | Allows you to record a | |
|
|
| changing its position between shots, you can record the subject as though it is | |
|
|
| moving (☞ pg. 24). |
|
BEEP/TALLY* |
| ON | The tally lamp comes on to signal the start of recording. | |
|
|
| The beep sounds when the power is turned on or off, and at the beginning and | |
|
|
| end of recording. Also to activate the shutter sound effect (☞ pg. 16). | |
|
| OFF | The tally lamp remains off at all times. |
|
|
|
| Even though not heard while shooting, shutter sound is recorded on the tape. | |
|
|
|
|
|
WIND CUT |
| ON | Helps cut down on noise created by wind. “ | ” appears. The quality of the |
|
|
| sound will change. This is normal. |
|
|
|
|
| |
|
| OFF | Disengages the function which cuts down on noise created by wind. | |
SOUND |
| 12 BIT | Enables recording of stereo sound on four separate channels, and is recommended | |
MODE* |
|
| for use when performing audio dubbing. (Equivalent to the 32 kHz mode of | |
|
|
| previous models) |
|
|
| 16 BIT | Enables recording of stereo sound on two separate channels. (Equivalent to the | |
|
|
| 48 kHz mode of previous models) |
|
|
|
|
| |
ID NUMBER* |
|
| This number is necessary when connecting the camcorder to a device such as a | |
|
|
| computer using the J terminal (JLIP). The numbers range from 01 to 99. Factory | |
|
|
| setting is 06. |
|
|
|
|
| |
DEMO MODE |
| ON | Demonstrates certain functions such as Programme AE with special effects, etc., | |
|
|
| and can be used to confirm how these functions operate. When “DEMO. MODE” | |
|
|
| is set to “ON” and the Menu Screen is closed, demonstration starts. | |
NOTES:
●If a tape is in the camcorder, the demonstration cannot be turned on.
●By turning off the camcorder, “DEMO. MODE” is set to “OFF” automatically.
OFF | Automatic demonstration will not take place. |
|
|
* Menu settings are also effective when the Power Switch is set to “ ![]() ”.
”.
![]()
![]() :
:
