18
 EN
EN


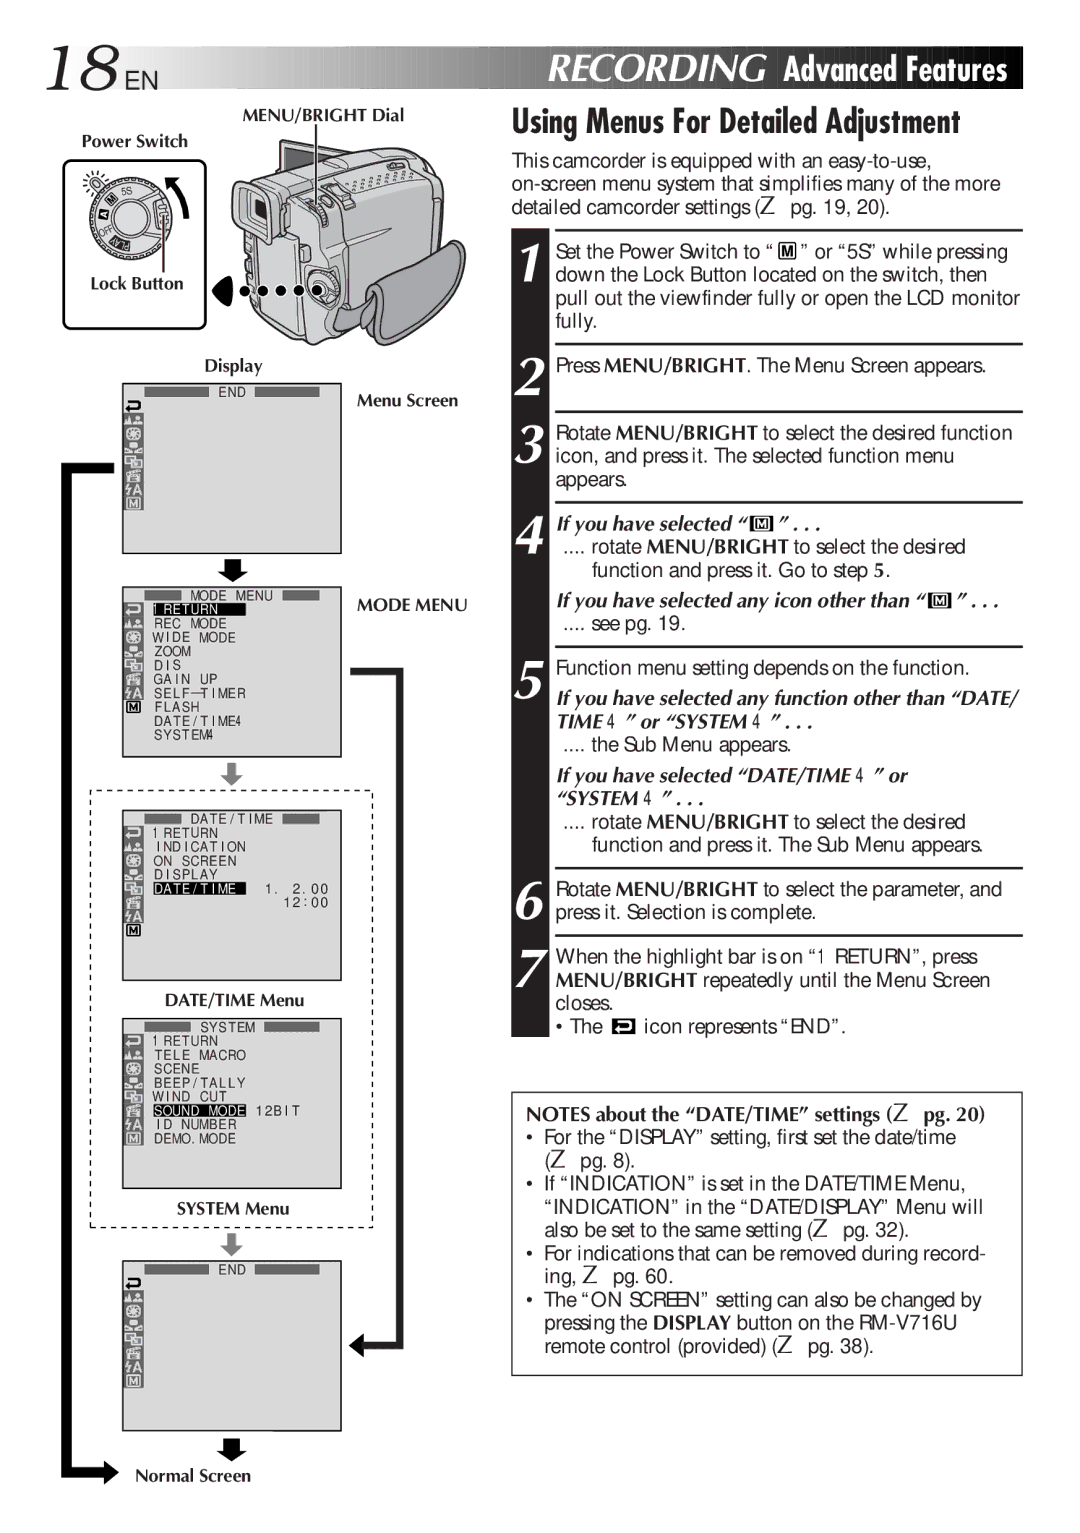
MENU/BRIGHT Dial
Power Switch


 RECORDING


 Advanced
 Features

Using Menus For Detailed Adjustment
![]() 5S
5S ![]()
This camcorder is equipped with an
OFF
YALP
Lock Button
1 Set the Power Switch to “ ![]() ” or “5S” while pressing down the Lock Button located on the switch, then pull out the viewfinder fully or open the LCD monitor fully.
” or “5S” while pressing down the Lock Button located on the switch, then pull out the viewfinder fully or open the LCD monitor fully.
Display
END | Menu Screen |
|
|
|
|
|
| MODE MENU |
|
| MODE MENU | |||
|
|
|
| 1RE TURN |
|
|
|
| |||
|
|
|
| REC MODE |
|
|
|
|
|
| |
|
|
|
|
|
|
|
|
|
| ||
|
|
| W I DE MODE |
|
|
|
|
| |||
|
|
|
| ZOOM |
|
|
|
|
| ||
|
|
|
| D I S |
|
|
|
|
| ||
|
|
| GA I N UP |
|
|
|
|
| |||
|
|
|
| SE L F – T I MER |
|
|
|
|
| ||
|
|
|
| F LASH |
|
|
|
|
| ||
|
|
|
| DATE / T I ME4 |
|
|
|
|
| ||
|
|
|
| SYSTEM4 |
|
|
|
|
| ||
|
|
|
|
| DAT E / T I ME |
|
|
|
| ||
|
|
|
|
|
|
|
|
| |||
|
|
| 1RE TURN |
|
|
|
|
| |||
|
|
|
| I ND I CAT I ON |
|
|
|
|
| ||
|
|
| ON SCREEN |
|
|
|
|
| |||
|
|
|
| D I SP LAY | 1 . | 2 . 0 0 |
|
| |||
|
|
|
| DAT E / T I ME |
|
|
| ||||
|
|
|
|
|
|
|
| 1 2 : 0 0 |
|
| |
|
|
|
|
|
|
|
|
|
|
|
|
|
|
|
|
|
|
|
|
|
|
|
|
|
|
|
|
|
|
|
|
|
|
|
|
DATE/TIME Menu
SYST EM
1RETURN
T E LE MACRO
SCENE
BEEP / TAL L Y
W I ND CUT
SOUND MODE 1 2B I T
I D NUMBER
DEMO. MODE
SYSTEM Menu
END
2
3 Rotate MENU/BRIGHT to select the desired function icon, and press it. The selected function menu appears.
4 If you have selected “ ![]() ” . . .
” . . .
.... rotate MENU/BRIGHT to select the desired
function and press it. Go to step 5.
If you have selected any icon other than “ ![]() ” . . .
” . . .
.... see pg. 19.
5 Function menu setting depends on the function.
If you have selected any function other than “DATE/ TIME 4” or “SYSTEM 4” . . .
.... the Sub Menu appears.
If you have selected “DATE/TIME 4” or “SYSTEM 4” . . .
.... rotate MENU/BRIGHT to select the desired
function and press it. The Sub Menu appears.
6 Rotate MENU/BRIGHT to select the parameter, and press it. Selection is complete.
7 When the highlight bar is on “1RETURN”, press MENU/BRIGHT repeatedly until the Menu Screen closes.
•The ![]() icon represents “END”.
icon represents “END”.
NOTES about the “DATE/TIME” settings (☞ pg. 20)
•For the “DISPLAY” setting, first set the date/time (☞ pg. 8).
•If “INDICATION” is set in the DATE/TIME Menu,
“INDICATION” in the “DATE/DISPLAY” Menu will also be set to the same setting (☞ pg. 32).
•For indications that can be removed during record- ing, ☞ pg. 60.
•The “ON SCREEN” setting can also be changed by
pressing the DISPLAY button on the
Normal Screen