8![]()
![]() EN
EN![]()
![]()
![]()
| GETTING STARTED (cont.) |
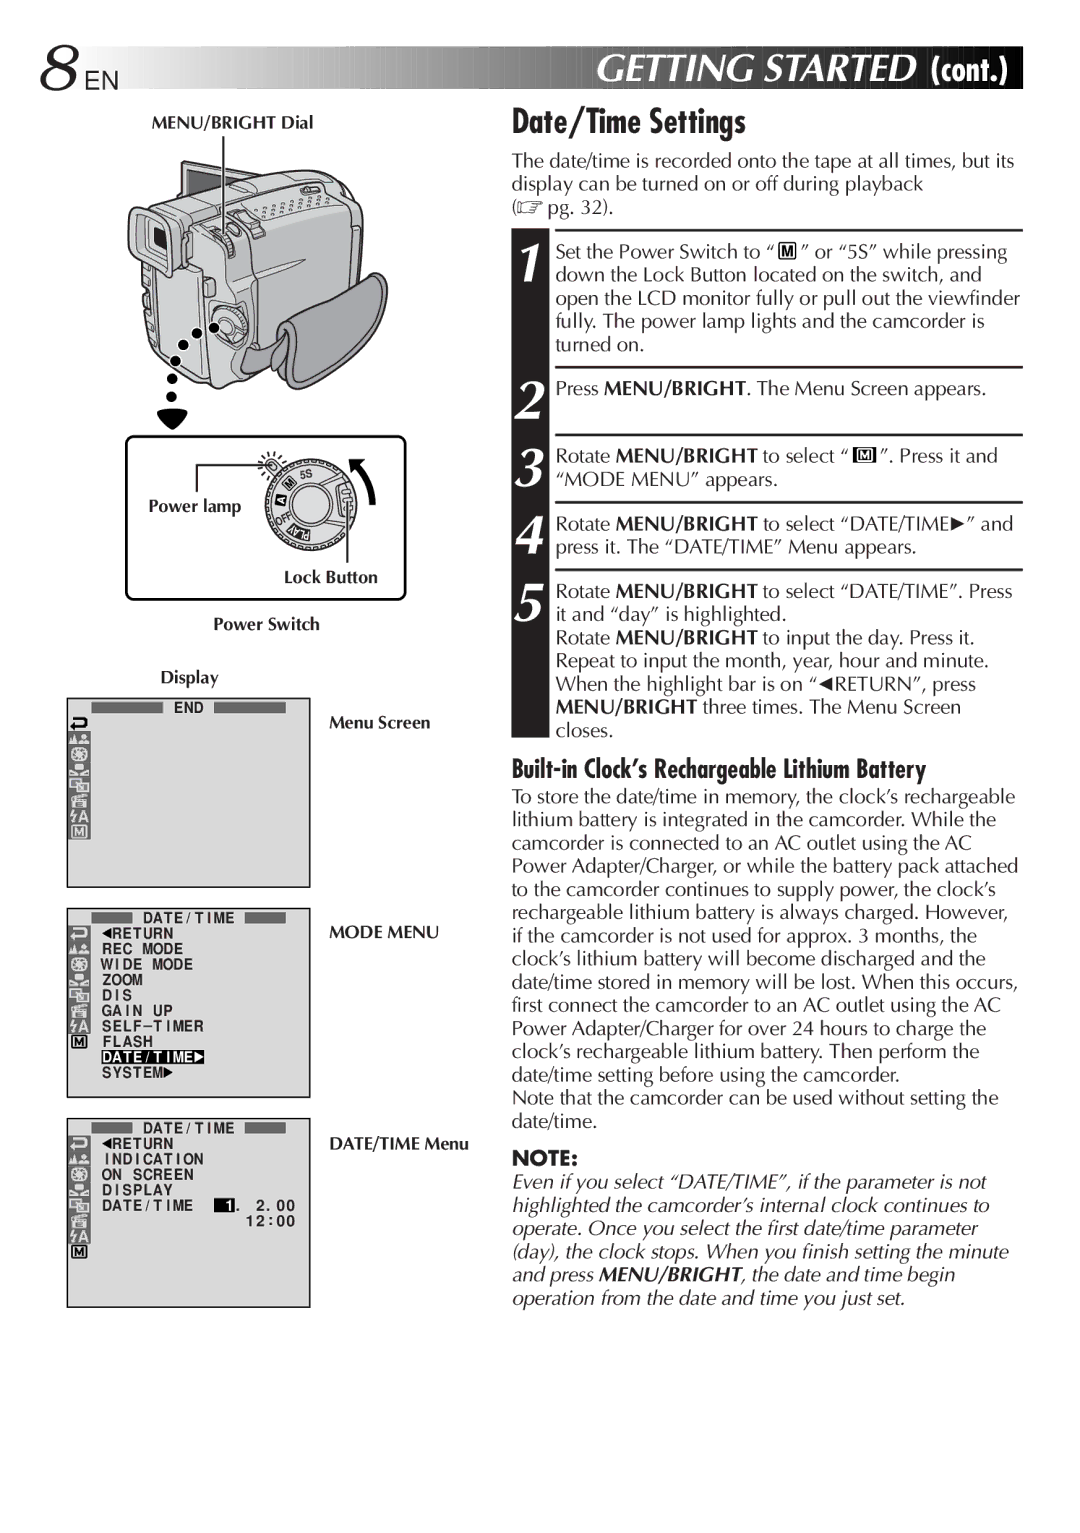
MENU/BRIGHT Dial | Date/Time Settings |
| The date/time is recorded onto the tape at all times, but its |
| display can be turned on or off during playback |
| (☞ pg. 32). |
| Set the Power Switch to “ ” or “5S” while pressing |
| 1 down the Lock Button located on the switch, and |
| open the LCD monitor fully or pull out the viewfinder |
| fully. The power lamp lights and the camcorder is |
| turned on. |
5S ![]()
Power lamp
OFF
YALP
Lock Button
Power Switch
Display
END
Menu Screen
|
|
|
|
| DAT E / T I ME |
| MODE MENU | |||
|
|
|
|
|
| |||||
|
|
| 1RETURN |
| ||||||
|
|
|
| REC MODE |
|
| ||||
|
|
| W I DE MODE |
|
| |||||
|
|
|
| ZOOM |
|
| ||||
|
|
|
| D I S |
|
| ||||
|
|
|
|
|
| |||||
|
|
|
|
|
| |||||
|
|
|
|
|
| |||||
|
|
| GA I N UP |
|
| |||||
|
|
|
|
| ||||||
|
|
|
| SEL F – T I MER |
|
| ||||
|
|
|
| F LASH |
|
| ||||
|
|
|
|
|
| |||||
|
|
|
| DAT E / T I ME4 |
|
|
|
|
| |
|
|
|
| SYS T EM4 |
|
|
|
|
| |
|
|
|
|
| DATE / T I ME |
| DATE/TIME Menu | |||
|
|
|
|
|
| |||||
|
|
| 1RE TURN |
| ||||||
|
|
|
| I ND I CAT I ON |
|
| ||||
|
|
| ON SCREEN |
|
| |||||
|
|
|
| D I SP LAY |
|
| ||||
|
|
|
| DAT E / T I ME | 1 | . | 2 . 0 0 | |||
|
|
|
| |||||||
|
|
|
| |||||||
|
|
|
| |||||||
|
|
|
|
|
|
|
|
| 1 2 : 0 0 | |
|
|
|
|
|
|
|
|
|
|
|
|
|
|
|
|
|
|
|
|
|
|
|
|
|
|
|
|
|
|
|
|
|
2 Press MENU/BRIGHT. The Menu Screen appears.
3 Rotate MENU/BRIGHT to select “ ![]() ”. Press it and “MODE MENU” appears.
”. Press it and “MODE MENU” appears.
4
5 Rotate MENU/BRIGHT to select “DATE/TIME”. Press it and “day” is highlighted.
Rotate MENU/BRIGHT to input the day. Press it. Repeat to input the month, year, hour and minute. When the highlight bar is on “1RETURN”, press MENU/BRIGHT three times. The Menu Screen closes.
Built-in Clock’s Rechargeable Lithium Battery
To store the date/time in memory, the clock’s rechargeable lithium battery is integrated in the camcorder. While the camcorder is connected to an AC outlet using the AC Power Adapter/Charger, or while the battery pack attached to the camcorder continues to supply power, the clock’s rechargeable lithium battery is always charged. However, if the camcorder is not used for approx. 3 months, the clock’s lithium battery will become discharged and the date/time stored in memory will be lost. When this occurs, first connect the camcorder to an AC outlet using the AC Power Adapter/Charger for over 24 hours to charge the clock’s rechargeable lithium battery. Then perform the date/time setting before using the camcorder.
Note that the camcorder can be used without setting the date/time.
NOTE:
Even if you select “DATE/TIME”, if the parameter is not highlighted the camcorder’s internal clock continues to operate. Once you select the first date/time parameter (day), the clock stops. When you finish setting the minute and press MENU/BRIGHT, the date and time begin operation from the date and time you just set.