ADDITIONAL OPERATIONS


 EN 33
EN 33
COUNTER VALUE CHANGE
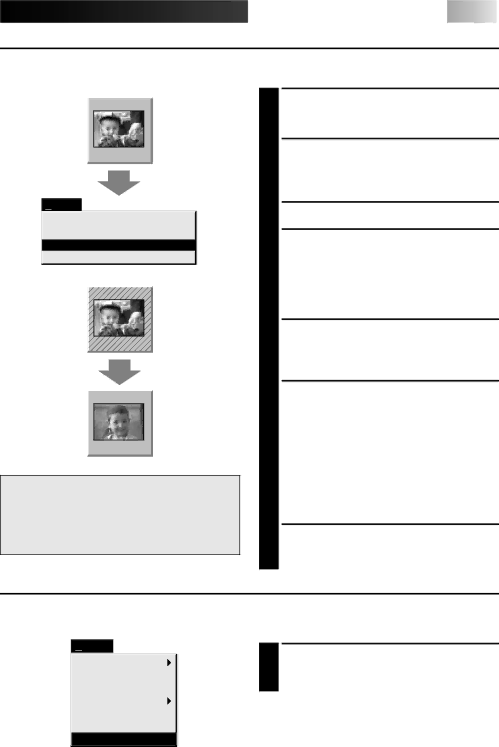
If you want to replace a captured image with a different one, you can capture the new one by changing the counter value.
02
00:02:17:21
Edit
Transfer the Index Image
Transfer the Full Image
Modify…
DeleteDel
02 |
00:01:23:12 |
02
00:01:23:12
NOTE : Note that if the index image data is saved in step 4, the hatching pattern indicating the change will no longer appear the next time it is called up.
1 Click the image display box of the index number you want to change.
•The box is bordered in green.
2 Open the menu bar and click "Edit" — "Modify…".
•The "Modify Capture Point" window appears.
3 Enter a new counter value.
4 Click "OK".
•The index image is surrounded by a hatching pattern indicating that a change is being made.
•The counter value is changed to the value you just entered.
5 Open the menu bar and click
6 Play the tape on the video source unit and click "Edit" — "Transfer the Index Image".
•Index image data at the counter setting is captured.
•Be sure to complete steps 1 through 7. If they are not all followed, the index image and the full image will be different as the full image data will not have been changed in step 6.
7 Click "Edit" — "Transfer the Full Image". •Full image data at the counter setting is
transferred.
COUNTER RESET
You can change the counter setting on connected video source units (VHS,
Set-up
Capture Mode
Image Format
Device Change
Preroll
Initialize
ID Change
Counter Reset
1 Open the menu bar and click
•The VCR's counter is reset.
