11. MENU SCREENS
11-10 LCD/VF Menu Screen (Cont’d)
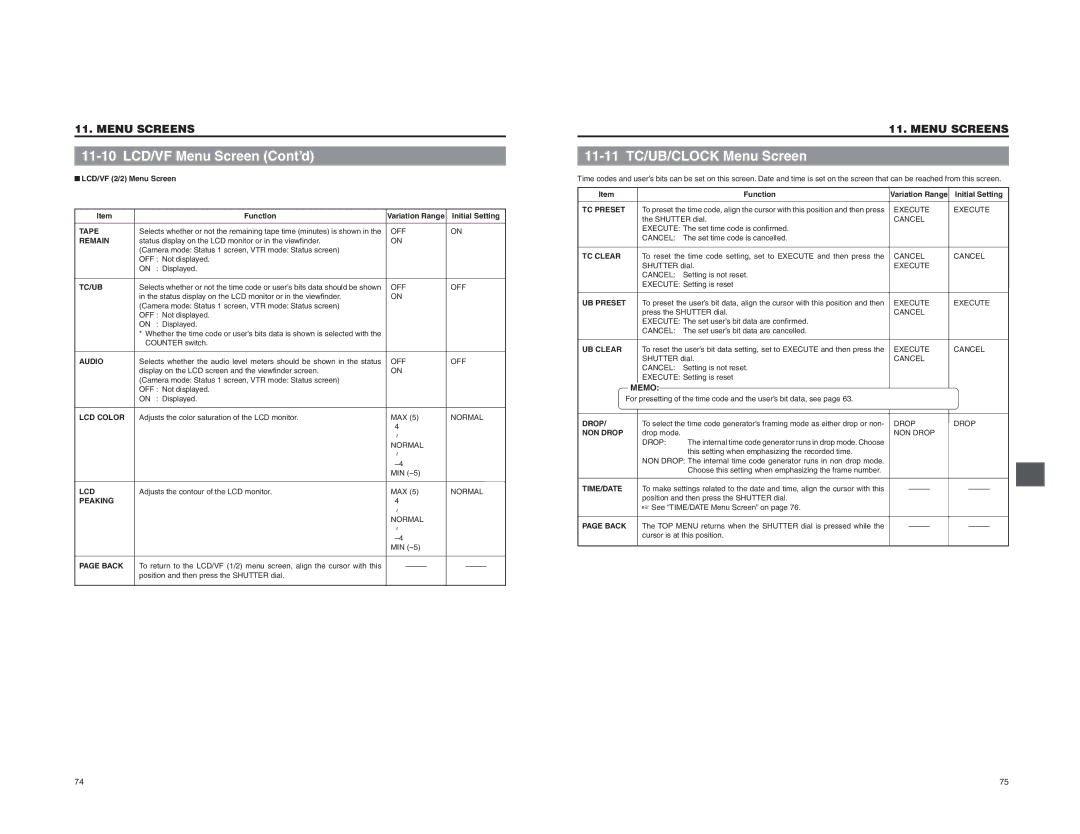
■LCD/VF (2/2) Menu Screen
Item |
| Function | Variation Range | Initial Setting |
TAPE | Selects whether or not the remaining tape time (minutes) is shown in the | OFF | ON | |
REMAIN | status display on the LCD monitor or in the viewfinder. | ON |
| |
| (Camera mode: Status 1 screen, VTR mode: Status screen) |
|
| |
| OFF : | Not displayed. |
|
|
| ON : | Displayed. |
|
|
TC/UB | Selects whether or not the time code or user’s bits data should be shown | OFF | OFF | |
| in the status display on the LCD monitor or in the viewfinder. | ON |
| |
| (Camera mode: Status 1 screen, VTR mode: Status screen) |
|
| |
| OFF : | Not displayed. |
|
|
| ON : | Displayed. |
|
|
*Whether the time code or user’s bits data is shown is selected with the COUNTER switch.
AUDIO | Selects whether the audio level meters should be shown in the status | OFF | OFF |
| display on the LCD screen and the viewfinder screen. | ON |
|
| (Camera mode: Status 1 screen, VTR mode: Status screen) |
|
|
| OFF : Not displayed. |
|
|
| ON : Displayed. |
|
|
LCD COLOR | Adjusts the color saturation of the LCD monitor. | MAX (5) | NORMAL |
|
| 4 |
|
|
| ~ |
|
|
| NORMAL |
|
|
| ~ |
|
|
|
| |
|
| MIN |
|
LCD | Adjusts the contour of the LCD monitor. | MAX (5) | NORMAL |
PEAKING |
| 4 |
|
|
| ~ |
|
|
| NORMAL |
|
|
| ~ |
|
|
|
| |
|
| MIN |
|
PAGE BACK | To return to the LCD/VF (1/2) menu screen, align the cursor with this | ||
| position and then press the SHUTTER dial. |
|
|
11. MENU SCREENS
|
|
| ||
Time codes and user’s bits can be set on this screen. Date and time is set on the screen that can be reached from this screen. | ||||
Item |
| Function | Variation Range | Initial Setting |
TC PRESET | To preset the time code, align the cursor with this position and then press | EXECUTE | EXECUTE | |
| the SHUTTER dial. | CANCEL |
| |
| EXECUTE: The set time code is confirmed. |
|
| |
| CANCEL: The set time code is cancelled. |
|
| |
TC CLEAR | To reset the time code setting, set to EXECUTE and then press the | CANCEL | CANCEL | |
| SHUTTER dial. | EXECUTE |
| |
| CANCEL: Setting is not reset. |
|
| |
| EXECUTE: Setting is reset |
|
| |
UB PRESET | To preset the user’s bit data, align the cursor with this position and then | EXECUTE | EXECUTE | |
| press the SHUTTER dial. | CANCEL |
| |
| EXECUTE: The set user’s bit data are confirmed. |
|
| |
| CANCEL: The set user’s bit data are cancelled. |
|
| |
UB CLEAR | To reset the user’s bit data setting, set to EXECUTE and then press the | EXECUTE | CANCEL | |
| SHUTTER dial. | CANCEL |
| |
| CANCEL: Setting is not reset. |
|
| |
| EXECUTE: Setting is reset |
|
| |
| MEMO: |
|
|
|
For presetting of the time code and the user’s bit data, see page 63. |
|
| ||
DROP/ | To select the time code generator’s framing mode as either drop or non- | DROP | DROP | |
NON DROP | drop mode. |
| NON DROP |
|
| DROP: | The internal time code generator runs in drop mode. Choose |
|
|
|
| this setting when emphasizing the recorded time. |
|
|
| NON DROP: The internal time code generator runs in non drop mode. |
|
| |
|
| Choose this setting when emphasizing the frame number. |
|
|
TIME/DATE | To make settings related to the date and time, align the cursor with this | |||
| position and then press the SHUTTER dial. |
|
| |
| ☞ See “TIME/DATE Menu Screen” on page 76. |
|
| |
PAGE BACK | The TOP MENU returns when the SHUTTER dial is pressed while the | |||
| cursor is at this position. |
|
| |
74 | 75 |