11. MENU SCREENS |
|
| ||
|
|
| ||
Item |
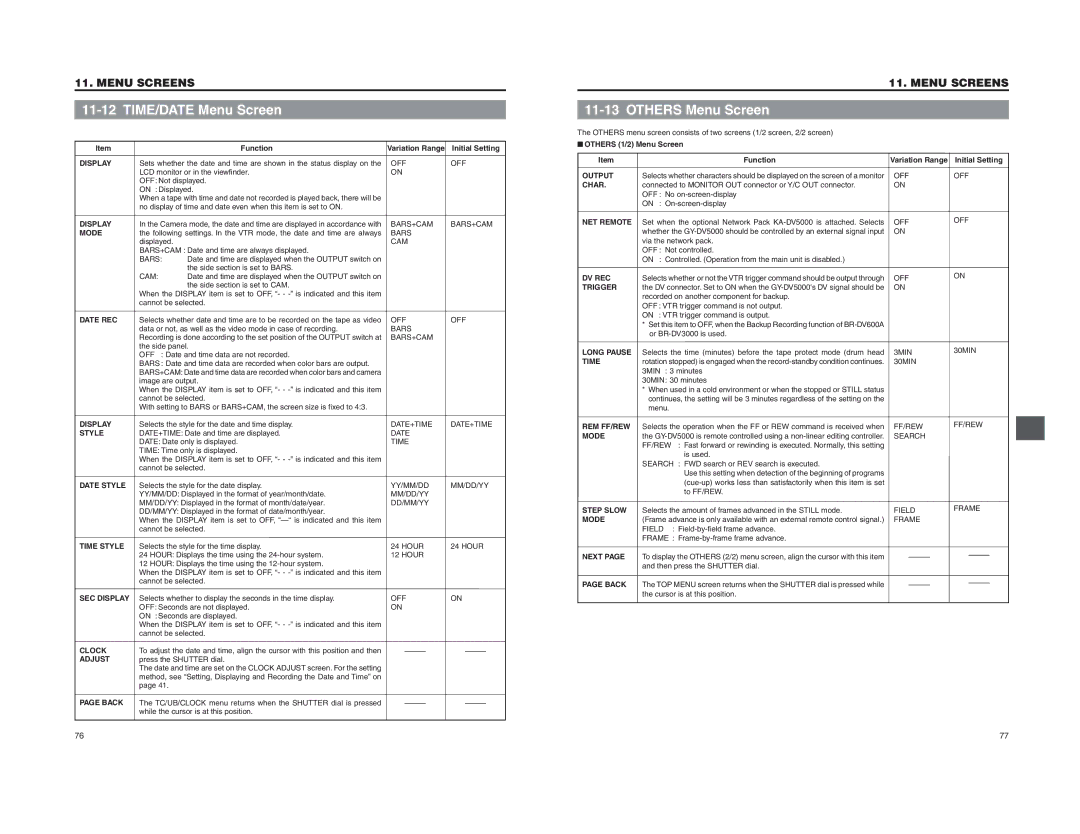
| Function | Variation Range | Initial Setting |
DISPLAY | Sets whether the date and time are shown in the status display on the | OFF | OFF | |
| LCD monitor or in the viewfinder. | ON |
| |
| OFF: Not displayed. |
|
| |
| ON : Displayed. |
|
| |
| When a tape with time and date not recorded is played back, there will be |
|
| |
| no display of time and date even when this item is set to ON. |
|
| |
DISPLAY | In the Camera mode, the date and time are displayed in accordance with | BARS+CAM | BARS+CAM | |
MODE | the following settings. In the VTR mode, the date and time are always | BARS |
| |
| displayed. |
| CAM |
|
| BARS+CAM : Date and time are always displayed. |
|
| |
| BARS: | Date and time are displayed when the OUTPUT switch on |
|
|
|
| the side section is set to BARS. |
|
|
| CAM: | Date and time are displayed when the OUTPUT switch on |
|
|
|
| the side section is set to CAM. |
|
|
| When the DISPLAY item is set to OFF, “- - |
|
| |
| cannot be selected. |
|
| |
DATE REC | Selects whether date and time are to be recorded on the tape as video | OFF | OFF | |
| data or not, as well as the video mode in case of recording. | BARS |
| |
| Recording is done according to the set position of the OUTPUT switch at | BARS+CAM |
| |
| the side panel. |
|
| |
| OFF : Date and time data are not recorded. |
|
| |
| BARS : Date and time data are recorded when color bars are output. |
|
| |
| BARS+CAM: Date and time data are recorded when color bars and camera |
|
| |
| image are output. |
|
| |
| When the DISPLAY item is set to OFF, “- - |
|
| |
| cannot be selected. |
|
| |
| With setting to BARS or BARS+CAM, the screen size is fixed to 4:3. |
|
| |
DISPLAY | Selects the style for the date and time display. | DATE+TIME | DATE+TIME | |
STYLE | DATE+TIME: Date and time are displayed. | DATE |
| |
| DATE: Date only is displayed. | TIME |
| |
| TIME: Time only is displayed. |
|
| |
| When the DISPLAY item is set to OFF, “- - |
|
| |
| cannot be selected. |
|
| |
DATE STYLE | Selects the style for the date display. | YY/MM/DD | MM/DD/YY | |
| YY/MM/DD: Displayed in the format of year/month/date. | MM/DD/YY |
| |
| MM/DD/YY: Displayed in the format of month/date/year. | DD/MM/YY |
| |
| DD/MM/YY: Displayed in the format of date/month/year. |
|
| |
| When the DISPLAY item is set to OFF, |
|
| |
| cannot be selected. |
|
| |
TIME STYLE | Selects the style for the time display. | 24 HOUR | 24 HOUR | |
| 24 HOUR: Displays the time using the | 12 HOUR |
| |
| 12 HOUR: Displays the time using the |
|
| |
| When the DISPLAY item is set to OFF, “- - |
|
| |
| cannot be selected. |
|
| |
SEC DISPLAY | Selects whether to display the seconds in the time display. | OFF | ON | |
| OFF: Seconds are not displayed. | ON |
| |
| ON : Seconds are displayed. |
|
| |
| When the DISPLAY item is set to OFF, “- - |
|
| |
| cannot be selected. |
|
| |
CLOCK | To adjust the date and time, align the cursor with this position and then | |||
ADJUST | press the SHUTTER dial. |
|
| |
| The date and time are set on the CLOCK ADJUST screen. For the setting |
|
| |
| method, see “Setting, Displaying and Recording the Date and Time” on |
|
| |
| page 41. |
|
|
|
PAGE BACK | The TC/UB/CLOCK menu returns when the SHUTTER dial is pressed | |||
| while the cursor is at this position. |
|
| |
11. MENU SCREENS
11-13 OTHERS Menu Screen
The OTHERS menu screen consists of two screens (1/2 screen, 2/2 screen)
■OTHERS (1/2) Menu Screen
Item |
|
| Function | Variation Range | Initial Setting |
OUTPUT | Selects whether characters should be displayed on the screen of a monitor | OFF | OFF | ||
CHAR. | connected to MONITOR OUT connector or Y/C OUT connector. | ON |
| ||
| OFF : | No |
|
| |
| ON : |
|
| ||
NET REMOTE | Set when the optional Network Pack | OFF | OFF | ||
| |||||
| whether the | ON |
| ||
| via the network pack. |
|
| ||
| OFF : | Not controlled. |
|
| |
| ON : | Controlled. (Operation from the main unit is disabled.) |
|
| |
DV REC | Selects whether or not the VTR trigger command should be output through | OFF | ON | ||
| |||||
TRIGGER | the DV connector. Set to ON when the | ON |
| ||
| recorded on another component for backup. |
|
| ||
| OFF : VTR trigger command is not output. |
|
| ||
| ON : VTR trigger command is output. |
|
| ||
| * Set this item to OFF, when the Backup Recording function of |
|
| ||
| or |
|
| ||
LONG PAUSE | Selects the time (minutes) before the tape protect mode (drum head | 3MIN | 30MIN | ||
| |||||
TIME | rotation stopped) is engaged when the | 30MIN |
| ||
| 3MIN | : 3 minutes |
|
| |
| 30MIN: 30 minutes |
|
| ||
| * When used in a cold environment or when the stopped or STILL status |
|
| ||
| continues, the setting will be 3 minutes regardless of the setting on the |
|
| ||
| menu. |
|
|
| |
REM FF/REW | Selects the operation when the FF or REW command is received when | FF/REW | FF/REW | ||
| |||||
MODE | the | SEARCH |
| ||
| FF/REW | : Fast forward or rewinding is executed. Normally, this setting |
|
| |
|
|
| is used. |
|
|
| SEARCH | : FWD search or REV search is executed. |
|
| |
|
|
| Use this setting when detection of the beginning of programs |
|
|
|
|
|
|
| |
|
|
| to FF/REW. |
|
|
STEP SLOW | Selects the amount of frames advanced in the STILL mode. | FIELD | FRAME | ||
| |||||
MODE | (Frame advance is only available with an external remote control signal.) | FRAME |
| ||
| FIELD | : |
|
| |
| FRAME : |
|
| ||
NEXT PAGE | To display the OTHERS (2/2) menu screen, align the cursor with this item | ||||
| |||||
| and then press the SHUTTER dial. |
|
| ||
PAGE BACK | The TOP MENU screen returns when the SHUTTER dial is pressed while | ||||
| |||||
| the cursor is at this position. |
|
| ||
76
77