CLOCK ADJUSTMENT
(USING THE REMOTE CONTROL UNIT)
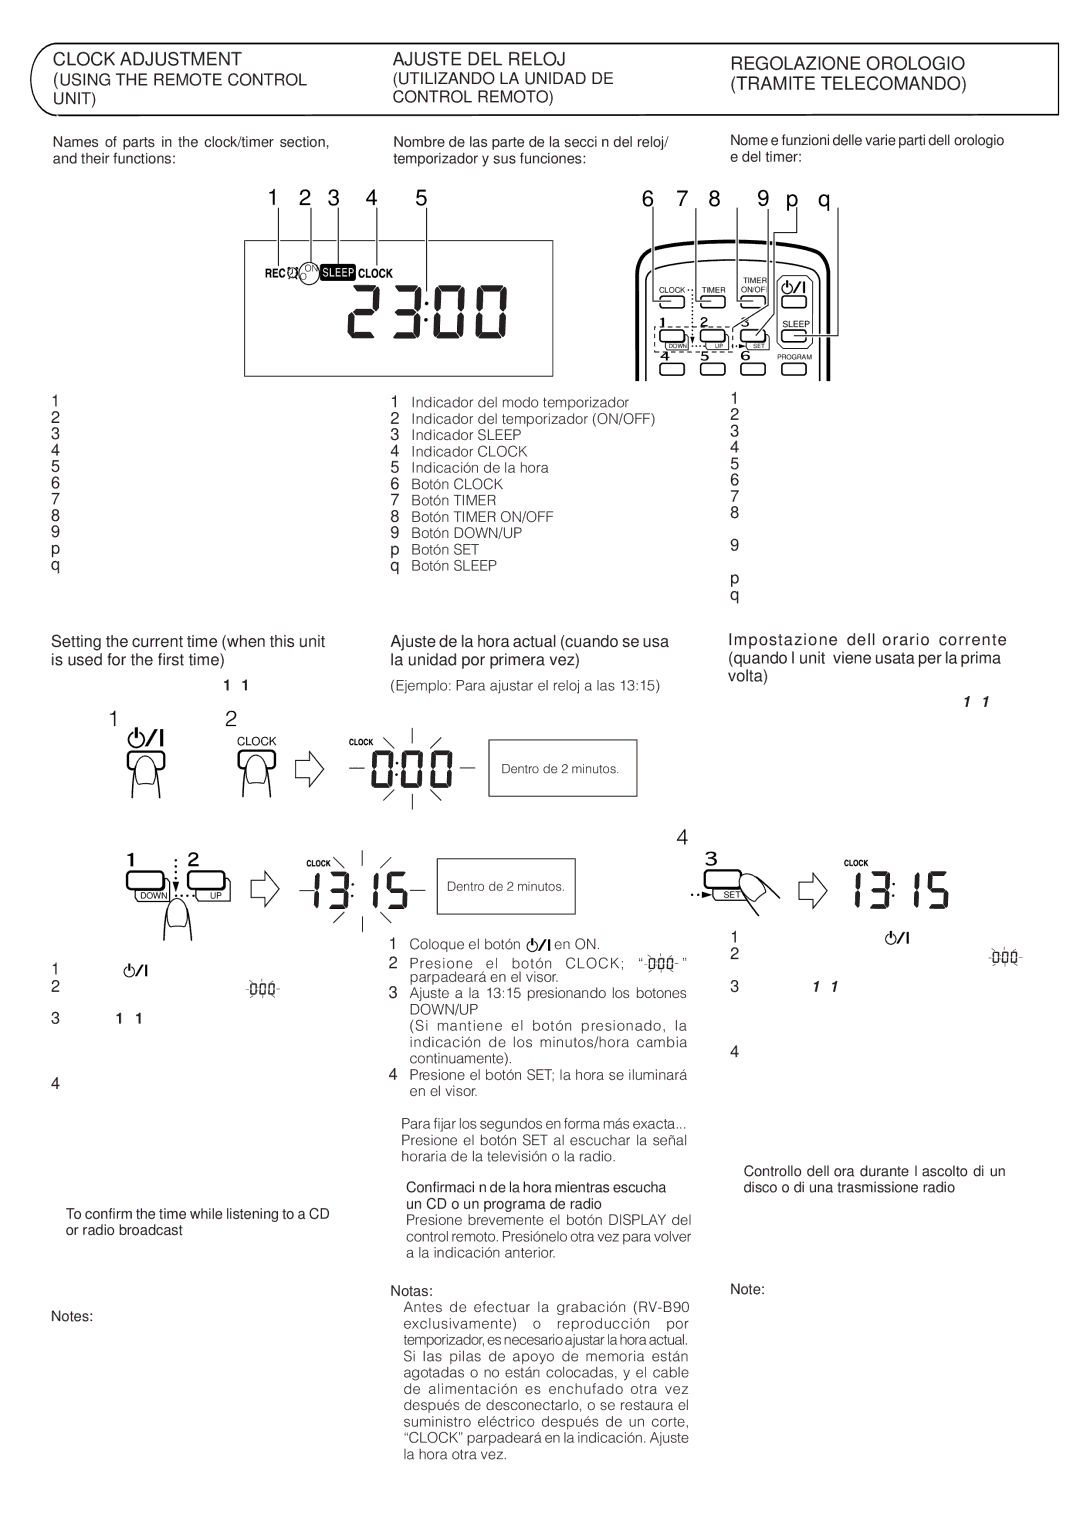
Names of parts in the clock/timer section, and their functions:
AJUSTE DEL RELOJ
(UTILIZANDO LA UNIDAD DE CONTROL REMOTO)
Nombre de las parte de la sección del reloj/ temporizador y sus funciones:
REGOLAZIONE OROLOGIO (TRAMITE TELECOMANDO)
Nome e funzioni delle varie parti dell’orologio e del timer:
1 2 3 4 5 | 6 7 8 9 p q | |
ON |
|
|
OFF |
| TIMER |
|
| |
| CLOCK | TIMER ON/OFF |
|
| SLEEP |
| DOWN | UPSET |
|
| PROGRAM |
1Timer mode indicator
2 Timer indicator (ON/OFF)
3 SLEEP indicator
4 CLOCK indicator
5 Time display
6 CLOCK button
7 TIMER button
8 TIMER ON/OFF button
9 DOWN/UP buttons p SET button
q SLEEP button
1Indicador del modo temporizador
2 Indicador del temporizador (ON/OFF)
3 Indicador SLEEP
4 Indicador CLOCK
5 Indicación de la hora
6 Botón CLOCK
7 Botón TIMER
8 Botón TIMER ON/OFF
9 Botón DOWN/UP p Botón SET
q Botón SLEEP
1Indicazione di modalità del timer
2Indicazione di timer attivato o no (ON o OFF)
3 Indicazione di spegnimento a tempo (SLEEP)
4 Indicazione dell’orologio (CLOCK)
5 Indicazione dell’ora
6 Tasto dell’orologio (CLOCK)
7 Tasto del timer (TIMER)
8 Tasto di attivazione e disattivazione del timer
(TIMER ON/OFF)
9 Tasti per scorrimento verso il basso (DOWN)
o verso l’alto (UP)
p Tasto di memorizzazione (SET)
q Tasto di azionamento dello spegnimento a tempo (SLEEP)
Setting the current time (when this unit | Ajuste de la hora actual (cuando se usa |
is used for the first time) | la unidad por primera vez) |
(Example: To set the clock to 13:15.) | (Ejemplo: Para ajustar el reloj a las 13:15) |
12
CLOCK
Within 2 minutes.
Dentro de 2 minutos.
Entro 2 minuti.
Impostazione dell’orario corrente (quando l’unità viene usata per la prima volta)
(Esempio: Per regolare l’orologio sulle 13:15.)
3
DOWN ![]()
![]() UP
UP
Within 2 minutes. Dentro de 2 minutos. Entro 2 minuti.
4
SET
1Set the ![]()
![]()
![]() button to ON.
button to ON.
2Press the CLOCK button; “ ![]()
![]()
![]()
![]()
![]()
![]() ” will blink in the display.
” will blink in the display.
3Set to 13:15 by pressing the DOWN/UP buttons.
(When the button is kept pressed, the minute/ hour indication changes continuously.)
4Press the SET button; the time will light in the display.
ÖTo set to the nearest second...
Press the SET button when you hear the time signal from a TV or radio.
ÖTo confirm the time while listening to a CD or radio broadcast
Press the DISPLAY button briefly on the remote control unit. Press it again to return to the previous display.
Notes:
ÖBefore performing timer recording
ÖIf memory
1Coloque el botón ![]()
![]()
![]() en ON.
en ON.
2Presione el botón CLOCK; “ ![]()
![]()
![]()
![]()
![]()
![]() ” parpadeará en el visor.
” parpadeará en el visor.
3Ajuste a la 13:15 presionando los botones
DOWN/UP
(Si mantiene el botón presionado, la indicación de los minutos/hora cambia continuamente).
4Presione el botón SET; la hora se iluminará en el visor.
ÖPara fijar los segundos en forma más exacta...
Presione el botón SET al escuchar la señal horaria de la televisión o la radio.
ÖConfirmación de la hora mientras escucha un CD o un programa de radio Presione brevemente el botón DISPLAY del control remoto. Presiónelo otra vez para volver a la indicación anterior.
Notas:
ÖAntes de efectuar la grabación
ÖSi las pilas de apoyo de memoria están agotadas o no están colocadas, y el cable de alimentación es enchufado otra vez después de desconectarlo, o se restaura el suministro eléctrico después de un corte, “CLOCK” parpadeará en la indicación. Ajuste la hora otra vez.
1Portare l’interruttore ![]()
![]() su ON.
su ON.
2Premere il tasto CLOCK l’indicazione “ ![]()
![]()
![]()
![]()
![]()
![]() ” lampeggia sul display.
” lampeggia sul display.
3Impostare 13:15 premendo i tasti DOWN/UP. (Se il tasto viene tenuto premuto, l’indicazione dei minuti/ore cambia continuamente).
4Premere il tasto SET; l’orario si illumina sul display.
ÖPer impostare l’ora esatta...
Premere il tasto SET in corrispondenza di un segnale orario della radio o della televisione.
ÖControllo dell’ora durante l’ascolto di un disco o di una trasmissione radio Premere brevemente il tasto DISPLAY del telecomando. Premere di nuovo lo stesso tasto per tornare alla visualizzazione precedente.
Note:
ÖPer poter procedere alla registrazione (solo per
ÖSe le batterie di appoggio della memoria sono esaurite, o non sono state installate, ricollegando il cavo di alimentazione dopo averlo staccato, o alla ripresa dell’alimentazione dopo una eventuale caduta di corrente, sul quadrante l’indicazione “CLOCK” lampeggia, ed è necessario procedere di nuovo alla predisposizione dell’ora.
32