Service
AGR4400ADW AGR4412ADB/Q/S/W AGR5712ADB/Q/S/W CPL1100ADH/L/Q/T/W
CPL1110ADH/L/T CPR1100ADQ/W CGL1100ADQ/W CGR1110ADQ/W CGR1125ADQ/W
CGR1415ADH CGR1425ADH/Q/S/T/W CGR3725ADB/Q/S/W CG31200ADQ/V/W
Customer Service Support Center
REVIEW ALL APPROPRIATE SERVICE INFORMATION BEFORE BEGINNING REPAIRS
Recognize Safety Symbols, Words, and Labels
Important Information
Table of Contents
Important Safety Information
Safety Practices for Servicer
Recognize this symbol as a safety precaution
W A R NIN G
Using the Oven
7. Adhere to all local regulations and codes when performing service
Receiving Oven
Important Safety Information
Connecting Range to Gas
Product Safety Devices
Gas Burner Orifices Oven Safety Valve
Baking, Broiling, and Roasting
Feature Content
General Information
Color
Brand
Specifications
Placement of the Oven
Service
Parts and Accessories
W ARNING
Grounding
General Information
Range Description
2004 Maytag Services
Surface Burner
Oven Door
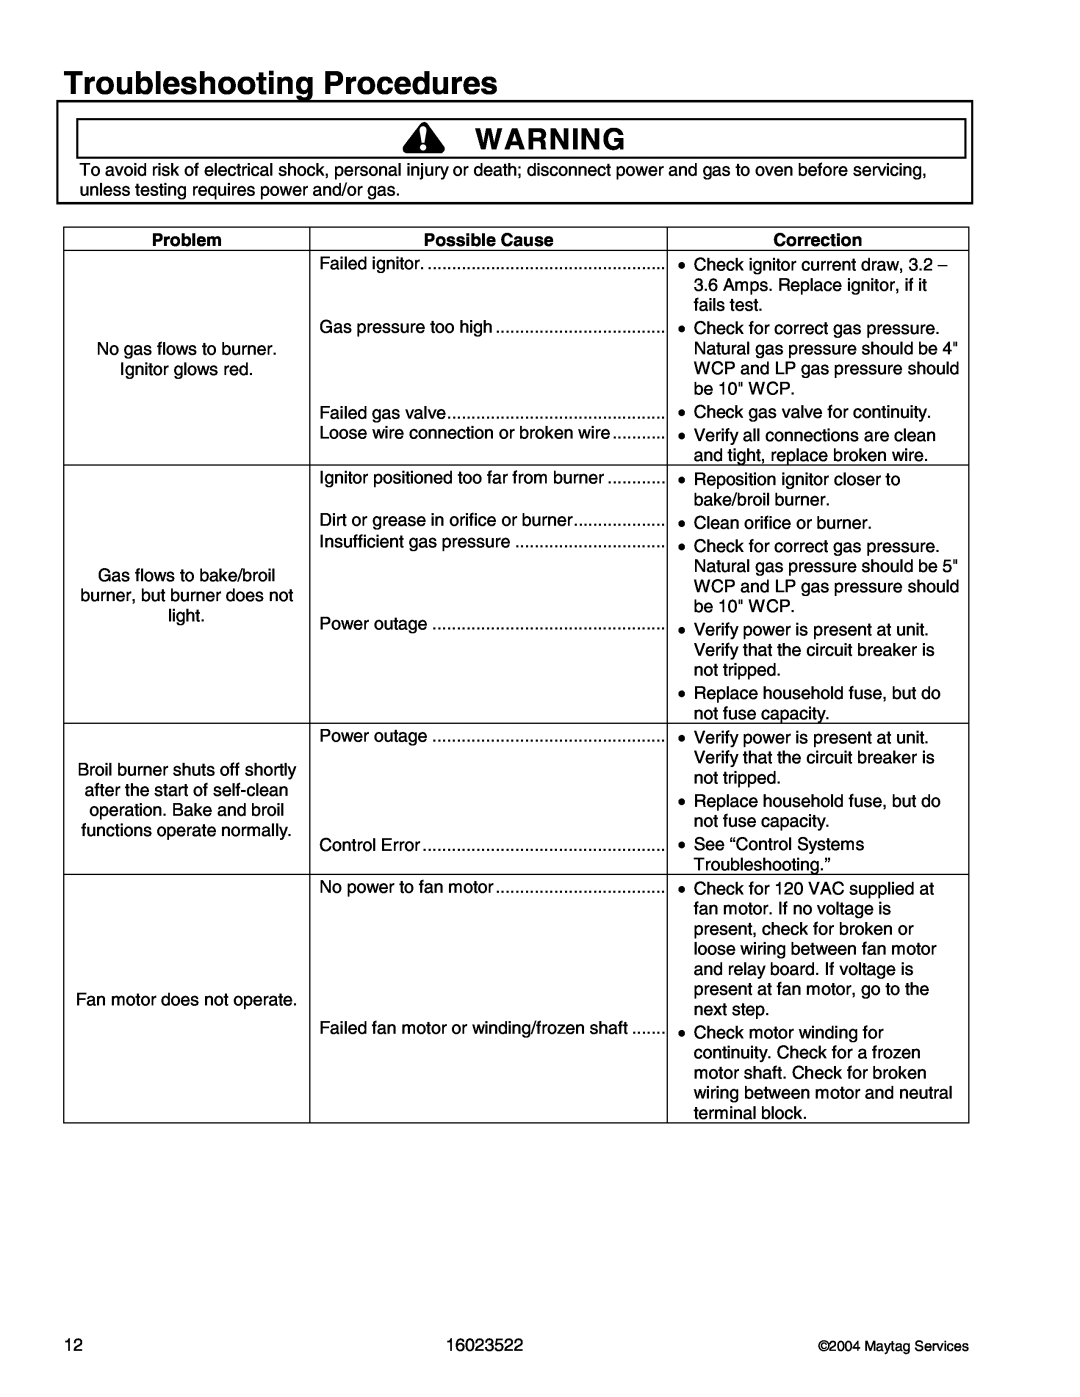
Troubleshooting Procedures
Problem
Possible Cause
Correction
Troubleshooting Procedures
2004 Maytag Services
Troubleshooting Procedures
Failed oven lamp
Component Testing Procedures
Test Procedure
Illustration
Component
Component Testing Procedures
Test Procedure
Illustration
Component
Component Testing Procedures
Test Procedure
hold Cancel and Cook & Hold pads
seconds of powering up the unit
Quick Test Mode for Electronic Range Control
Description of Error Codes
Display will indicate the following
Component Testing Procedures
Component Testing Procedures
Component Testing Procedures
CANCEL
Delay
Clock
Disassembly Procedures
Maintop Assembly
Rocker Switch
Top Surface Valve and Spark Switch
Valve / Regulator Assembly
Manual Oven Door Latch Assembly
Open Burner
Oven Sensor
Oven Door Hinge Receiver
Side Panel Removal
Backguard
Storage Drawer Removal
Oven Light Assembly
Frameless Door Disassembly Large and Standard Windows
Power Cord
Oven Light Bulb/Oven Light Socket
Frameless Oven Door
Large Window
Disassembly Procedures
Standard Window
Door Disassembly No Window
Oven Door - No Window
Disassembly Procedures
Door
Appendix A
2004 Maytag Services
16023522
Installation Instructions Models CP31200AD*, CG31200AD
2004 Maytag Services
Installation Instructions Models CP31200AD*, CG31200AD
2004 Maytag Services
16023522
INSTALLATION
INSTALLATION DRAWINGS
Installation Instructions Models CPL1100AD*, CGL1100AD
MOBILE HOMES
DISCONNECT ELECTRICAL POWER TO AVOID SHOCK HAZARD
INSTALLATION DRAWINGS
Installation Instructions Models CPL1100AD*, CGL1100AD
BACKGUARD INSTALLATION
Installation Instructions Model LPR1115AD
2004 Maytag Services
Installation Instructions Model LPR1115AD
2004 Maytag Services
16023522
2004 Maytag Services
16023522
Appliance Pressure Regulator Alternate Connectors
See figure
b. Oven burner flame can be checked as follows
Appendix B
2004 Maytag Services
16023522
Use Instructions Models CP/CG31200AD*, CPL1100AD*, CGL1100AD
2004 Maytag Services
2004 Maytag Services
Use Instructions Models CP/CG31200AD*, CPL1100AD*, CGL1100AD
16023522
Setting the controls
Surface Cooking
Surface Controls
Pilotless Ignition select models
Manual Clean Oven Control
Using the Touchpads
Setting the Timer
Setting the Clock
Self-Clean Oven Control select models
Clock
A BC D E F G H I J
To change the clock to 24-hour format
Operating During a Power Failure
Setting the controls
Pilotless Ignition
2004 Maytag Services
To cancel the timer operation
A B C D E F
Manual Clean Oven Control
Using the Touchpads
Self-Clean Oven Control select models
Using the Touchpads
2004 Maytag Services
Oven Cooking
Care & Cleaning
Care and Cleaning
Cleaning Procedures
PROCEDURE
Care & Cleaning
Care and Cleaning
PROCEDURE
2004 Maytag Services
Appendix C
2004 Maytag Services
Conversion Instructions Models CP31200AD*, CG31200AD
2004 Maytag Services
Conversion Instructions Models CP31200AD*, CG31200AD
HOW TO REMOVE RANGE
SERVICE - PARTS INFORMATION
GAS CONVERSION
Conversion Instructions Models CPL1100AD*, CGL1100AD
How To Remove Range For Servicing
Service - Parts Information
Gas Conversion
Conversion Instructions Model CPR1100AD
Orifice Conversion
From Natural Gas To LP/Propane Gas
From LP/Propane Gas To Natural Gas
Conversion Instructions Model CPR1100AD
Range Adjustments
Top Section - Gas Top Pilot Adjustment
Top Burner Adjustment
Top Section - Electric Ignition
Conversion Instructions Model LPR1115AD
16023522
Minimum
C-10
16023522
ORIFICE HOOD
LOCK SCREW AIR SHUTTER
ORIFICE HOOD
AIR SHUTTER NATURAL POSITION AIR SHUTTER LP POSITION
Gas Conversion
General
Appliance Pressure Regulator Conversion
INLET PRESSURE IN
Orifice Conversion
Oven Burner Conversion
Surface Burner Conversion Sealed Burner
1. Bake Burner
Surface Burner Conversion Conventional
Burner
To Reassemble
NOTE Save all parts removed in conversion
Air Shutter
AIR SHUTTER 3/4 FLAME ORIFICE HOOD