Warranty can be found on
Example
Important Safety Instructions
Table of contents
Useful features
HDD Hard disk drive handling care
Inserting/Removing the SD card
Disc and card handling
Unit care
SAP
Using DVD-R, DVD-RW and +R on this unit
Playing the disc on other DVD players
Batteries Use
Accessories
Remote control
Play-only discs 12 cm 5z/8 cm 3z
HDD, disc and card information
HDD and discs you can use for recording and play
DVD Video Recording format DVD-Video format
Type
Cards useable on this unit
Discs that cannot be played
Data that can be recorded and played Instructions
RQT8307 Press the Smart Wheel lightly when turning it
These operations are also possible… ≥Changing channels
Unit’s display
Power button Power Í/I
Main unit
Opening the front panel
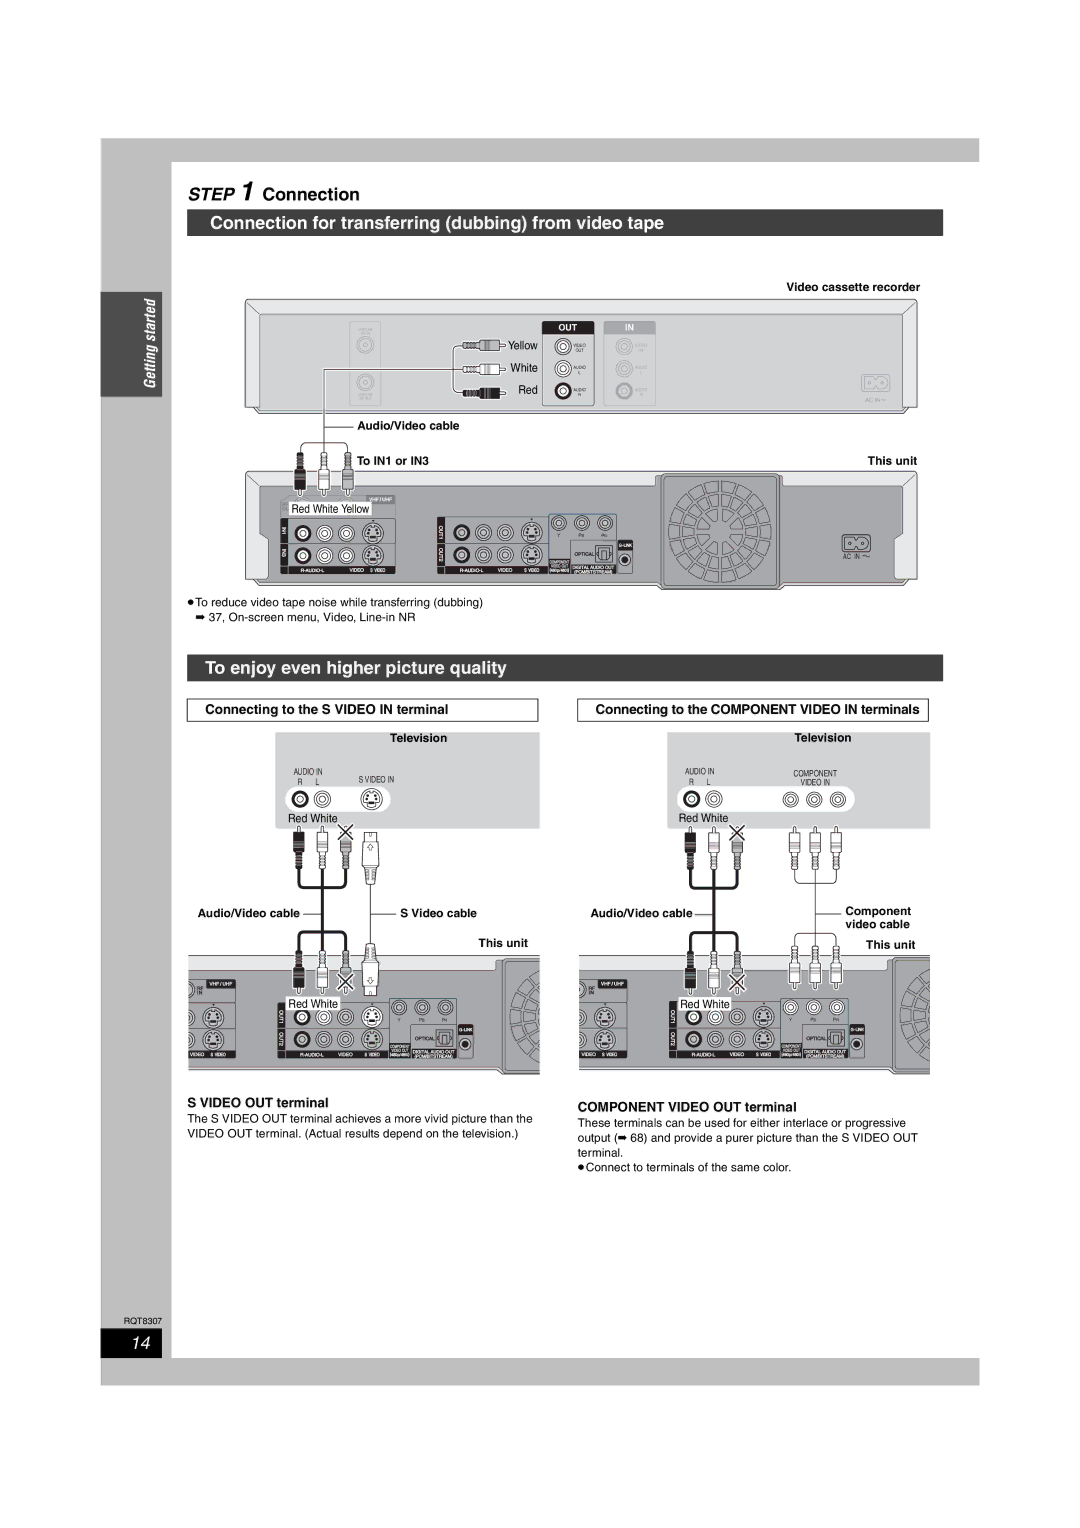
To enjoy even higher picture quality
When the unit is not to be used for a long time
Connection with a television and video cassette recorder
Sec. Quick Start for Recording & EPG Display
Setting the IR Blaster
Connection with a cable TV box and video cassette recorder
To enjoy even higher picture quality
Connection
Connection for transferring dubbing from video tape
Connecting an amplifier or system component
If the antenna connector doesn’t match
Input the operating environment for
Press Í DVD Power
Following the on-screen messages
Your television
Press Enter
Leave this unit in the standby mode
Set contents are displayed together
Return
Selecting television type
Press 3, 4 to select the item and press Enter
≥Aspect 43/Aspect
Power saving function
Press Setup
Press 3, 4 to select Setup
Television operation
Recording television programs
After recording
Recording modes and approximate recording times
Before recording
Flexible Recording
Selecting audio to record
Press Audio
Recording for High-Speed Dubbing
Playing while you are recording
Press TV Guide
Scheduled recording
Press the Green button
Press 3, 4, 2, 1 to select
Manually programming scheduled recordings
Enter the settings
To cancel recording when it has already begun
Press Schedule
Dubbing
Using VCR Plusi system to make scheduled recordings
Scheduled recording
Check, change or delete a program
Press 3, 4 to select the program
Registering a program you don’t want to miss as Favorite
Utilizing the TV Guide On ScreenTM system
To change to the selected channel
Messages screen
Setup screen
Change channel display menu-CHANNEL
Promotions screen
Playing recorded video contents/Playing play-only discs
Operations during play
Simple editing operations during play
Changing audio during play
Press TOP Menu
Using menus to play MP3
Using the tree screen to find a group
Press 3, 4 to select the track and press Enter
Playing still pictures JPEG/TIFF
Useful functions during still picture
Play
Press Display
Using on-screen menus/FUNCTIONS window and Status message
Using on-screen menus
Status messages
Functions window
Press 3, 4 to select an item
Press Status
Chapters
Editing titles/chapters
Editing titles/chapters and playing
Press 3, 4, 2, 1 to select the chapter
Combine
Title operations
Chapter operations
Press 2, 1 to select the position to
Creating, editing and playing playlists
Press 2, 1 to select the source title and press
Creating playlists
Select the operation and press Enter
Editing and playing playlists/chapters
Press SUB MENU, then 3, 4 to
Playlist operations
Editing still pictures
Picture and folder operation
Transferring dubbing titles or playlists
Transferring dubbing mode
Transferring dubbing speed mode types and features
Transferring dubbing direction
Set the transfer dubbing direction
Set the recording mode
One Touch Transfer dubbing
Transferring dubbing titles or playlists
Press 3, 4 to select Start Dubbing and press Enter
Set Time Limit
≥If you are not going to change the setting step
When the top menu is displayed
DVD-V HDD
Start play on the other equipment
Recording from a video cassette recorder
Manual recording
Press ¥ REC
Register still pictures for transfer dubbing
Transferring dubbing using the transferring dubbing list
Transferring dubbing still pictures
To register individual still pictures
Folder and press Enter Press 2, 1 to select
To select another folder
Structure of folders displayed by this unit
SD HDD or RAM
HDD, disc and card management
Common procedures
Setting the protection
Providing a name for a disc
Erasing all the contents of a disc or card-Format
Erasing all titles and playlists-Erase All Titles
Press 2, 1 to select Yes
Enabling discs to be played on other equipment
Press 3, 4 to select Finalize
Press 2, 1 to select Start
Press 3, 4, 2, 1 to select a character and press Enter
Entering text
Show Enter Name screen
Press Set
Setup
Changing the unit’s settings
Summary of settings
Press 3, 4 to select the tab and press
Video
Screen
Changing the unit’s settings
Tabs Menus
DTS
Press To select s1 or r1
Auto channel/clock settings
Adjust Time Zone
CH W
Press 3, 4 to select the first character and press
Channel captions
Press 3, 4 to select the caption and press
Press 2, 1 to return to the Channel Number column
On the unit’s display
Messages
On the television
PCM DTS
Frequently asked questions
Cover
TV Guide On Screen TM system
Troubleshooting guide
Cannot switch audio
Picture quality when adjusted
Low volume
Remote control doesn’t
Troubleshooting guide
Scheduled recording, the TV
On, and when you try to start
TV Guide On ScreenTM system As soon as the unit is turned
Display No Listing
≥This occurs as scenes change during Quick View
Title operation Start point Cannot erase chapters
Specifications
Tiff
Glossary
Product Service
Product information
If YOU Ship the Product to a Servicentre
Limited Warranty
Warranty Service
Panasonic Canada Inc
Memo
Index