The warranty can be found on page
DVD Recorder
Model No. DMR-EH60
RQT8307-P
IMPORTANT SAFETY INSTRUCTIONS
Getting started
RISK OF ELECTRIC SHOCK DO NOT OPEN
Table of contents
Useful features
remote control/Power saving function
Playing recorded video contents Playing play-only discs
∫ Setup precautions
∫ When moving the unit
∫ When “HDD SLP SLEEP” appears in the display
∫ Indemnity concerning recorded content
∫ How to hold a disc or card
∫ Handling precautions
Disc and card handling
Unit care
Using DVD-R, DVD-RW and +R on this unit
Therefore, follow the steps below when you use DVD-R, etc
∫ When recording an SAP program to DVD-R, etc
Restrictions with DVD-R, etc.§
Accessories
The remote control
∫ Batteries
∫ Use
HDD, disc and card information
HDD and discs you can use for recording and play
Play-only discs 12 cm 5z/8 cm 3z
∫ DVD Video Recording format
Cards useable on this unit
Discs that cannot be played
Getting started
Page
Main unit
The unit’s display
HDD REC
LP VR
∫ When the unit is not to be used for a long time
STEP 1 Connection
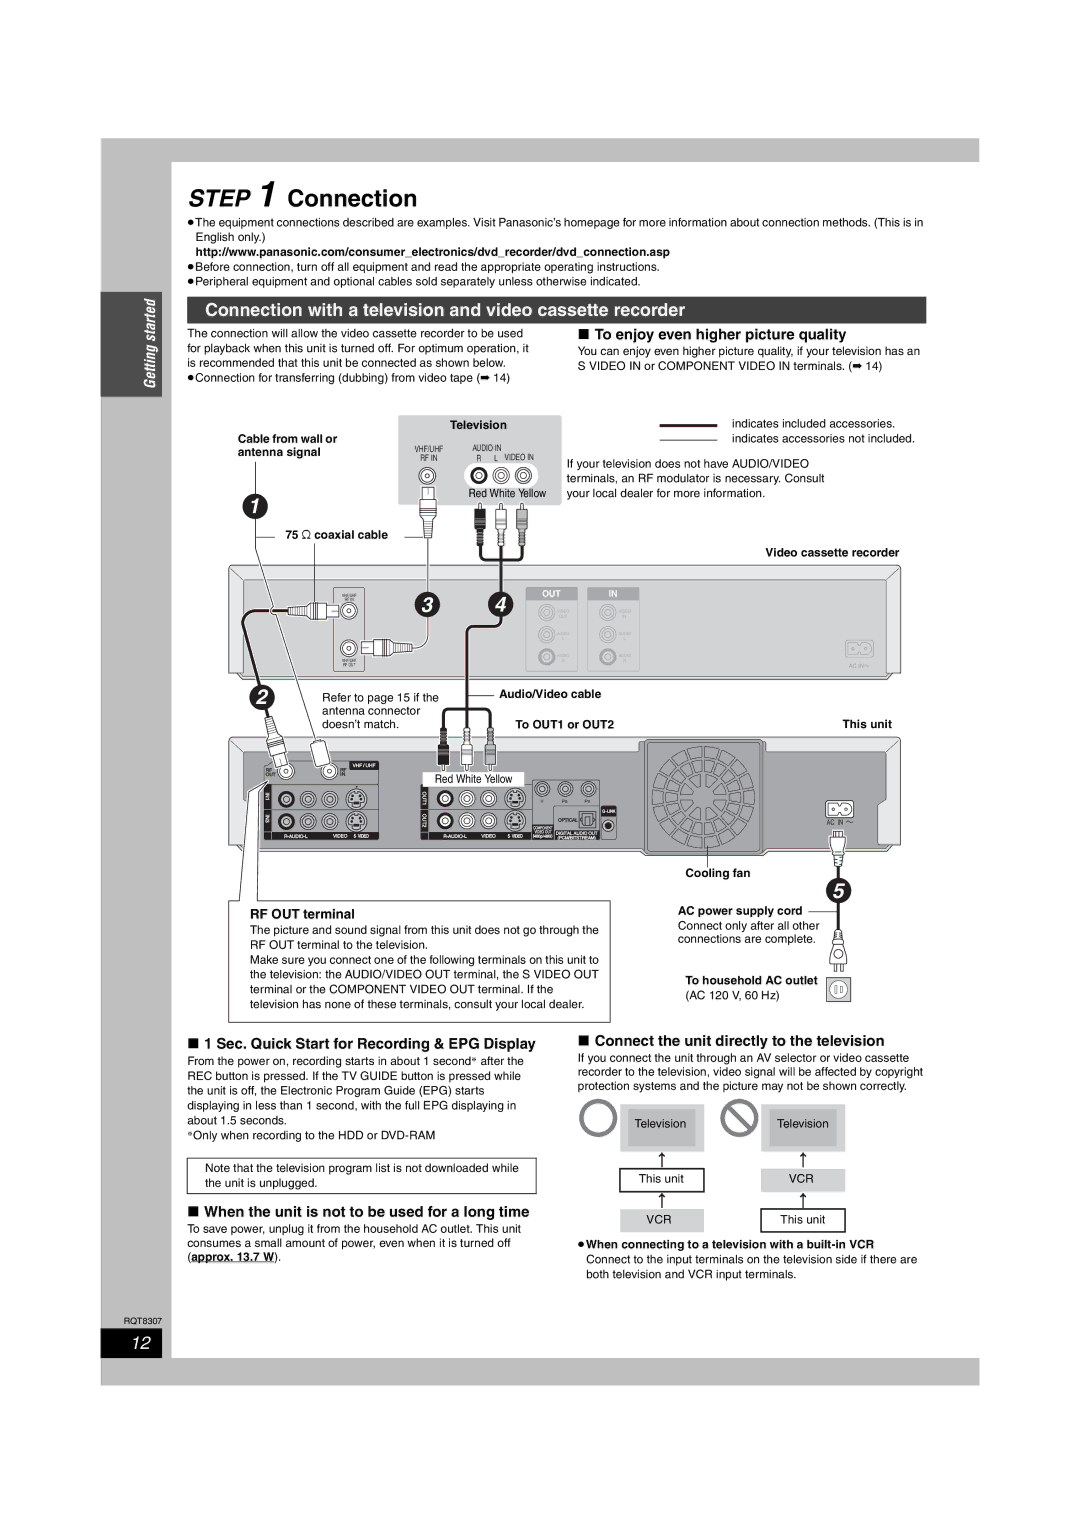
Connection with a television and video cassette recorder
∫ To enjoy even higher picture quality
∫ Why should I connect the IR Blaster?
Setting the IR Blaster
Connection with a cable TV box and video cassette recorder
∫ Should I use the AUDIO/VIDEO OUT terminal or
Connecting to the S VIDEO IN terminal
Connecting to the COMPONENT VIDEO IN terminals
STEP 1 Connection
Connection for transferring dubbing from video tape
Connecting an amplifier or system component
If the antenna connector doesn’t match
∫ Connection to a stereo amplifier
∫ To enjoy multi-channel surround sound on DVD-Video
STEP 2 Setting up the TV Guide On ScreenTM system
1 Press Í DVD POWER
2 Following the on-screen messages
input the operating environment for
4 Press Í DVD POWER
5 Leave this unit in the standby mode
∫ The set contents are displayed together
3 Press ENTER
Selecting television type
2 Press 3, 4 to select “TV Screen” and press
3 Press 3, 4 to select “TV Type” and press ENTER
4 Press 3, 4 to select the item and press ENTER
While pressing Í POWER TV enter the code with the numbered buttons
When other Panasonic products respond to this remote control
Press SETUP
Press 3, 4 to select “Setup” and
4 Press REC MODE to select the
recording mode XP, SP, LP, or EP
Recording television programs
Press OPEN/CLOSE on the main
Off Timer
When using DVD-RW
Recording modes and approximate recording times
Before recording
Select the audio Main or SAP in “Select MTS” in the SETUP menu
Press SETUP 2 Press 3, 4 to select “Disc” and press
3 Press 3, 4 to select “Settings for Recording” and press ENTER
∫ When recording MTS broadcasts
Press F Rec
Press 3, 4, 2, 1 to select “Start” and press ENTER
Playing while you are recording
Press 1 PLAY during recording
Using the TV Guide On ScreenTM system to make scheduled recordings
∫ To change the setting 1 Press SUB MENU to go to the Navigation menu
4 Change the setting as necessary and press ENTER
Scheduled recording
3 Enter the settings
∫ To cancel recording when it has already begun
Manually programming scheduled recordings
1 Press SCHEDULE
Scheduled recording
∫ To cancel recording when it has already begun
5 Press TV GUIDE
Recording
∫ To change the time, recording mode and recording drive
∫ When there is a duplicate or overlapping
Check, change or delete a program
2 Press 3, 4 to select the program
Utilizing the TV Guide On ScreenTM system
2 Press SUB MENU to go to the Navigation menu
3 Press 2, 1 to select the item and press
∫ To change to the selected channel
∫ “Change system settings” menu-Access to the
TV Guide On ScreenTM system setup screen
SETUP screen
∫ “Change channel display” menu-CHANNEL EDITOR
Playing recorded video contents/Playing play-only discs
1 Press HDD or DVD to select the playback drive
Press OPEN/CLOSE on the main unit to open the tray and insert a disc
3 Press 1 PLAY
∫ When a menu screen appears on the television
Operations during play
Stop
Pause
Playing recorded video contents/Playing play-only discs
Displaying the television image as a picture-in-picture
Skipping the specified time Time Slip
CM Skip
Using menus to play MP3
Using the tree screen to find a group
1 Press TOP MENU
2 Press 3, 4 to select the track and press ENTER
Playing still pictures JPEG/TIFF
Press HDD, DVD or
4 Press 3, 4, 2, 1 to select the still picture and press ENTER
SD to select the drive
Useful functions during still picture
play
Start Slide
Show
Using on-screen menus/FUNCTIONS window and Status message
Using on-screen menus
4 Press 3, 4 to select the setting
Common procedures
FUNCTIONS window
2 Press 3, 4 to select an item and
Status messages
Press STATUS
Editing titles/chapters
Editing titles/chapters and playing
chapters
Press DIRECT NAVIGATOR
Setup Protection§
Cancel Protection§
2 Press ENTER when the image you want to use as a thumbnail is shown
Title operations
Creating, editing and playing playlists
Press 3, 4 to select “PLAYLISTS” and press ENTER
Press 3, 4, 2, 1 to select “Create” and press ENTER
Press 2, 1 to select the source title and press
Editing and playing playlists/chapters
3 Press 3, 4 to select “PLAYLISTS” and press ENTER
4 Press 3, 4, 2, 1 to select the playlist
5 Press SUB MENU, then 3, 4 to
Editing still pictures
Press the “Green” button to select
“Picture”
3 Press 3, 4, 2, 1 to select the still picture
∫ Transferring dubbing mode
∫ Transferring dubbing speed mode types and features
Transferring dubbing titles or playlists
∫ Transferring dubbing direction
4 Set the recording mode
One Touch Transfer dubbing
1 Play the title or playlist you want to
transfer dub
6 Press 3, 4 to select “Start Dubbing” and press ENTER
Transferring dubbing list icons and functions
∫ To stop transferring dubbing
∫ To return to the previous screen
∫ Setting the unit to transferring dubbing according to the set time
5 Set “Time Limit”
DVD-V HDD
6 Press 3, 4 to select “Start Dubbing” and press ENTER
4 Press REC MODE to select the recording mode
2 Press REC MODE to select the recording mode
Recording from a video cassette recorder
Manual recording
Transferring dubbing using the transferring dubbing list
Transferring dubbing still pictures
Press FUNCTIONS 2 Press 3, 4 to select “DUBBING” and press ENTER
5 Register still pictures for transfer dubbing
Functions” and press ENTER 3 Press 3, 4 to select “COPY ALL
PICTURES” and press ENTER
∫ To select another folder
Press FUNCTIONS 2 Press 3, 4 to select “Other
Common procedures
Setting the protection
HDD, disc and card management
4 Press 3, 4 to select “Disc Protection” and press ENTER
Erasing all the contents of a disc or card-Format
Erasing all titles and playlists-Erase All Titles
6 Press 2, 1 to select “Start” and press ENTER
7 Press ENTER
Enabling discs to be played on other equipment
4 Press 3, 4 to select “Top Menu Style” and press ENTER
5 Press 3, 4, 2, 1 to select the background and press ENTER
6 Press 3, 4 to select “Playback will start with” and press ENTER
Entering text
1 Show Enter Name screen
2 Press 3, 4, 2, 1 to select a character and press ENTER
3 Press ∫ Set
Changing the unit’s settings
Summary of settings
Options Underlined items are the factory presets
Setup
Disc
Video
Options Underlined items are the factory presets
Tabs
Changing the unit’s settings
TV Screen
Options Underlined items are the factory presets
Tabs
Channel/Clock settings when TV Guide On ScreenTM system is not used
Auto channel/clock settings
1 Press SETUP 2 Press 3, 4 to select “Channel” and press
1 Press SETUP 2 Press 3, 4 to select “Setup” and press
1 Press SETUP
3 Press 3, 4 to select “Preset Channel Captions” and press ENTER
Channel captions
2 Press 3, 4 to select “Channel” and press
Messages
On the television
On the unit’s display
R
Frequently asked questions
Set up
Page
Disc
TV Guide On Screen TM system
On Screen TM system. If you select “No, repeat setup process”, you can then access the
Page
Reference
Troubleshooting guide
Reference
Reference
TV screen and video Continued
There is no apparent change in
with the Video menu in the on
Troubleshooting guide
Reference
There is no picture on the television
Reference
Cannot receive some channels
Some off-air or cable channels
are not listed on the television
Troubleshooting guide
You have forgotten your ratings
Specifications
Glossary
Product Service
Product information
Reference
Limited Warranty
PANASONIC/TECHNICS PRODUCT-LIMITED WARRANTY
Panasonic Canada Inc
Reference
Memo
RQT8307
Index
RQT8307-P
Panasonic Canada Inc