∫To cancel recording when it has already begun
Press [∫], then [ENTER] within 5 seconds.
≥You can also press and hold [∫] on the main unit for more than 3 seconds to stop recording.
≥There may be some channels that are not displayed in the television program list even if they are receivable. In this case set them manually (➡below).
Manually programming scheduled recordings
≥You can manually set the date, channel, start and end times and so on for programs you want to record.
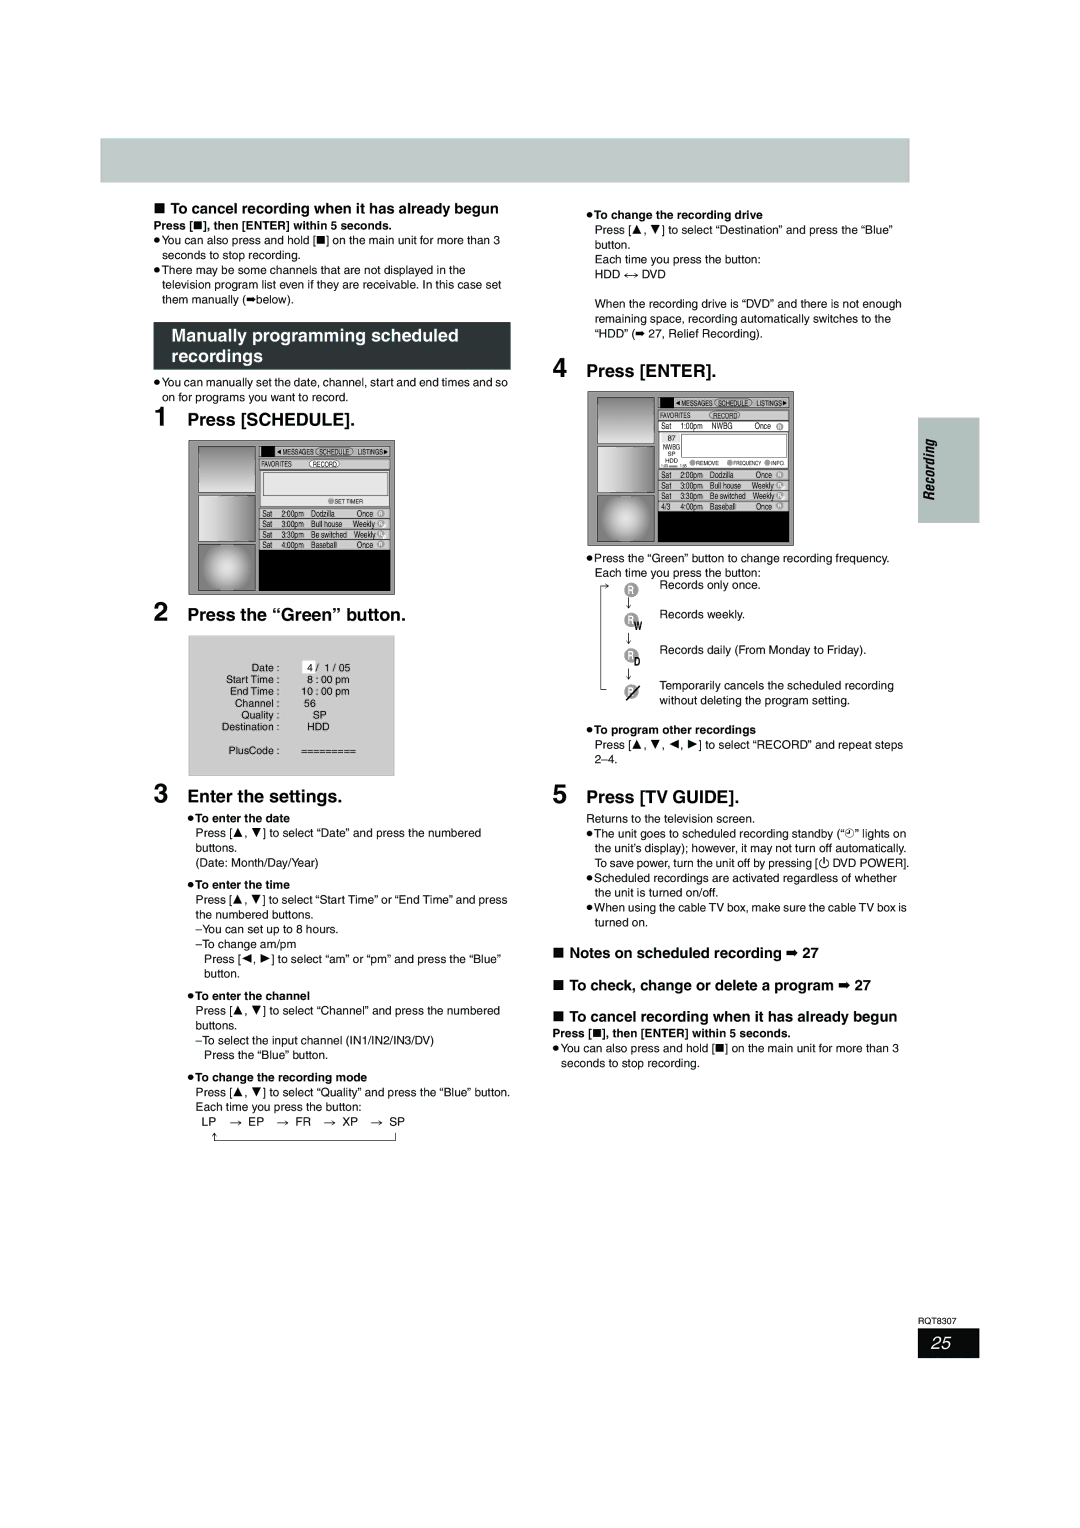
1 Press [SCHEDULE].
|
|
|
|
|
|
|
|
|
| MESSAGES SCHEDULE | LISTINGS | ||
|
| FAVORITES | RECORD |
|
| |
|
|
|
|
|
|
|
|
|
|
|
|
|
|
|
|
|
| SET TIMER |
| |
|
| Sat | 2:00pm | Dodzilla | Once | R |
|
| Sat | 3:00pm | Bull house | Weekly | RW |
|
| Sat | 3:30pm | Be switched | Weekly | RW |
|
| Sat | 4:00pm | Baseball | Once | R |
|
|
|
|
|
|
|
|
|
|
|
|
|
|
2 Press the “Green” button.
Date : |
|
|
|
|
| 4 |
| / 1 / 05 | |
Start Time : | 8 |
| : 00 pm | |
End Time : | 10 |
| : 00 pm | |
Channel : | 56 | |||
Quality : |
|
| SP | |
Destination : |
| HDD | ||
PlusCode : | ========= | |||
|
|
|
|
|
3 Enter the settings.
≥To enter the date
Press [3, 4] to select “Date” and press the numbered buttons.
(Date: Month/Day/Year)
≥To enter the time
Press [3, 4] to select “Start Time” or “End Time” and press the numbered buttons.
Press [2, 1] to select “am” or “pm” and press the “Blue” button.
≥To enter the channel
Press [3, 4] to select “Channel” and press the numbered buttons.
≥To change the recording mode
Press [3, 4] to select “Quality” and press the “Blue” button. Each time you press the button:
LP # EP # FR # XP # SP ^==============}
≥To change the recording drive
Press [3, 4] to select “Destination” and press the “Blue” button.
Each time you press the button:
When the recording drive is “DVD” and there is not enough remaining space, recording automatically switches to the “HDD” (➡ 27, Relief Recording).
4 Press [ENTER].
|
|
|
|
|
|
|
|
|
|
|
|
|
|
|
|
|
|
| MESSAGES SCHEDULE | LISTINGS |
|
| |||
|
|
|
| FAVORITES |
| RECORD |
|
|
|
| ||
|
|
|
| Sat | 1:00pm | NWBG | Once | R |
|
| ||
|
|
|
| 87 |
|
|
|
|
|
| Recording | |
|
|
|
| NWBG |
|
|
|
|
|
| ||
|
|
|
| SP |
|
|
|
|
|
| ||
|
|
|
| HDD |
| REMOVE FREQUENCY | INFO. |
| ||||
|
|
|
| 1:00 |
| 1:55 |
| |||||
|
|
|
|
|
|
|
|
|
| |||
|
|
|
| Sat | 2:00pm | Dodzilla | Once R |
| ||||
|
|
|
| Sat | 3:00pm | Bull house | Weekly RW |
| ||||
|
|
|
| Sat | 3:30pm | Be switched | Weekly RW |
| ||||
|
|
|
| 4/3 | 4:00pm | Baseball | Once R |
|
| |||
|
|
|
|
|
|
|
|
|
|
|
|
|
|
|
|
|
|
|
|
|
|
|
|
|
|
|
|
|
|
|
|
|
| |||||
≥Press the “Green” button to change recording frequency. |
| |||||||||||
| Each time you press the button: |
|
|
| ||||||||
[. | R | Records only once. |
|
|
| |||||||
|
| l | ; |
|
|
|
|
|
|
|
|
|
|
| l | RW | Records weekly. |
|
|
|
| ||||
|
| l |
|
|
|
|
|
|
|
|
| |
|
| l | ; | Records daily (From Monday to Friday). |
| |||||||
|
| RD |
| |||||||||
|
| l |
| |||||||||
|
|
|
|
|
|
|
|
|
|
| ||
|
| l | ; |
|
|
|
|
|
|
|
|
|
{ | R | Temporarily cancels the scheduled recording |
|
| without deleting the program setting. |
≥To program other recordings
Press [3, 4, 2, 1] to select “RECORD” and repeat steps
5 Press [TV GUIDE].
Returns to the television screen.
≥The unit goes to scheduled recording standby (“F” lights on the unit’s display); however, it may not turn off automatically. To save power, turn the unit off by pressing [Í DVD POWER].
≥Scheduled recordings are activated regardless of whether the unit is turned on/off.
≥When using the cable TV box, make sure the cable TV box is turned on.
∫Notes on scheduled recording ➡ 27
∫To check, change or delete a program ➡ 27
∫To cancel recording when it has already begun
Press [∫], then [ENTER] within 5 seconds.
≥You can also press and hold [∫] on the main unit for more than 3 seconds to stop recording.
RQT8307
25