Model No. KX-PS8000
Operating Instructions
Page
KX-PS8002
KX-PS8001
Term
End-User License Agreement
Helpful Phone Numbers
Technical Support Calls
Contents
Contents
Ozone Release
Power Source
Laser Safety
General
Moving the Units
Light Source
Laser diode properties
For Users in Australia
Before You Start
Static Electricity Damage
Interface Cable
Waste Disposal Method
Scanner Function
Features
Digital Duplicator Utility
Printer Function
Digital Duplicator Function
Image conversion function
Parallel interface requirement
System Requirements
Interface
Scsi interface requirements
Minimum Space Requirements
Scanner Box
Unpacking
Printer Box
Rear side view
Part Names
Scanner
Front side view
Printer
$ INCREASE/NEXT button
Mode button
Scanner Panel Overview
# LCD Liquid Crystal Display panel
Start B/W button
READY/ERROR indicator
Status Ready Indicator Error Indicator
STOP/RESET button Pressing this button BExits the Menu mode
Continue button
Cancel button
Printer Panel Overview
$ MENU/EXIT button
Ready indicator green
Error indicator orange
Preparing the Imaging Unit
Setting Up the Printer
Setting Up the Output Tray
Setup
Open the right side door
Installing the Toner Cartridges
Close the right side door
Repeat steps 1, 2 and 4 for each toner cartridge
Screwdriver until the lock pops out
Setting Up the Scanner
Unlocking the Scanner
Turn the scanner lock counterclockwise with a flat-blade
Rear of the scanner
Installing the Automatic Document Feeder
For method A, perform the following procedure
Installing the Scanner
Lock the scanner by sliding it toward the right
Scanner gently onto the printer
Loading Media
Loading Paper or Transparencies in the Media Tray
Tray Size
Setup
Slide the media tray completely into the slot
Place the media in the tray under the hooks
Legal
Margins and Print Area
Media Size Print area Margins Top Bottom Sides
Letter
Loading Media in the Multi-purpose Tray
Setting media thickness switch
Loading Paper, Transparency, Coated Paper
Setup
Loading Labels
Loading an Envelope
Connecting the System
Digital Color Imaging System Dcis Standard System P
Dcis Stand Alone System P
Connecting the Printer to a Computer P
Connecting the Scanner to a Computer P
Make sure the computer, scanner, printer and the other
Scanner’s Scsi connector a or B
To the scanner’s Scsi connector
Dcis Standard System
Printer’s AC inlet and to AC outlets
Connect the power cords to the scanner’s AC inlet, to
Dcis Stand Alone System
Outlet
AC outlet
Connecting the Scanner to a Computer
Make sure the computer, scanner and the other connected
Peripheral devices are turned off
Setup
Printer’s Scsi connector
Connecting the Printer to a Computer
Using a Scsi cable
Connect the Scsi cable to the computer’s Scsi connector
Default setting
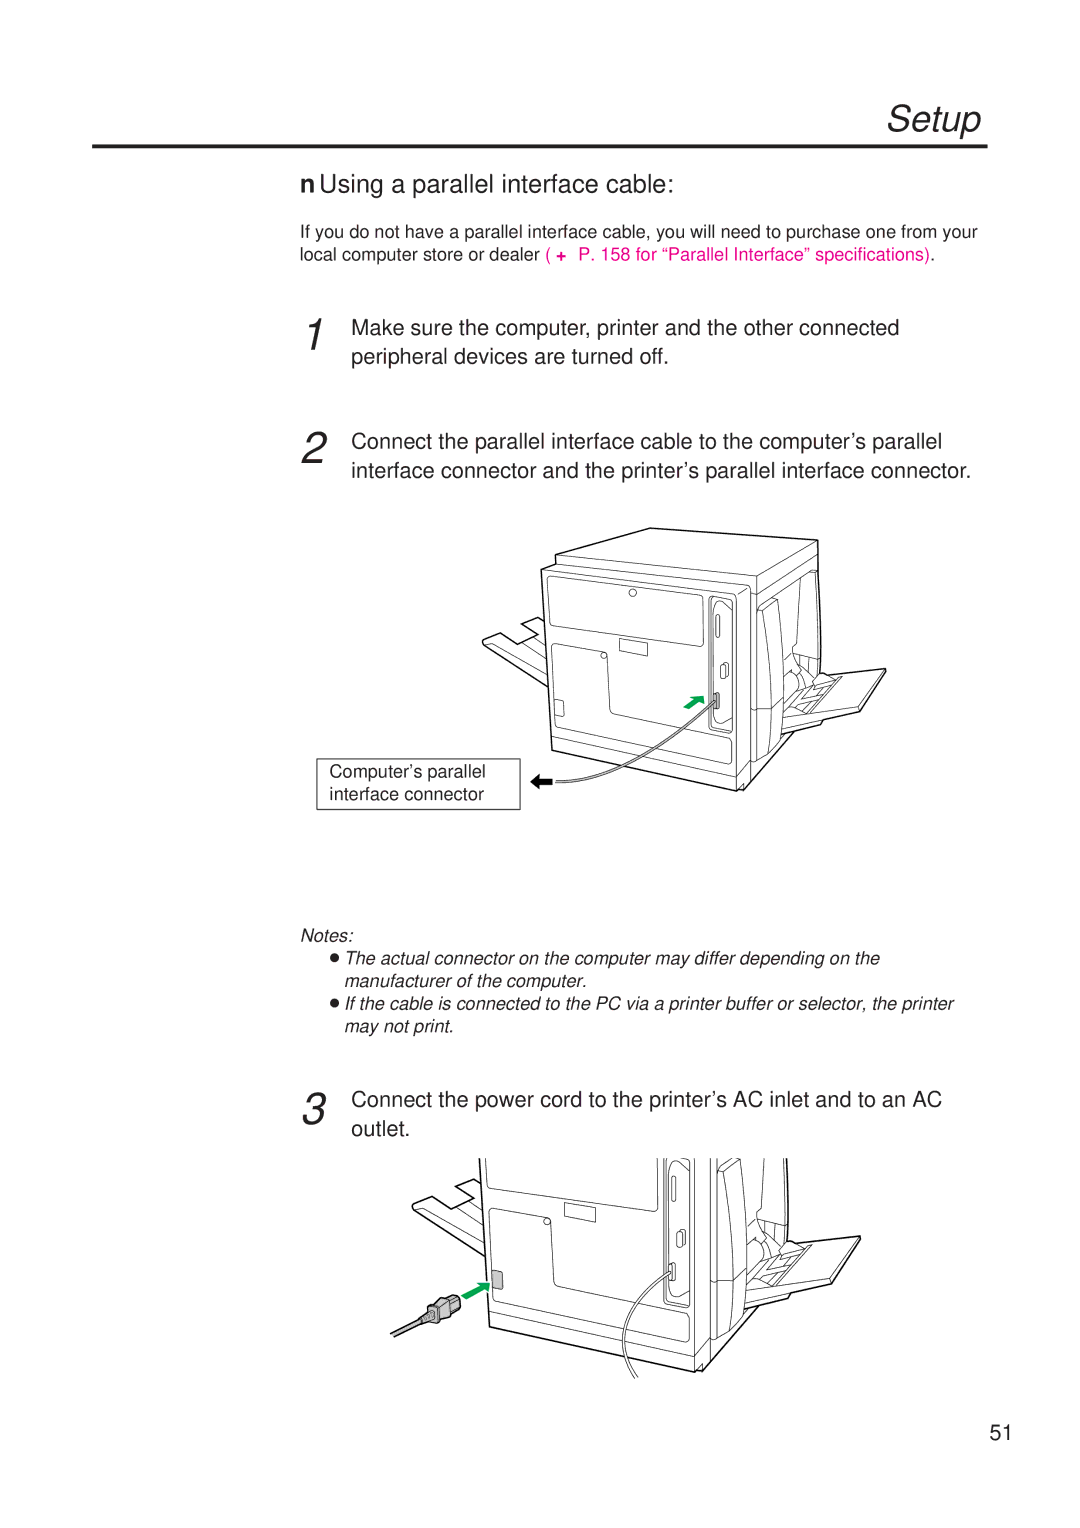
Computer’s parallel interface connector
Using a parallel interface cable
ID No Scsi ID No. switches
Setting the Scsi ID Number, Terminator
Setting the Scsi ID Number
Setting the Terminator
Power On
Press the Enter button again
Printing a Test Page From the Printer Panel
Installing the KX-PS8000 Software
Installing the Printer Driver and Utilities for Windows
Double click Add/Remove Programs
Click Install
Using Plug and Play
Installing the Printer Driver and Utilities for Windows NT
Click Have Disk
Click Browse
Open Drivers, Winnt40, Printer, then select pgdint.inf file
Installing the Scsi port
Click Add Port
Click New Monitor
Click New Port
Open Drivers, WinNT40, Printer, then select Monitor.inf file
Using the Printer in a Network Environment
For the server computer
Select the Panasonic KX-PS8000 printer
Next
For a client computer
Select Network printer server
Finish
Click Browse Select the KX-PS8000 printer
Open Drivers, Win95, Printer, then select Pgdi95.inf file
Have Disk
Removing the Printer Driver
Select Panasonic KX-PS8000
Click File menu, then click Delete Click Yes
For Windows 95 / Windows NT 4.0 users
Click Uninstall
Removing the KX-PS8000 Software
For Windows 3.1 users
Browse
Installing the Bundled Software
Insert the KX-PS8000 Driver & Utility CD-ROM into your
File Run
Box Select Instapp.exe, and click
Start Windows 95 / Windows NT
Click Move the pointer to Run..., then click
Start Run
Press the F button 5 times and the following is displayed
Setting the Color Density
$ Press the F button
Press the Enter button
Color Calibration Page Example
BIf they do not match, go to step
Compare the current color density settings on the Color
Calibration Card to see if they match
You may proceed with any operation you wish to perform
Press the F/I button to darken/lighten all the colors
Perform the following, then go to step
# Repeat instructions # through % of on
$ Press the Enter button
Press the Enter button to reprint the Color Calibration
Press the F/I button to darken/lighten the cyan color
For scanner glass
Before Operation
Acceptable Documents
Unacceptable Documents
Placing Documents
Using the ADF
Using the scanner glass
Adjust the document guides to the width of the documents
Start
Using the Digital Duplicator Utility
Duplicating Documents
Icon and double click the Digital Duplicator Utility icon
Image Type Original Document
$ Click
Button Print Type Original Document
Using the Scanner Panel
Multi-purpose Tray in the Paper Source menu P
Scanner Panel
Scanning Documents
Click Select Source
Click Corel PHOTO-PAINT
Scan
Click Acquire
Print
Printing a Scanned Document
Click the File menu, then click
Click OK
Enter the File Name Select the File Type Click Save
Saving a Scanned Document
Click the File menu, then click Save As
Enter the File Name Select the File Type Click OK
Main Menu Selection Menu Upper line in LCD
Scanner Menu Mode
Outline for Menus
After clearing a media jam in the printer
Jam Recovery
Menu Default
Energy Star
Outline for Operation
Main Menu Item Menu Selection 1 Menu Selection 2 Menu
Printer Menu Mode
Color Calibration
Test
Supplies Average life
System Setting
Maintenance
Network
Or display the desired selection
To the next item in the same menu that you selected in step
Printer Panel
Basic Operations
Cleaning
External
Internal
Cleaning the paper-pick rollers
Cleaning the home sensor
Slide the media tray back into place
Open the printer’s front door
Green surface Black belt
Handles
Use a dry, lint-free cloth to wipe the slot of the sensor
Printer component Printer panel message
User Replaceable Components
Care and Maintenance
When a jam occurs at the document input area
Clearing a Jam
100
101
When a jam occurs at the document output area
Clearing a media jam
Jam at MPT Jam at B Jam at C Jam at E Jam at a
Jam at D 102
Jam at a
or
103
104
2nd cassette feeder
105
Jam at B
Jam at C
Remove the fuser
106
107
108
109
110
Jam at D
111
Jam at E
Remove the jammed media from the output tray
112
113
Jam at MPT Multi-purpose tray
Troubleshooting
114
Trouble Possible Cause Corrective Action
115
116
117
118
119
120
121
122
If you can’t make a print
123
Problems with image size and position
124
Print quality problems
125
Error Messages
Error Message Possible Cause Corrective Action
Scanner LCD Panel
126
Printer LCD Panel
127
128
129
Status Display Program
130
Scanner Status Dialog Box
131
132
Printer Status Dialog Box
133
Repacking
134
Material required
135
Packing the Scanner
Cables
Scanner by sliding it toward the left
136
Packing material into the media tray
Packing the Printer
Remove the media trays from the printer remove the media
From the trays
# Open the printer’s front door
Secure the tray to the printer
If you have other media trays, repack them for shipping or
Storage in their original shipping boxes
Wrap the imaging unit with a protective black plastic sheet
Insert the imaging unit into the packaging
139
140
141
Packing the toner cartridges
# Open the right side door $ Remove a toner cartridge
142
143
Wipe off any loose toner in and around the printer
Tape
If you have a 2nd Cassette Feeder
144
145
Specifications
146
Printing method
Mass Weight of standard unit with all consumables
147
Warm-up time
Plain Paper Legal Transparency Color Mono
148
Paper output
Maximum printing speed
Altitude
149
150
Medium Size Dimensions
Media
Media Sizes
151
Paper Weight
Types of Paper to Avoid
Two-Sided Printing
152
Transparencies and Labels
153
Envelopes
For best printing results
154
155
Duplicate
Bundled Software
Software
156
System Requirement
Scsi Interface
Specifications
Pin Configuration Signal Pin
Scsi Interface Connector Printer and Scanner side
Parallel Interface
Pin configuration Signal Pin Return Side pin
Signal Pin Return Side pin
Parallel Interface connector printer side
159
Index
160
Index
161