IM-6
Consumer Support . . . . Back Cover Warranty
Read and Save These Instructions
It is normal for several cubes to be joined together
About the automatic icemaker
Icemaker is not plugged
Icemaker is not turned on
Correctly
Water line is kinked
Fill tube not correctly seated in fill cup
Temperature control not
House supply not properly
Connected to the water valve
Completion time 20-60 minutes
Which Instructions should YOU FOLLOW?
Read these instructions completely and carefully
Contents of KIT IM-6
Installation Instructions
Icemaker Fill Cup side-mounted
Water Valve and Tube Assembly
Water Line Clamp strain relief
Remove Existing ICE Tray Holder
Reposition or Remove Freezer Shelves
Icemaker Installation Instructions C
Install the ICE Bucket
Install the Icemaker Fill CUP
Attach Warranty Label
Plug in the Icemaker
Remove the Cover
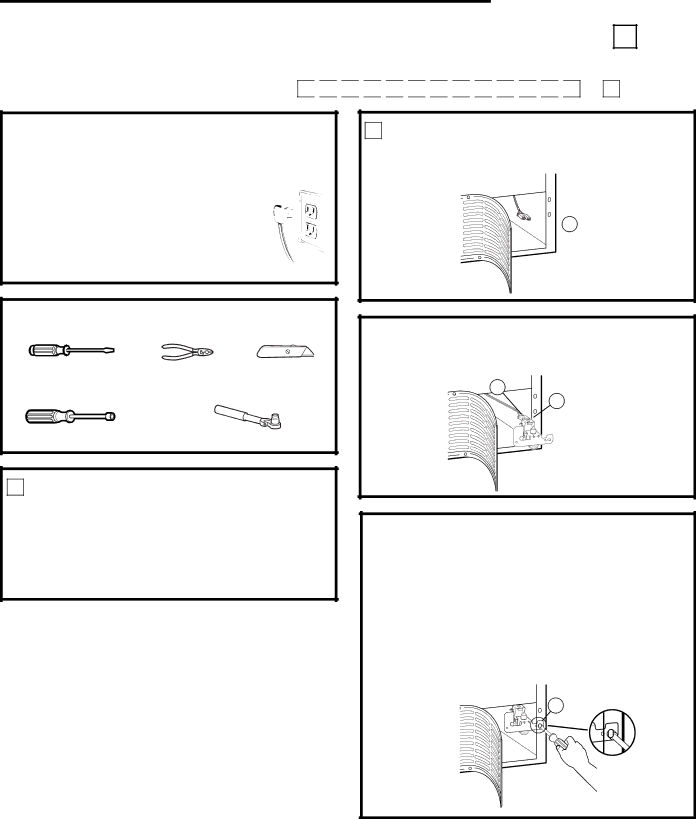
Water Valve Assembly Installation Instructions C
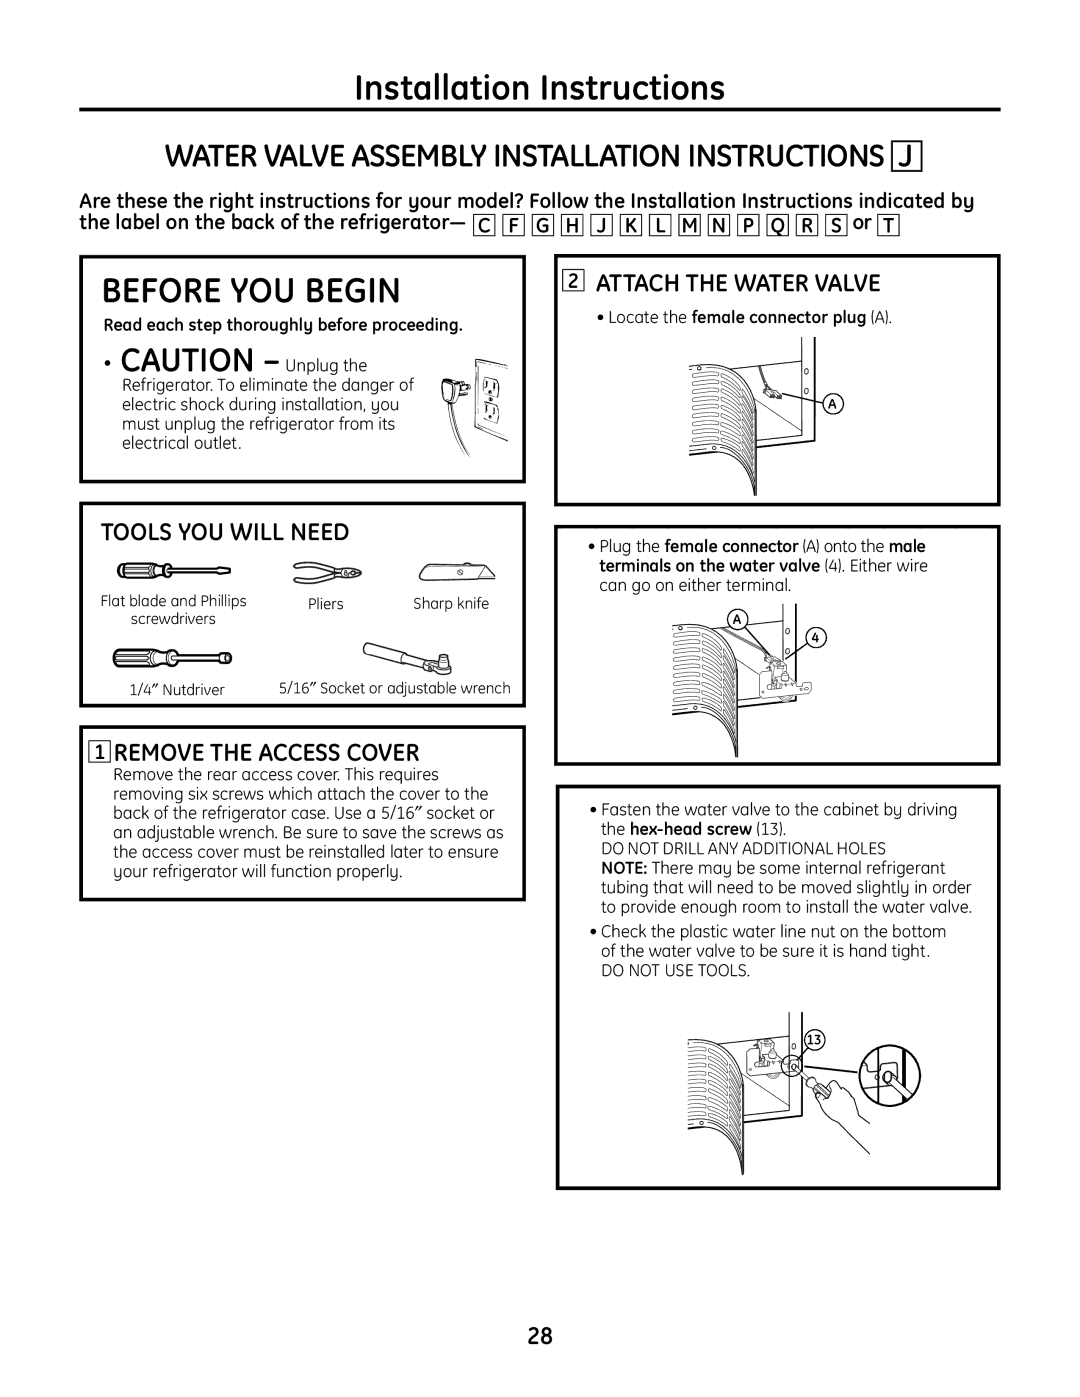
Attach the Water Valve
16″ Nutdriver
Water Valve Installed
Install Water Line Clamp
Route the Plastic Water Line
Connect the Water Line
Loosen Mounting Screws
Icemaker Installation Instructions F
Remove Plug Cover
Reinstall the Electric Plug Cover
″ Nutdriver
Water Valve Assembly Installation Instructions F
Attach the metal water line clamp strain relief
On the tube side of the water tube inlet 15 there
Icemaker Installation Instructions G
Install Water Tube Inlet
Mount Icemaker
Make sure the icemaker Power switch is set to
″ and 5/16″ Nutdrivers
Water Valve Assembly Installation Instructions G
Locate the female connector plug B
Adhesive-backed fasteners for plastic water line
Remove the screw and pull the cover off
Icemaker Installation Instructions H
Power Cord Adapter
″ and 5/16″ Nutdriver
Water Valve Assembly Installation Instructions H
Do not OVER-TIGHTEN the Screw
Install Fill Tube
Icemaker Installation Instructions J
″and 5/16″ Nutdriver or adjustable wrench
Prepare the Refrigerator
Place the icemaker on its Side as shown. Insert
Icemaker power cord plug
Locate the female connector plug a
Water Valve Assembly Installation Instructions J
Remove the Access Cover
Plastic water line
Remove Fill Hole Plug
Icemaker Installation Instructions K
Install Mounting Bracket
Install the Icemaker Fill CUP and Insert
Connector plug C. Plug Water valve wire
Water Valve Assembly Installation Instructions K
Female connector plug
White female connector B onto the blue male
Route and Attach the Plastic Water Line
Replace the screws but do not screw them all
Icemaker Installation Instructions L
Cut the fill tube extension
Install the Icemaker Fill CUP
Cabinet leg
Water Valve Assembly Installation Instructions L
Install Water Line Clamp
Remove the Outlet Cover
Icemaker Installation Instructions M
Remove the outlet cover with a flat-blade screwdriver
Inside the freezer, loosen the two mounting screws
Two screws
Water Valve Assembly Installation Instructions M
Install Water Line Clamp
Go to the back of the refrigerator
Icemaker Installation Instructions N
Slide the fill tube with foil Onto the water tube inlet
Then Securely Tighten the Icemaker Mounting Screw
Water Valve Assembly Installation Instructions N
Connect the Water Line
Water tube inlet 15 there
Icemaker Installation Instructions P
Socket on the rear
Power cord plug D into
Holding the icemaker in place, insert the icemaker
Wall, making sure the prongs and holes are
Water Valve Assembly Installation Instructions P
Connect the Water Line
Icemaker Installation Instructions Q
Install the Icemaker Fill CUP
Water Valve Assembly Installation Instructions Q
Do not overtighten the screw
Install the Mounting Block
Icemaker Installation Instructions R
Parts Required That Came with the Refrigerator
Hole. Pull out the insulation plug Any debris
Place the lower freezer basket back into the freezer drawer
Locate the female connector plug C
Water Valve Assembly Installation Instructions R
Adhesive-backed
Prepare for Installation
Icemaker Installation Instructions S
Icemaker is level Icemaker power switch is set to OFF
Install the Mounting Screws
RE-INSTALL the Shelf Support BUCKET, Shelf and Basket
″ and 5/16″ Nutdrivers Tape measure
Water Valve Assembly Installation Instructions S
CUT Plastic Water Tubing
Route and Attach the Water Tube
Using one of the adhesive-backed fasteners
Connect Water Tube to Inlet
Replace Feeler ARM
Icemaker Installation Instructions T
Verify free rangeand Feeler Arm of motion Feeler arm
Hold feeler arm while tightening Phillips head screw
Install the Mounting Screws
Water Valve Assembly Installation Instructions T
Remove the Tube Cover
Before YOU Begin
Installing the Water Line
What YOU will Need
15 ′ 4.6 m
Drill the Hole for the Valve
Choose the Valve Location
Fasten the Shutoff Valve
Two 1/4″ outer diameter compression nuts
Route the Tubing
Tighten the Pipe Clamp
Connect the Tubing to Valve
Flush OUT the Tubing
Plug in the Refrigerator
Icemaker power switch is in the on position
Start the Icemaker
Turn the Water on AT the Shutoff Valve
Cut the fill tube 16 to this length for 99/16″ 24.3 cm
Ubetemplatestfill
21 cm
13.3 cm
This length for L
Fill Tube Extension Templates
Replacement of house fuses or resetting of circuit breakers
Icemaker Warranty
Elle vous dira si vous devez utiliser les instructions
Mesures de sécurité
La machine à glaçons automatique
La conduite d’eau est tordue
La machine à glaçons n’est pas bien branchée
Ou n’est pas branchée
Glaçons Le robinet d’eau n’est pas bien branché
La conduite d’eau n’est pas
Robinet d’eau
Branchée au raccord d’arrivée
De conduite d’eau
Durée requise pour l’installation 20-60 minutes
Dommages Expédition Installation
Quelles Instructions DEVEZ-VOUS SUIVRE?
Lisez ces instructions complètement et attentivement
Contenu DE LA Trousse IM-6
Instructions d’installation
Machine à glaçons
Liste de pièces
Dispositif de fixation de conduite ’eau avec envers adhésif
Glaçons montage de côté
Enlevez LE Support Actuel DE Plateau À Glaçons
Support de Clayette Monture de base
Outils Nécessaires
Instructions D’INSTALLATION DE LA Machine Glaçons C
Préparez Votre Installation
Montez LA Machine À Glaçons
Branchez LA Machine À Glaçons
Adaptateur DE Cordon D’ALIMENTATION Électrique
Un adaptateur de cordon d’alimentation électrique
Collez L’ÉTIQUETTE DE Garantie
Installez LE BAC À Glaçons
Conservez CE Manuel
Enlevez LE Couvercle
Placez LA Conduite D’EAU EN Matière Plastique
Fixez LE Robinet D’EAU
Fixez LE Collier DE Serrage
Branchez LA Conduite D’EAU
UNE Fois LE Robinet D’EAU Installé
Fixez LA Conduite D’EAU EN Matière Plastique
Pincez les extrémités du collier de serrage de tuyau
Enlevez LE Couvercle DE LA Prise Électrique
Instructions D’INSTALLATION DE LA Machine Glaçons F
Dévissez LES VIS DE Montage
La prise
Adaptateur DE Cordon ’ALIMENTATION Électrique
Mettez le commutateur de marche de la machine à
Accrochez la machine à glaçons aux deux vis de montage a
Mettez le bac à glaçons
Tourne-écrou de 1/4″
Trouvez la prise du connecteur femelle C
Montez LE Collier DE Serrage DE LA Conduite D’EAU
Desserrez LES VIS DE Montage
Instructions D’INSTALLATION DE LA Machine Glaçons G
Enlevez LE Couvercle DE LA Prise
Adaptateur DE Cordon ’ALIMENTATION Électrique
Montez LA Machine À Glaçons
Tourne-écrou de 1/4 po et 5/16 po
Trouvez la prise du connecteur femelle B
Branchez LA Conduite D’EAU
Coupez la conduite ’alimentation 16 à la
Instructions D’INSTALLATION DE LA Machine Glaçons H
Desserrez LES VIS DE Montage
Assurez-vous bien que
Collez L’ÉTIQUETTE DE Garantie
’alimentation
Instructions D’INSTALLATION DE L’ENSEMBLE DE Robinet D’EAU H
101
Préparez Votre Réfrigérateur
Instructions D’INSTALLATION DE LA Machine Glaçons J
Si votre réfrigérateur a une clayette de plateau
Coupez la conduite
Placez la machine à
Enlevez LE Couvercle DE LA Prise Électrique
Fixez LA Machine À Glaçons
Et Phillips Tourne-écrous de 1/4 po
Enlevez LE Couvercle D’ACCÈS
Trouvez la prise du connecteur femelle a
Du robinet d’eau
Installez LE Support DE Montage
Instructions D’INSTALLATION DE LA Machine Glaçons K
Montez LE Tuyau D’ALIMENTATION Isolé
Enlevez LE Capuchon DU Trou D’ALIMENTATION
Installez le récipient de remplissage de la machine
Mettez le bac à glaçons 11 sous la machine à glaçons
Conservez LE Présent Manuel
La machine à glaçons soit bien fixée au support
Fixez LE Robineau D’EAU
111
Installez LA Conduite ’ALIMENTATION D’EAU
Instructions D’INSTALLATION DE LA Machine Glaçons L
Enlevez LA Clayette DU Plateau À Glaçons
La longueur Consultez le Gabarit L
Installez LE Récipient DE Remplissage
Mettez le bac à glaçons enplace sous la machine à glaçons
Tourne-écrous de 5/16 po et de 1/4 po
Instructions D’INSTALLATION DE L’ENSEMBLE DE Robinet D’EAU L
116
Coupez la conduite d’alimentation 16 à la
Instructions D’INSTALLATION DE LA Machine Glaçons M
118
119
Instructions D’INSTALLATION DE L’ENSEMBLE DE Robinet D’EAU M
121
Tournevis à lame Pinces
Instructions D’INSTALLATION DE LA Machine Glaçons N
’eau
Installez LA Conduite ’ALIMENTATION
’alimentation garnie du
De montage
Instructions D’INSTALLATION DE L’ENSEMBLE DE Robinet D’EAU N
126
Instructions D’INSTALLATION DE LA Machine Glaçons P
Adhésif. Enlevezcet endos adhésif et faites glisser
Du côté de la conduite
Mettez le commutateur de marche de la machine
Montez la clayette du compartiment congélation
Vis de montage C Assurez-vous bien que
Instructions D’INSTALLATION DE L’ENSEMBLE DE Robinet D’EAU P
131
Instructions D’INSTALLATION DE LA Machine Glaçons Q
La longueur Q consultez le Gabarit Q page 154 avec un
’alimentation 16 à
Lame de rasoir
Du côté de la conduite du
134
Tourne-écrous de 1/4 po et de 5/16 po
Instructions D’INSTALLATION DE L’ENSEMBLE DE Robinet D’EAU Q
136
’alimentation d’eau 16 dans Le raccord de conduite
Instructions D’INSTALLATION DE LA Machine Glaçons R
’alimentation d’eau
Vis à tête
Mettez LE Commutateur DE
Installez LE Bloc DE Montage
DE LA Machine À Glaçons
’aide des vis à tête Phillips
Enlevez le panier de gauche en le détachant
Instructions D’INSTALLATION DE L’ENSEMBLE DE Robinet D’EAU R
141
Instructions D’INSTALLATION DE LA Machine Glaçons S
Etlepanier
Montez Lamachine Àglaçons
COLLEZL’ÉTIQUETTEDEGARANTIE
Du compartiment congélation
Instructions D’INSTALLATION DE L’ENSEMBLE DE Robinet D’EAU S
Placez LA Conduite D’EAU ET FIXEZ-LA AU Réfrigérateur
Branchez LA Conduite D’EAU AU Raccord DE Conduite
Dispositifs de fixation Avec envers adhésif
Conduite allant du robinet d’eau jusqu’au raccord
Remplacement DU Bras Palpeur
Instructions D’INSTALLATION DE LA Machine Glaçons T
Retournez la machine à glaçons
Sur l’arbre
Mettez deux vis auto
ET LE Panier
Passez à l’étape 6 si les vis sont
Instructions D’INSTALLATION DE L’ENSEMBLE DE Robinet D’EAU T
Attraper la
Enlevez LE Couvercle DE Conduite D’EAU
CE Dont Vous Aurez Besoin
Installation DE LA Conduite D’EAU
Avant DE Commencer
CE Dont Vous Aurez Besoin Suite
Percez UN Trou Pour LE Robinet
Branchez LE Tuyau AU Robinet
Fixez LE Robinet D’ARRÊT
Serrez LE Collier DE Serrage
Acheminez LE Tuyau
Branchez LE Tuyau À Votre Réfrigérateur Suite
Branchez Votre Réfrigérateur
Du réfrigérateur
Le collet
’eau 16 à cette longueur pour P
Nmjhgp Q R
Coupez la rallonge de conduite d’alimentation d’eau
Gabarits DE Rallonge DE Conduite ’ALIMENTATION
Cette longueur pour
’eau 10 à cette longueur pour G et M
156
Garantie de la machine à glaçons
Bureau 310, 1 Factory Lane Moncton, N.B. E1C 9M3
Visitez notre site Web ou appelez-nous au
192-195
Podría escuchar
196-199
200-203
Sobre la máquina automática de hielos
Está encendida
La máquina de hielos no
La tuberîa de agua está enroscada
El suministro de agua está
La tubería de agua no está
La válvula de agua
Conectada a la entrada para
La tubería del agua
Lea estas instrucciones completa y cuidadosamente
Daños EN EL Envío / Instalación
Dejar estas instrucciones con el consumidor
Tiempo de instalación 20-60 minutos
Contenido DEL KIT IM-6
Instrucciones para la instalación
Cables de amarre
Sujetadores de la tubería del Agua con adhesivo posterior
Esta parte
Cómo Retirar EL Soporte Existente DE LA Bandeja DE Hielos
Cómo Reemplazar O Retirar LOS Estantes DEL Congelador
Herramientas Necesarias
Instrucciones Para LA Instalación DE LA Máquina DE Hielos C
Prepárese Para LA Instalación
Instale Extensión DEL Tubo DE Llenado
Conecte LA Máquina DE Hielos
Instale LA Taza DE Llenado
Monte LA Máquina DE Hielos
Instale LA Cubeta DE Hielos
Retire LA Cubierta
Instale LA Válvula DEL Agua
Llave de 5/16″
Cualquier cable puede ir en cualquier terminal
Dirija LA Tubería Plástica DEL Agua
UNA LA Abrazadera DE Alivio DE Presión
Conecte LA Tubería DEL Agua
Instale LA Tubería Plástica DEL Agua
Afloje LOS Tornillos DEL Montaje
Instrucciones Para LA Instalación DE LA Máquina DE Hielos F
Instale EL Tubo DE Llenado
Adaptador Para EL Cable
La sexta ranura arriba de la parte inferior del carril
Reinstale LA Cubierta DEL Enchufe Eléctrico
Llave de 1/4″
Instale LA Abrazadera DE LA Tubería DEL Agua
Retire LA Cubierta DEL Enchufe
Instrucciones Para LA Instalación DE LA Máquina DE Hielos G
Instale LA Entrada DE LA Tubería DE Agua
177
Del kit . no Perfore Ningún Orificio Adicional
Llave de 1/4″ y 5/16″
De hielos en la posición de on encendido
Presione los extremos de la abrazadera para manguera
Instrucciones Para LA Instalación DE LA Máquina DE Hielos H
Levante la máquina de hielos de manera que el tubo
182
183
Instale LA Entrada DE LA Tubería
Instrucciones Para LA Instalación DE LA Máquina DE Hielos J
Llave de 1/4″ y 5/16″ o una llave ajustable
En el lado del tubo de la entrada
185
Retire LA Cubierta DE Acceso
187
Instale EL Tubo DE Relleno
Instrucciones Para LA Instalación DE LA Máquina DE Hielos K
Instale EL Sostenedor DE Montaje
Retire EL Tapón DE Relleno DE Orificio
La máquina de
Montaje LA Máquina DE Hielos
La válvula de agua macho azul
Herramientas Necesarias Conecte LA Válvula DEL Agua
Llave de 1/4″ y 5/16″ o llave ajustable
Dirija E Instale LA Tubería Plástica DEL Agua
Llave de 1/4″ o una llave ajustable
Instrucciones Para LA Instalación DE LA Máquina DE Hielos L
Instale LA Extension DE LA Tubería
193
194
195
La entrada de la tubería del agua
Instrucciones Para LA Instalación DE LA Máquina DE Hielos M
197
198
199
En la parte posterior del Refrigerador, en el lado del tubo
Instrucciones Para LA Instalación DE LA Máquina DE Hielos N
201
202
203
Orificio cerca de la parte
Instrucciones Para LA Instalación DE LA Máquina DE Hielos P
Destornillador de pala Alicates Cuchilla
205
Destornillador de 1/4″ y 5/16″
207
Vaya a la parte posterior del
Instrucciones Para LA Instalación DE LA Máquina DE Hielos Q
Hasta la longitud Q consulte
209
210
211
Partes Necesarias QUE Vienen CON EL Refrigerador
Instrucciones Para LA Instalación DE LA Máquina DE Hielos R
Instale EL Bloque DE Montaje
Tornillos de
213
214
Se muestra para tensar la tubería
Instrucciones Para LA Instalación DE LA Máquina DE Hielos S
REINSTALEELAPOYODELESTANTE, CUBETA, Estante Y Canasta
Instalelostornillos Demontaje
Phillips 14 que se encuentran
Partir de la pared lateral
Apriete la válvula de agua en el gabinete insertando
Corte EL Tubo Plástico DEL Agua
Cinta métrica
Se muestra
Conecte LA Tubería DEL Agua a LA Entrada
Dirija E Instale LA Tubería DEL Agua
Reemplace EL Brazo DEL Sensor
Instrucciones Para LA Instalación DE LA Máquina DE Hielos T
Movimiento del brazo
Del sensor
221
222
Retire LA Cubierta DE LA Tubería
Antes DE Iniciar
Instalación DE LA Tubería DEL Agua
QUÉ Necesita
El martilleo del agua agua golpeando contra la tubería
Perfore EL Orificio Para LA Válvula
Cierre EL Suministro Principal DE Agua
Conecte LA Tubería a LA Válvula
Instale LA Válvula DE Cierre
Apriete LA Abrazadera DEL Tubo
Dirija LA Tubería
Conecte LA Tubería AL Refrigerador
Conecte EL Refrigerador
Inicie LA Máquina DE Hielos
4 ″
Corte el tubo de llenado 16 a esta longitud para
Corte el tubo de llenado 16 a esta
Longitud para
8 ″
Guías DE LA Extensión DEL Tubo DE Llenado
Garantía de la máquina de hielos
Servicio al consumidor Página Web de GE Appliances
Canada, call
Consumer Support