| DATE/ | PHOTO |
| START/ |
|
OSD |
| STOP |
| ||
TIME | SHOT |
|
|
| |
COUNTER RESET | TITLE |
| ZOOM |
| |
MULTI/ |
|
|
| T |
|
¥REC | A.DUB |
|
|
| |
r |
|
| |||
|
|
| sVOL |
| 2 |
V/REW | PLAY | FF/W |
| W | |
6 | 1 | 5 |
|
| |
|
|
| |||
STILL ADV | PAUSE | STILL ADV |
|
|
|
E | ; | D |
|
|
|
INDEX | STOP | INDEX |
|
|
|
K | ∫ | L |
|
|
|
SELECT | VAR. |
|
| P.B. | 1 |
|
|
| |||
| SEARCH |
|
| ZOOM | |
STORE |
| MENU |
|
| |
|
|
|
| 3 | |
OFF/ON |
|
|
| SET | |
|
|
|
| ||
ITEM
P.B.DIGITAL
PB ZOOM 2t
|
| DATE/ | PHOTO | START/ |
| OSD | STOP | ||
| TIME | SHOT |
| |
| COUNTER RESET | TITLE | ZOOM | |
| MULTI/ |
|
| T |
| ¥REC | A.DUB |
| |
| r | |||
1 |
|
|
| sVOL |
V/REW | PLAY | FF/W | W | |
6 | 1 | 5 | ||
| STILL ADV | PAUSE | STILL ADV |
|
| E | ; | D |
|
| INDEX | STOP | INDEX |
|
| K | ∫ | L |
|
2 | SELECT | VAR. |
| P.B. |
|
| |||
|
| SEARCH |
| ZOOM |
| STORE |
| MENU |
|
|
|
|
| |
| OFF/ON |
|
| SET |
1 |
|
| ITEM | |
P.B.DIGITAL
|
| DATE/ | PHOTO | START/ | |
| OSD | STOP | |||
| TIME | SHOT |
| ||
| COUNTER RESET | TITLE | ZOOM | ||
| MULTI/ |
|
| T | |
| ¥REC | A.DUB |
| ||
| r | ||||
1 |
|
|
| sVOL | |
V/REW | PLAY | FF/W | W | ||
6 | 1 | 5 | |||
| |||||
|
| ||||
| STILL ADV | PAUSE | STILL ADV |
| |
| E | ; | D |
| |
| INDEX | STOP | INDEX |
| |
| K | ∫ | L |
| |
2 | SELECT | VAR. |
| P.B. | |
|
| ||||
|
| SEARCH |
| ZOOM | |
3 | STORE |
| MENU |
| |
|
|
| |||
4 | OFF/ON |
|
| SET | |
|
|
| |||
P.B.DIGITAL |
|
| ITEM | ||
WIPE
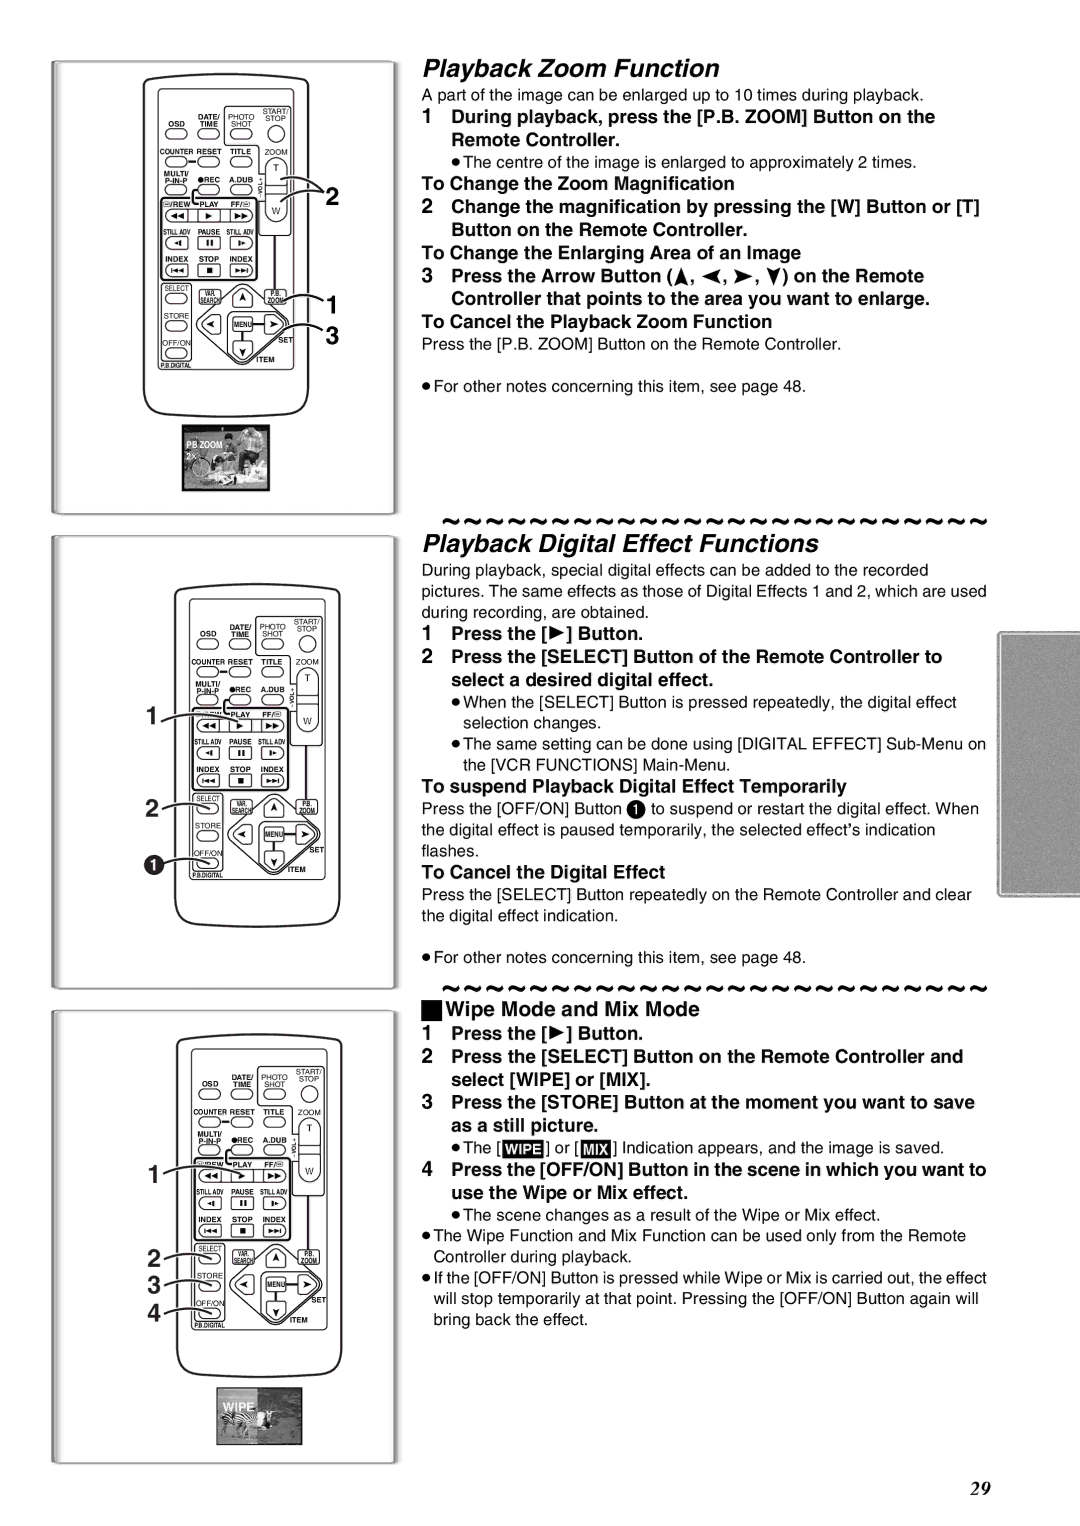
Playback Zoom Function
A part of the image can be enlarged up to 10 times during playback.
1During playback, press the [P.B. ZOOM] Button on the
Remote Controller.
≥The centre of the image is enlarged to approximately 2 times.
To Change the Zoom Magnification
2Change the magnification by pressing the [W] Button or [T] Button on the Remote Controller.
To Change the Enlarging Area of an Image
3Press the Arrow Button (π, ∑, ∏, ∫) on the Remote
Controller that points to the area you want to enlarge.
To Cancel the Playback Zoom Function
Press the [P.B. ZOOM] Button on the Remote Controller.
≥For other notes concerning this item, see page 48.
~~~~~~~~~~~~~~~~~~~~~~~~~
Playback Digital Effect Functions
During playback, special digital effects can be added to the recorded pictures. The same effects as those of Digital Effects 1 and 2, which are used during recording, are obtained.
1Press the [1] Button.
2Press the [SELECT] Button of the Remote Controller to select a desired digital effect.
≥When the [SELECT] Button is pressed repeatedly, the digital effect selection changes.
≥The same setting can be done using [DIGITAL EFFECT]
To suspend Playback Digital Effect Temporarily
Press the [OFF/ON] Button 1 to suspend or restart the digital effect. When the digital effect is paused temporarily, the selected effect’s indication flashes.
To Cancel the Digital Effect
Press the [SELECT] Button repeatedly on the Remote Controller and clear the digital effect indication.
≥For other notes concerning this item, see page 48.
~~~~~~~~~~~~~~~~~~~~~~~~~
ªWipe Mode and Mix Mode 1 Press the [1] Button.
2 Press the [SELECT] Button on the Remote Controller and select [WIPE] or [MIX].
3 Press the [STORE] Button at the moment you want to save
as a still picture.
≥The [B] or [C] Indication appears, and the image is saved.
4Press the [OFF/ON] Button in the scene in which you want to use the Wipe or Mix effect.
≥The scene changes as a result of the Wipe or Mix effect.
≥The Wipe Function and Mix Function can be used only from the Remote Controller during playback.
≥If the [OFF/ON] Button is pressed while Wipe or Mix is carried out, the effect will stop temporarily at that point. Pressing the [OFF/ON] Button again will bring back the effect.
29
