PDP-5080HD PDP-4280HD
Ventilation Caution
English
Information to User
For Canadian model
Operating Environment
Contents
TV Guide On Screen System Operation
Adjustments and Settings
Enjoying through External Equipment
Useful Remote Control Features
Using the Hdmi Control
Appendix
Important User Guidance Information
Installation guidelines
Usage guidelines
Information of pixel defect
When not using the product for a long period of time
Cleaning the cabinet
Plasma display protection function
Image Retention
About the menu window size following video format switch
Fan motor noise
To use this product for a long period of time
Safety Precautions
Rear view PDP-5080HD Side view
Installation Precautions
When using the optional brackets or equivalent items
When using other items
For PDP-5080HD only Speaker cables ⋅
Supplied Accessories
Speaker accessories
Speaker Mounting Fittings
Channel UP/DOWN buttons LEFT/RIGHT
Part Names
Plasma display
Viewed from below of the display
Rear PDP-5080HD
18 19
Favorite CH A, B, C, D
Remote control unit
Mode switch With TV selected
Luminous remote control buttons
Moving the plasma display
Installing the plasma display
Installing the Pioneer speaker PDP-5080HD
Preparation
Side Center Speaker cable Bead band
Speaker mounting
Screw M5 x 10 mm
Speaker Speaker mounting fitting
When using M5 x 10 mm Table top stand, do
Tighten from back using the supplied screws three locations
Side with the padding strip is facing upwards
Rear view
Bundle the cables
Be sure not to mount the speaker upside down
When using the hung on wall unit
Bundle the cables See procedure 6 on
Have two people perform this procedure
Stabilizing on a table or rack
Preventing the plasma display from falling over
Detaching the stand
Attaching/detaching the Pioneer stand
Remove the stand from the plasma display
Attaching the stand again
Vmixer Rear view Coaxial Cable TV
Connecting VHF/UHF antennas and a Cable
Inserting the CableCARD
VHF antenna
Plasma display rear view
Connecting the power cord
Routing cables
Attaching speed clamps to the main unit
Close the battery cover
Preparing the remote control unit
Allowed operation range of the remote control unit
Battery disposal
Turning off the power
Turning on the power
Basic Operations
Selecting the antenna
Watching TV channels
Changing channels
Changing the language
Changing the volume and sound
Volume +
Volume adjustment display
When receiving Stereo + SAP sound signals
Setting MTS/SAP mode
When receiving Stereo sound signals
When receiving Mono + SAP sound signals
Viewing a channel banner
Using the multiscreen functions
Using the POD service
Press Split to select the display mode
Freezing images
Press Freeze again to cancel the function
Press Freeze
Welcome Screen
TV Guide On Screen System Setup
Setting up the TV Guide On Screen system
About the TV Guide On Screen system
Screen 2 Enter ZIP or Postal Code
System Setup Screens
Screen 3 Select services
Screen 1 Select Country
Screen 6 Congratulations English
Screen 5 Are the settings correct?
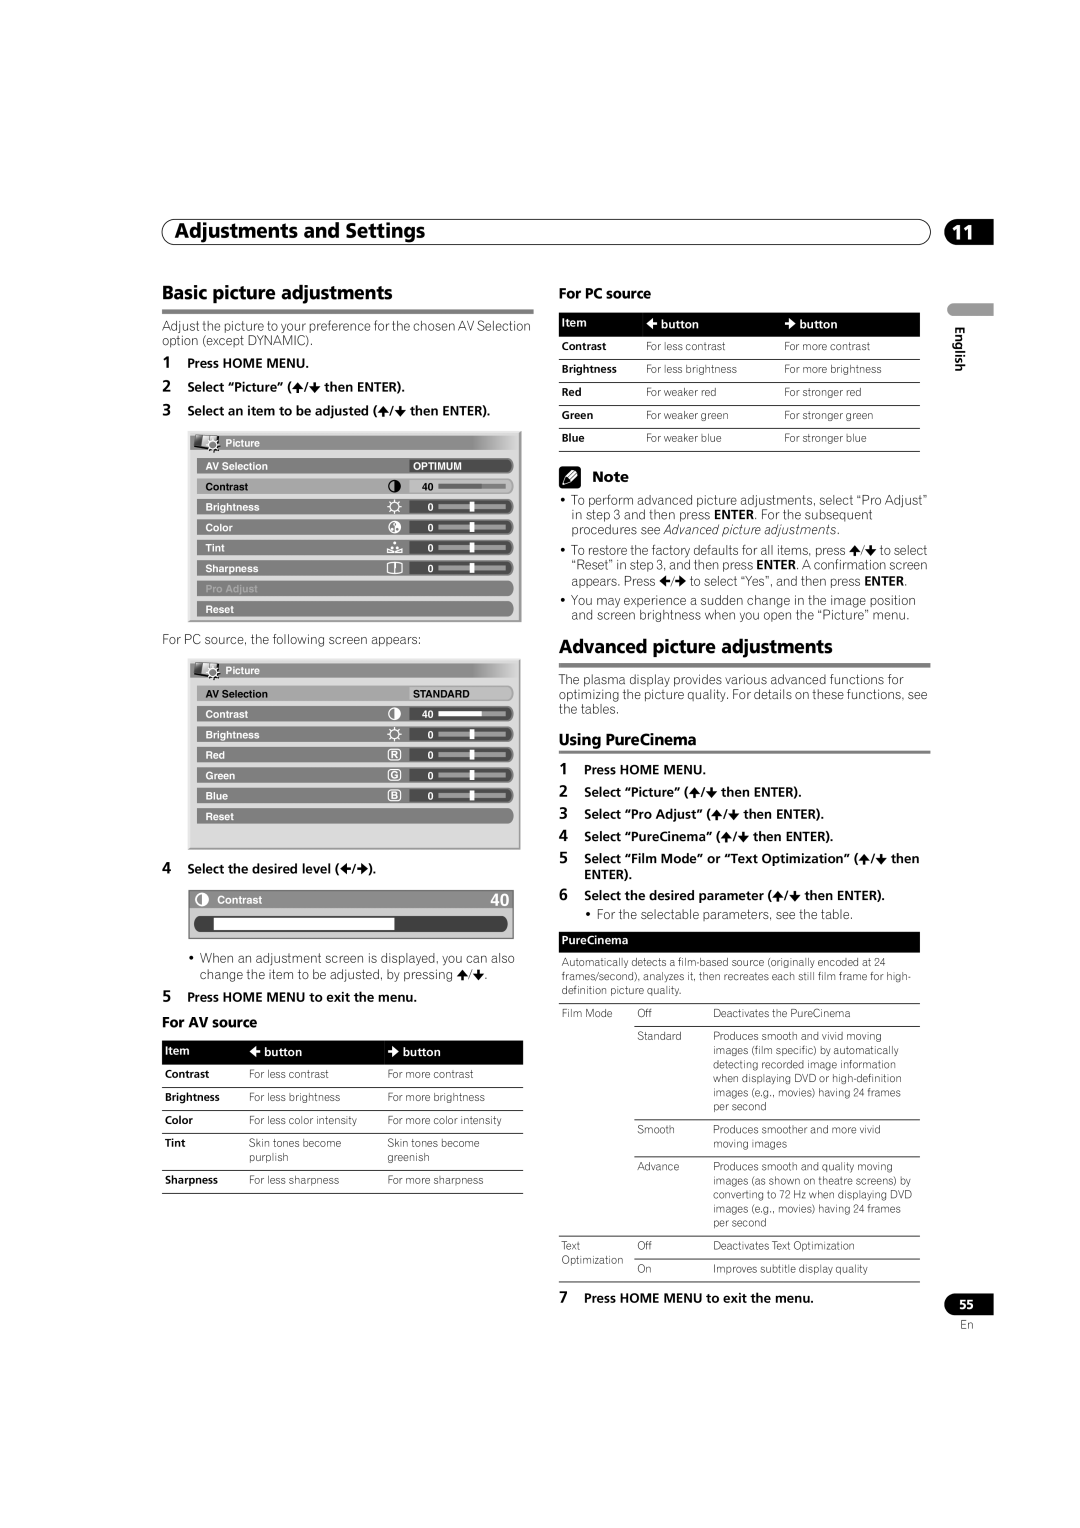
For PC source For AV source
Using the Home Menu
Home Menu
Home Menu overview
Setting up TV channels
Tuner Setup
Voluntary movie rating system Mpaa
Changing the password
Parental Control
Checking the CableCARD ID
If you forget the password
Clearing the password
Setting the voluntary movie rating system Mpaa
Setting the TV ratings
Canadian English ratings
Setting the TV Parental Guidelines TV
Blocking Not Rated TV programs
Canadian rating systems
Canadian French ratings
Setting Canadian English ratings
Setting Canadian French ratings
Setting new ratings
Antenna a or antenna B
Select a for Accept or D for Cancel
Deleting new ratings
Temporarily deactivating the Parental Control
Selecting the type of conventional closed captions
Setting your favorite channels
Setting up closed captions
Activating the closed caption
Selecting digital closed caption parameters
Clock Setting
Selection
Screen components
Using the TV Guide On Screen system
TV Guide On Screen System Operation
TV Guide On Screen icons
Press TV Guide to display the Listings screen
Setting program reminders
Listings screen
TV Guide On Screen navigation
When scheduled reminder is due auto-tune is on
When scheduled reminder is due auto-tune is OFF
Press a to make the Timer Alert screen disappear
Searching by category
Searching for programs
Alphabetical search
Searching by keyword
Search Episode Options menu
Scheduling reminders
Navigation and search tips
Schedule Optios menu
Changing setup options
Using the reminder To Do list
Changing the system settings
No, repeat setup process displays screen 1 shown on
Changing the channel display settings
From the channel display settings you can set/change
Changing the default options Displaying setup progress
For PC source
Adjustments and Settings
AV Selection
For AV source
Advanced picture adjustments
Basic picture adjustments
Using PureCinema
Eliminating noise from images
Using the Picture Detail
Using Color Temp
Using CTI
Screen appears. Press / to select Yes, and then press
Comparing picture adjustments on the screen
Sound adjustments
Each press of the button toggles between Before and After
Energy Save
Power Control
No Signal off AV source only
Sound Effect
No Operation off AV source only
Sleep Timer
Power Management PC source only
Select Off cancel, 30 min, 60 min, 90 min or 120 min
About Option menus
Image position adjustment AV source only
Manual image position and clock adjustments PC source only
Perform adjustment / or
AV source
Selecting a game mode
Reducing video noise
Selecting a screen size manually
Full and wide screen
Selecting a screen size automatically
Detecting side masks
PC source
Orbiter
Language setting
Room Light Sensor
Blue LED Dimmer
Watching a DVD image
Enjoying through External Equipment
About External Equipment
Watching a VCR image
Deep Color supported
Using Hdmi Input
Connecting Hdmi equipment
Hdmi Control supported
ItemDescription
To specify the type of input signals
To specify the type of digital video signals
To specify the type of audio signals
Enjoying a game console or watching camcorder images
Connecting other audio equipment
Connecting a game console or camcorder
Connecting an AV receiver
Displaying an image from a personal computer
Computer compatibility chart
Connecting a personal computer
Watching an image from a personal computer
About SR+
Connecting control cords
Readable data files
Connecting a USB device
Enjoying through USB interface Home Gallery function
Readable memory cards
Starting a thumbnail screen
Displaying a device list
Starting the initial Home Gallery screen
Selecting a folder
Starting a standard single-image screen
Starting the Slide Show Setup screen
Select Display Mode Select Normal or Full
Select Playback Mode Select Auto or Manual
Starting the Slide Show screen
Function Description Usable Devices
Using the Hdmi Control
Using the Hdmi Control functions
Hdmi Control functions
For an AV system
Connecting an AV amp/BD player For a recorder
Making the Hdmi Control connections
On-screen control panel
Connecting a BD player
Setting the Hdmi Control
Selecting the input terminal
Using the Hdmi Control menus
Manufacturing Reset
Useful Remote Control Features
Presetting manufacturer codes to control other devices
Presetting manufacturer codes
Programming codes
Daewoo
CyberPower 1972 Headquarter 0046 Memorex
Mark
0278
Vector 0045
Sonographe 0046 Trix 0037
Ultra
Unitech 0240
DirecTV 0739 Hush 1972 Pioneer 1337 Toshiba
EverFocus 1346 IBUYPOWER 1972
1972 Niveus Media Stack Alienware
Dell 1972 Humax 0739 Philips 0618 Tivo
1265 ProVision 0778 Sigma Designs 0674 1608 Onkyo
1158 Theta Digital 0571 Next Base 0826 Princeton 0674 Sharp
Norcent
Prosonic 0699 Shinsonic 0533
Turns the Pioneer receiver power on and off
Mode switch buttons operate at any position
Selects the input source connected to the Pioneer receiver
CH +
Mode switch with CBL/SAT selected
CBL/SAT control buttons
Enter
VCR control buttons
Mode switch with VCR selected
DVD/DVR control buttons
Internal protective circuits may have been activated
Troubleshooting
Problem Possible Solution
Appendix
Code Message Check
Original SSLeay License
GNU General Public License
Linux Source Notice
Preamble
Appendix
How to Apply These Terms to Your New Programs
No Warranty
GNU Lesser General Public License
Appendix
Appendix
How to Apply These Terms to Your New Libraries
Specifications
PDP-4280HD Unit mm inch
Dimensions PDP-5080HD Unit mm inch
Patent
Important Notice about software upgrade from Pioneer
Trademarks
License
101
NE PAS Ouvrir
Milieu de fonctionnement
Informations destinées à l’utilisateur
Pour le modèle destiné au Canada
Français
Table des matières
11 Réglages et mises au point
Utilisation du système TV Guide On Screen
Annexe
Utilisation de la commande Hdmi
Particularités du boîtier de Télécommande
Emploi d’un appareil extérieur
Remarque
Instructions d’installation
Informations importantes pour l’utilisateur
Instructions d’usage
Brouillage radioélectrique
Fonction de protection de l’écran plasma
Information sur les défauts de pixel
Rayonnement infrarouge
Pour minimiser les dommages des brûlures d’écran
Bruit de moteur de ventilateur
Pour utiliser cet appareil pendant longtemps
Rémanence d’image
Le cordon ou la fiche d’alimentation sont endommagés
Précautions de sécurité
Vue de dos PDP-4280HD
Précautions d’installation
Si vous utilisez d’autres accessoires
Vue de dos PDP-5080HD Vue de côté
Accessoires pour enceintes
Accessoires fournis
Pièces de fixation pour le montage des enceintes
Nomenclature
Commander le système TV Guide On Screen
Écran plasma
Dos PDP-5080HD
Sélecteur de mode Sur la position TV
Boîtier de télécommande
Touches lumineuses du boîtier de télécommande
Emplacement
Installation de l’écran plasma
Déplacement de l’écran plasma
Installation des enceintes Pioneer PDP-5080HD
➀ Serrez d’abord la vis du trou de forme ronde
Vis de montage des enceintes M5 x 10 mm
Pièce de fixation des enceintes pour le centre
Le côté portant le ruban de garniture doit être en haut
Vue de dos
Attacher les câbles
Assurez-vous de ne pas monter les enceintes à l’envers
Lors de l’utilisation du support mural
Attachez les câbles Voir procédure 6 de
Cette procédure doit être effectuée par deux personnes
Fixation sur une table ou une étagère
Pour empêcher l’écran plasma de se renverser
Retirez le support de l’écran plasma
Pose et dépose du support Pioneer
Dépose du support
Pour le PDP-4280HD, commencez à l’étape
Remise en place du support
Connexion d’antennes VHF/UHF et d’un câble
Introduction de la carte CableCARD
Écran plasma vue de dos
Cheminement des câbles
Connexion du cordon d’alimentation
Fixation des colliers rapides à l’appareil
Mise en place des piles
Préparation du boîtier de télécommande
Portée du boîtier de télécommande
Précautions relatives au boîtier de télécommande
Mise hors service
Mise en service
Opérations de base
Écran plasma vue du côté droit
Pour regarder une chaîne de télévision
Sélection de l’antenne
Sélection des chaînes
Affichage de coupure du son
Modification du volume et du son
Sélection de la langue
Affichage de réglage du niveau sonore
Au cours de la réception de signaux Stéréo + SAP
Sélection du canal audio MTS et SAP
Au cours de la réception de signaux Stéréo
Au cours de la réception de signaux Mono + SAP Remarque
Affichage d’une bannière de chaîne
Utilisation des services POD
Appuyez sur Split pour sélectionner le mode d’affichage
Utilisation des fonctions d’affichage multiple
Appuyez sur Freeze
Gel d’une image
Écran d’accueil
Configuration du système TV Guide On Screen
Configuration du système TV Guide On Screen
Présentation du système TV Guide On Screen
Écran 2 Entrée du Code ZIP ou Postal
Écrans de configuration du système
Écran 3 Sélection de services
Écran 1 Sélection du pays
Français Écran 6 Félicitations
Écran 5 Les réglages sont-ils corrects ?
Pour source PC Pour source AV
Menu principal Home Menu
Présentation du menu principal Home Menu
Utilisation du menu principal Home Menu
Réglage pour sauter les chaînes indésirables
Vérification de la puissance du signal
Inst. du tuner
Réglage des chaînes de télévision
Classement volontaire des films Mpaa
Contrôle parental
Vérification de l’identité de la carte CableCARD
Changement de mot de passe
Effacement du mot de passe
Mise en service de la restriction parentale
Si vous oubliez le mot de passe
Sélectionnez Bloquer ou Ne pas bloquer / puis Enter
Interdiction des émissions de télévision non classées
Systèmes de classement en vigueur au Canada
Classement pour les Canadiens anglophones
Classement pour les Canadiens francophones
Utilisation du classement pour les Canadiens francophones
Utilisation du classement pour les Canadiens anglophones
Réglage de nouvelles valeurs
Entrée 1 à Entrée
Mise hors service temporaire de la restriction parentale
Suppression des nouvelles valeurs
Antenne a ou antenne B
Sélection du type de sous-titrage codé ordinaire
Mise en service du sous-titrage codé
Sélection des chaînes favorites
Utilisation des sous-titres codés
Taille de police Auto/Grande/Standard/Petite Police
Réglage de l’horloge
Sélection des paramètres du sous-titrage codé numérique
Élément Valeurs possibles
Éléments d’écran
Utilisation du système TV Guide On Screen
Utilisation du système TV Guide On Screen
Icônes du système TV Guide On Screen
Appuyez sur TV Guide pour afficher l’écran Listings
Réglage des rappels d’émission
Écran Listings
Navigations au sein du système TV Guide On Screen
Mar /30 1230am-1259am Ant. a 1000.000 BRAV022
Recherche par catégorie
Recherche d’émissions
Entrez le mot-clé qui va servir pour la recherche
Recherche par mot-clé
Recherche alphabétique
Mettez enter keyword en surbrillance et appuyez sur
Conseils pour la navigation et la recherche
Programmation de rappels
Menu de recherche Episode Options
Appuyez sur Enter
Changement des réglages du système
Changement des options de configuration
Utilisation de la liste To Do de rappel
Menu Schedule Options
Changement des réglages d’affichage de chaîne
Changement des options par défaut
Affichage de progression configuration
Pour source PC
Réglages et mises au point
Sélection AV
Pour source AV
Sélectionnez la valeur désirée
Réglages de base de l’image
Réglages avancés de l’image
Utilisation de PureCinema
Élimination du bruit des images
Utilisation de Détail image
Utilisation de Temp. Couleur
Utilisation de CTI
Aigus
Comparaison des réglages d’image sur l’écran
Réglages du son
RB Image
Vous pouvez sélectionner SRS FOCUS, SRS ou SRS TruBass
Commande alimentation
Effet sonore
Économie d’énergie
’est exécutée pendant trois heures
Minut. Extinction
Gestion alimentation source PC uniquement
Select from Arrêt annulé, 30 mn, 60 mn, 90 mn ou 120 mn
Effectuez le réglage / ou
La configuration automatique démarre
Réglage de la position de l’image source AV uniquement
Au sujet des menus Options
Sélectionnez RB Tuner Sélectionnez Marche
Sélection d’un mode jeu
Réduction de bruit vidéo
Sélection manuelle d’un format d’écran
Source PC
Sélection automatique d’un format d’écran
Détection de cache latéraux
Source AV
Mire vidéo
Capteur de luminosité ambiante
Luminosité DEL bleue
Orbiteur
Affichage des images d’un lecteur de DVD
Emploi d’un appareil extérieur
Appareil extérieur
Affichage des images d’un magnétoscope
Deep Color pris en charge
Commande Hdmi prise en charge
Utilisation de l’entrée Hdmi
Connexion d’un appareil Hdmi
Pour spécifier le type des signaux vidéo numériques
Pour spécifier le type des signaux d’entrée
Pour spécifier le type des signaux audio
Connexion d’un récepteur audiovisuel
Utilisation d’une console de jeu ou d’un caméscope
Connexion d’autres appareils audio
Connexion d’une console de jeu ou d’un caméscope
Affichage des images d’un ordinateur personnel
Affichage des images d’un ordinateur personnel
Tableau de compatibilité ordinateur
Connexion d’un ordinateur personnel
SR+
Connexion des câbles de commande
Pour la connexion des câbles de commande avec un ou
Quelques mots sur SR+
Connexion d’un appareil USB
Utilisation de l’interface USB Fonction Home Gallery
Cartes de mémoire lisibles
Fichiers de données lisibles
Sélectionnez un appareil / puis Enter
Lancement d’un écran page de vignettes
Lancement de l’écran Home Gallery initial
Sélection d’un dossier
Lancement d’un écran standard à une image
Lancement de l’écran de configuration de diaporama
Sélectionnez Mode affichage Sélectionnez Normal ou Plein
Sélectionnez Mode de lecture Sélectionnez Auto ou Manuel
Lancement du diaporama
Fonction Description Appareils Utilisables
Utilisation de la commande Hdmi
Utilisation des fonctions de la commande
Fonctions de la commande Hdmi
Pour un lecteur
Connexions pour la commande Hdmi
Ampli AV
Lecteur BD
Sélection de la prise d’entrée
Réglage de la commande Hdmi
Lecteur BD Remarque
Ampli AV Lecteur BD
Utilisation des menus de commande
Réinitialisation aux réglages de l’usine
Particularités du boîtier de télécommande
Préréglage des codes de fabricant
Recherche bibliothèque
Câble
Codes de programmation
Magnétoscope
Rio 1137 Stack 1972 Pentax
Magnétoscope numérique
DVD-R
Mise en service ou hors service du récepteur Pioneer
Sélecteur de mode sur la position CBL/ SAT
Touches de commande du tuner CBL/SAT
Sélecteur de mode sur la position VCR
Touches de commande de magnétoscope
Touches de commande du lecteur de DVD, graveur de DVD
Guide de dépannage
Annexe
Anomalie Action corrective possible
Code Message Vérification
Modèle d’écran plasma 42 po. PDP-4280HD
Caractéristiques techniques
PDP-4280HD Unité mm pouce
Dimensions PDP-5080HD Unité mm pouce
273 11/32
Avis de non-responsabilité
Marques de commerce
Licence
Brevet
Annexe
Importante
Español
Información al usuario
Para el modelo canadiense
Entorno de funcionamiento
Contenido
Operación del sistema TV Guide On Screen
Ajustes y configuraciones
15 Apéndice
Utilización de un equipo externo
Utilización del Control Hdmi
Funciones útiles del mando a Distancia
Consejos para la utilización
Consejos para la instalación
Nota
Rayos infrarrojos
Precaución
Función de protección de la pantalla de plasma
Información de defecto de píxel
Minimización de daños desde el quemado de la pantalla
Retención de imagen
Para utilizar este producto por un largo período de tiempo
Imagen remanente del panel
Precauciones de seguridad
Vista trasera PDP-4280HD
Precauciones relacionadas con la instalación
Cuando utilice otros componentes
Vista trasera PDP-5080HD Vista lateral
Accesorios de altavoz
Accesorios suministrados
Accesorios de montaje de altavoz
Pantalla de plasma
Nombres de los componentes
Guide On Screen
Parte trasera PDP-5080HD
2526 18 19
Interruptor de modo Con TV seleccionado
Mando a distancia
Botones de mando a distancia luminosos
Instalación del altavoz Pioneer PDP-5080HD
Preparación
Instalación de la pantalla de plasma
Traslado de la pantalla de plasma
Accesorio de montaje de altavoz lado
Altavoz
Accesorio de montaje de altavoz para centro
Tornillo de montaje de Altavoz M5 x 10 mm Cuando utilice el
El lado con la regleta de relleno está hacia arriba
Conecte el otro extremo de los cables de altavoz al altavoz
Ate los cables
Vista trasera
Ate los cables Consulte el procedimiento 6 en la página
Cuando utilice la unidad de montaje en pared
Por lo menos dos personas deben realizar este procedimiento
Asegúrese de no montar el altavoz al revés
Estabilización en una mesa o estantería
Prevención de caída de la pantalla de plasma
Pioneer
Instalación/extracción del soporte
Extracción del soporte
Pantalla de plasma Hoja
Reinstalación del soporte
Conexión de antenas VHF/UHF y de un cable
Colocación de la tarjeta CableCARD
Pantalla de plasma vista trasera Precaución
Encaminamiento de los cables
Conexión de cable de alimentación
Fijación y extracción de las abrazaderas rápidas
Rango de operación permisible del mando a distancia
Preparación del mando a distancia
Instalación de las pilas
Precauciones relacionadas con las pilas
Encendido del sistema
Operaciones básicas
Apagado del sistema
Selección de la antena
Contemplación de canales de TV
Cambio de canales
Visualización del silenciamiento
Cambio del volumen y sonido
Visualización del ajuste del volumen
Cambio del idioma
Cuando se está recibiendo señales de sonido Estéreo + SAP
Configuración del modo MTS/SAP
Cuando se está recibiendo señales de sonido Estéreo
Cuando se está recibiendo señales de sonido Mono +
División de la pantalla
Utilización de las funciones de multipantalla
Visualización de un rótulo de canal
Utilización del servicio POD
Con la pantalla dividida, no se puede congelar una imagen
Pulse Freeze de nuevo para cancelar la función
Congelamiento de imágenes
Pulse Freeze
Pantalla de bienvenido
Configuración del sistema TV Guide On Screen
Configuración del sistema TV Guide On Screen
Sobre el sistema TV Guide On Screen
Pantalla 3 Seleccione servicios
Pantallas de configuración del sistema
Pantalla 1 Seleccione País
Pantalla 2 Introduzca el código ZIP o postal
Pantalla 6 Congratulaciones Español
Pantalla 5 ¿Están las configuraciones correctas?
Para la fuente de PC Para la fuente de AV
El Menú Principal
Resumen del Menú Principal
Utilización del Menú Principal
Configuración de los canales de TV
Configuración del sintonizador
Sistema de clasificación de cine voluntario Mpaa
Control familiar
Cambio de la contraseña
Comprobación de la identificación de la tarjeta CableCARD
Si se olvida de la contraseña
Configuración de las clasificaciones de TV
Borrado de la contraseña
Activación del control familiar
Clasificaciones canadienses en inglés
Configuración de las guías familiares de TV Guías de TV
Bloqueo de programas de TV no clasificados NR
Sistemas de clasificaciones canadienses
Clasificaciones canadienses en francés
Configuración de las clasificaciones canadienses en inglés
Configuración de las clasificaciones canadienses en francés
Configuración de nuevas clasificaciones
Antena a o Antena B
Seleccione a para Aceptar o D para Cancelar
Eliminación de nuevas clasificaciones
Desactivación temporal del control familiar
Selección del tipo de subtitulación convencional
Configuración de sus canales favoritos
Configuración de la subtitulación
Activación de la subtitulación
Selección de los parámetros de la subtitulación digital
Ajuste del reloj
Ítem Selección
Iconos del sistema TV Guide On Screen
Operación del sistema TV Guide On Screen
Utilización del sistema TV Guide On Screen
Componentes de la pantalla
Pulse TV Guide para visualizar la pantalla de listas
Configuración de los avisos de programa
La pantalla de listas
Navegación por el sistema TV Guide On Screen
Pulse a para que la pantalla Medidor de Alerta desaparezca
Pulse a para dejar el aviso efectivo, o D para descartarlo
Búsqueda por categoría
Búsqueda de programas
Introduzca la palabra clave para la búsqueda
Búsqueda alfabética
Consejos para la navegación y búsqueda
Programación de avisos
El menú de búsqueda Episode Options
Del área Schedule, puede revisar, editar o eliminar avisos
El menú Schedule Options
Cambio de las opciones de configuración
Cambios de las configuraciones del sistema
Utilización de la lista de avisos To Do
Cambio de las configuraciones de visualización de canales
Cambio de las opciones predeterminadas
Visualización del progreso de configuración
Para la fuente de PC
Ajustes y configuraciones
Selección AV
Para la fuente de AV
Seleccione el nivel deseado
Ajustes de imagen básicos
Ajustes de imagen avanzados
Utilización de PureCinema
Eliminación de ruido de las imágenes
Utilización del detalle de imagen
Utilización de la temperatura de color
Utilización de CTI
Seleccione el ítem que desee ajustar
Comparación de los ajustes de imagen en la pantalla
Ajustes del sonido
Cada pulsación del botón cambia entre Antes y Después
Apagado sin señal fuente de AV solamente
Control de la alimentación
Efecto sonido
Ahorro de energía
Español Pulse Home Menu para salir del menú
Temporizador de apagado
Apagado sin operación fuente de AV solamente
Gestión de energía fuente de PC solamente
Realice el ajuste / o
La autoconfiguración comienza
Ajuste de las posiciones de imagen fuente de AV solamente
Acerca de los menús Opción
Fuente de AV
Reducción de ruido de vídeo
Selección de un modo de juego
Selección manual de un tamaño de pantalla
Fuente de PC
Selección automática de un tamaño de pantalla
Detección de máscaras laterales
Importante
Patrón de vídeo
Configuración del idioma
Sensor de luz de la habitación
Regulación del LED azul
Visualización de la imagen de un DVD
Utilización de un equipo externo
Sobre los equipos externos
Visualización de la imagen de una videograbadora
Equipo Hdmi
Conexión de un equipo Hdmi
Soporte de Control Hdmi
Soporte de color profunda
Para especificar el tipo de señales de vídeo digitales
Para especificar el tipo de señales de entrada
Para especificar el tipo de señales de audio
Conexión de un receptor de AV
Reproducción con consola de videojuegos o videocámara
Conexión de otro equipo de audio
Conexión de una consola de videojuegos o una videocámara
Conexión de una computadora
Visualización de la imagen de una computadora
Gráfica de compatibilidad con computadora
Visualización de la imagen de una computadora
Acerca de SR+
Conexión de los cables de control
Pantalla de plasma Vista trasera
Conexión a un dispositivo USB
Utilización de interfaz USB función Home Gallery
Tarjetas de memoria que pueden leerse
Archivos de datos que pueden leerse
Iniciación de una pantalla de miniaturas
Visualización de una lista de dispositivos
Iniciación de la pantalla Home Gallery inicial
Selección de una carpeta
Iniciación de una pantalla de imagen simple estándar
Cancela la función Home Gallery
Seleccione Modo de reproducción Seleccione Auto o Manual
Iniciación de la pantalla de presentación de diapositivas
Función Descripción
Utilización del Control Hdmi
Utilización de las funciones del Control
Funciones del Control Hdmi
Conexión de un amplificador de AV/reproductor BD
Conexiones de Control Hdmi
Reproductor BD
Para un reproductor
Selección del terminal de entrada
Configuración del Control Hdmi
Reproductor BD Nota
Amplificador de AV Reproductor BD
Utilización de los menús del Control Hdmi
Reposición de fabricación
Funciones útiles del mando a distancia
Preajuste de los códigos de fabricante
Búsqueda de librería
Marca Códigos
Programación de los códigos
Videograbadora
Sanky 0048 Pilot 0037
PVR
DVD-R
Enciende y apaga el receptor Pioneer
Interruptor de modo con CBL/SAT seleccionado
Botones de control CBL/SAT
Interruptor de modo con VCR seleccionado
Botones de control de videograbadora
Botones de control DVD/DVR
Problema
Solución de problemas
Apéndice
Código Mensaje Comprobación
Problema Solución posible
Especificaciones
PDP-4280HD Unidad mm pulgada
Dimensiones PDP-5080HD Unidad mm pulgada
Aviso de exención de responsabilidad
Marcas registradas
Licencia
Patente
Pioneer Corporation

 /
/ ).
).