Recorder connections

02


1


To antenna input

Antenna/cable TV


wall outlet


From antenna output


VCR


From SCART AV

To recorder's


connector


antenna input


3


AV2 (INPUT 1/


DECODER)


ANTENNA


DIGITAL

IN


AUDIO OUT

AV 2 (INPUT 1/DECODER)


AC IN


HDMI OUT COAXIAL


G-LINK CONTROL

ANTENNA(DIGITAL)


OUT

IN

OUT

IN


AV 1 (RGB) – TV


5 V

30 mA

AV1 (RGB) - TV

2

To SCART AV

connector

TV

1Connect your TV antenna to the recorder and TV. See Connecting a TV antenna on page 62 for details.

If you want to incorporate a VCR in your setup, connect it before the recorder (i.e., between the antenna wall outlet and the antenna input on the recorder).

2Use a SCART cable (not supplied) to connect the AV1 (RGB)-TV AV connector on this recorder to the SCART AV connector on your TV.

3Use another SCART cable to connect the AV2 (INPUT 1/DECODER) AV connector to a SCART AV connector on your VCR.

Tip

This recorder has a ‘through’ function which allows you to record a TV programme from the built-in TV tuner in this recorder while watching a video playing on your VCR (To use this feature when the recorder is in standby, Power Save must be set to Off — see Power Save on page 152).

Connecting to a cable box or satellite receiver

If you have a cable box or satellite receiver with a built-in decoder, connect it to this recorder and your TV as shown on this page. If you are using a separate decoder box for your cable/satellite TV, set up following the instructions on the next page.

Using the setup on this page you can:

Record any channel by selecting it on the cable box, satellite receiver or digital terrestrial receiver.

Change channels and set timer recordings on the external receiver using the GUIDE Plus+® system (via the G-LINK™ cable, and after setting up).

Important

• Do not connect this recorder to your TV ‘through’ your VCR, satellite receiver or other component. Always connect each component directly to your TV or AV amplifier/receiver.

• When using the GUIDE Plus+ system to make a timer recording from an external receiver, make sure that the external receiver is switched on.


1


To antenna input


Satellite dish/


antenna/cable TV


From antenna output


wall outlet


To recorder's

Cable/Satellite


From SCART AV

receiver


connector

antenna input


3

AV2 (INPUT 1/

DECODER)

4

ANTENNA


DIGITAL

IN


AUDIO OUT

AV 2 (INPUT 1/DECODER)


AC IN


HDMI OUT

COAXIAL


G-LINK CONTROL

ANTENNA(DIGITAL)


OUT

IN


OUT

IN


AV 1 (RGB) – TV


5 V

30 mA


AV1 (RGB) - TV


2


To SCART AV


connector

TV


1 Connect RF antenna cables as shown.

See Connecting a TV antenna on page 62 for more on RF antenna connections, including from this recorder to your TV.

63

En

Page 63
Image 63
Pioneer SX-LX70SW manual Recorder connections, Connecting to a cable box or satellite receiver

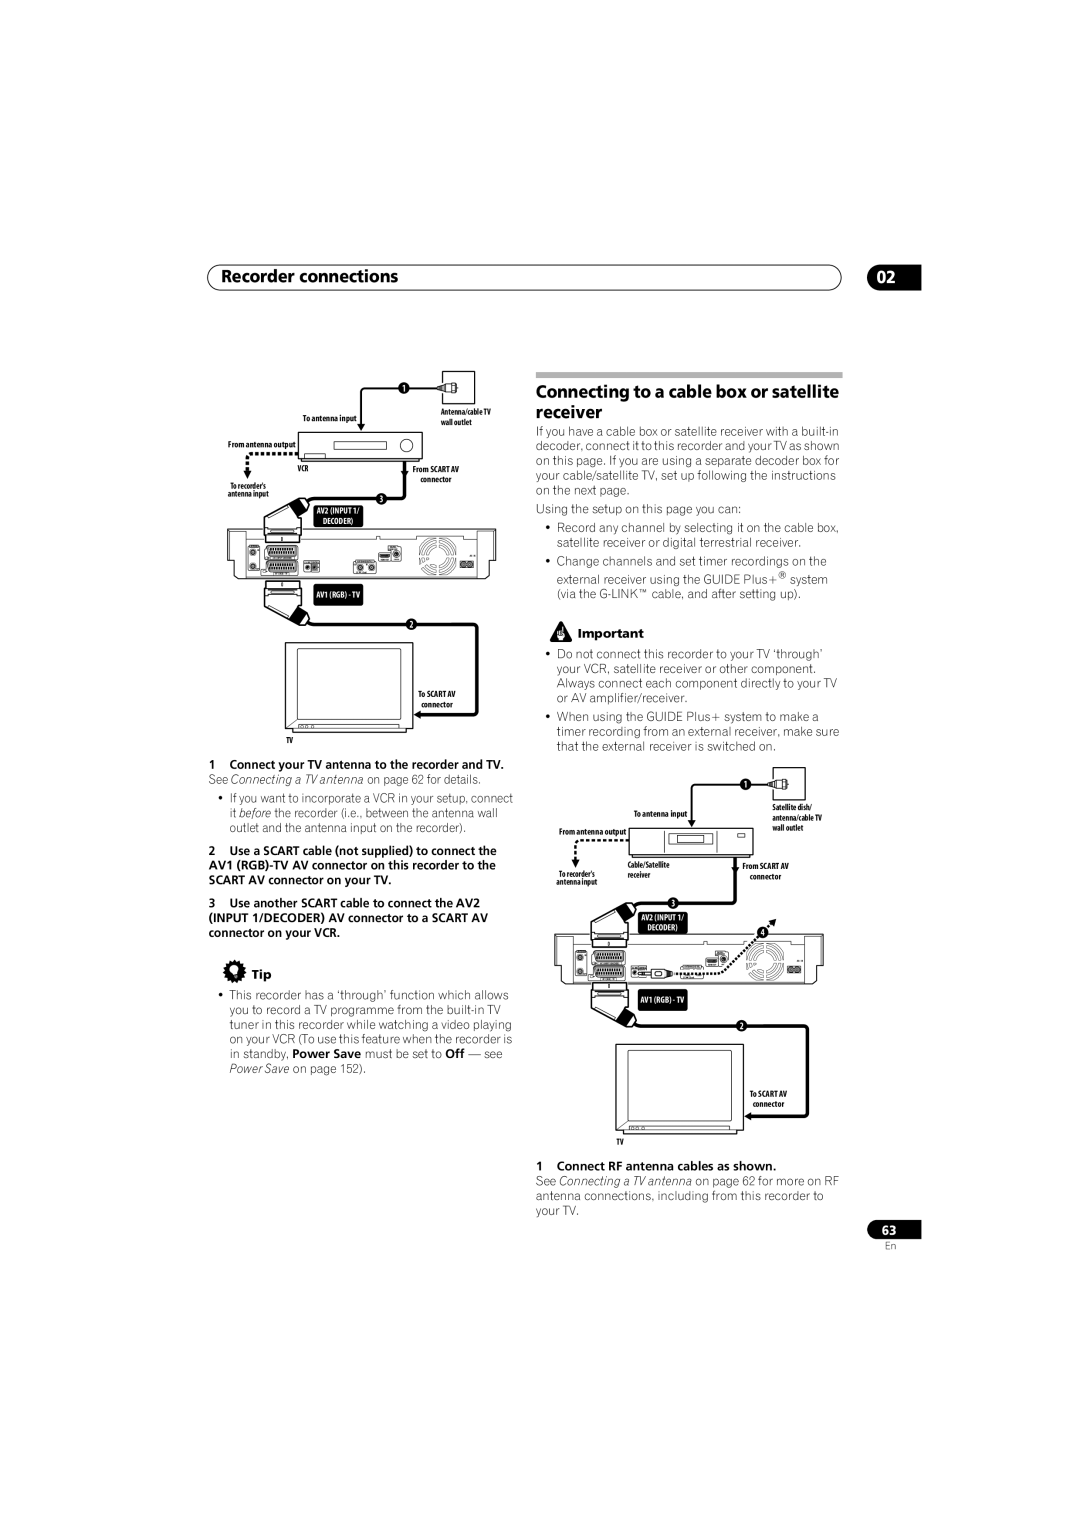
SX-LX70SW specifications

The Pioneer SX-LX70SW is a high-performance home theater receiver that combines advanced technology with user-friendly features to enhance the audio experience in any living space. This model is part of Pioneer's prestigious line of receivers, designed for audiophiles and casual listeners alike, making it a solid choice for those looking to elevate their home entertainment setup.

One of the standout features of the SX-LX70SW is its powerful amplifier section, delivering robust audio performance with a total output of up to 100 watts per channel. This ensures that every sound, whether it’s dialogue in a movie or the subtle notes of a symphony, is reproduced with stunning clarity and precision. Additionally, its 7.2-channel configuration provides ample power to drive multiple speakers, allowing for an immersive surround sound experience that envelops listeners in rich audio.

The SX-LX70SW incorporates advanced audio technologies like Dolby Atmos and DTS:X, which create a three-dimensional soundstage that adds depth and realism to any content. These technologies allow for sound to move around and above the listener, making action scenes in films or live concerts feel more engaging and lifelike.

Another key characteristic of the receiver is its extensive connectivity options. It features multiple HDMI inputs for easy integration with today's digital devices, including Blu-ray players, game consoles, and streaming devices. The built-in Wi-Fi and Bluetooth capabilities enable users to stream their favorite music services directly, providing easy access to thousands of songs without the hassle of wired connections.

The receiver’s interface is designed for ease of use, featuring an intuitive on-screen display that guides users through setup and customization. Additionally, the inclusion of a smartphone app allows for remote control and adjustments, offering added convenience for users who prefer managing their audio settings from a distance.

In terms of build quality, the SX-LX70SW is designed with durability in mind, ensuring long-term reliability. With its elegant finish and sleek design, it complements modern home entertainment systems, adding aesthetic value alongside its impressive functionality.

Overall, the Pioneer SX-LX70SW stands out as a versatile, high-performance receiver that marries cutting-edge technology with user-centric features, making it an ideal choice for anyone looking to enhance their home audio setup.