TEFAL781-3in1_NC00111822_Mise en page 1 26/04/12 18:28 Page5
portion) because there isn't the mark of 1 cup in the cooking pot, you should use 1 measuring cup of white rice and then add 1 1/2 measuring cup of water. With some types of rice it is normal for a little rice to stick on the base when cooking 1 cup of rice. To cook other quantity of white rice, refer to cooking guide below.
•The maximum quantity of water + rice should not exceed the
5.5cup or 10 cup mark inside the bowl – Fig.11. Depending on the type of rice, quantities of water may need adjustment. See the table below.
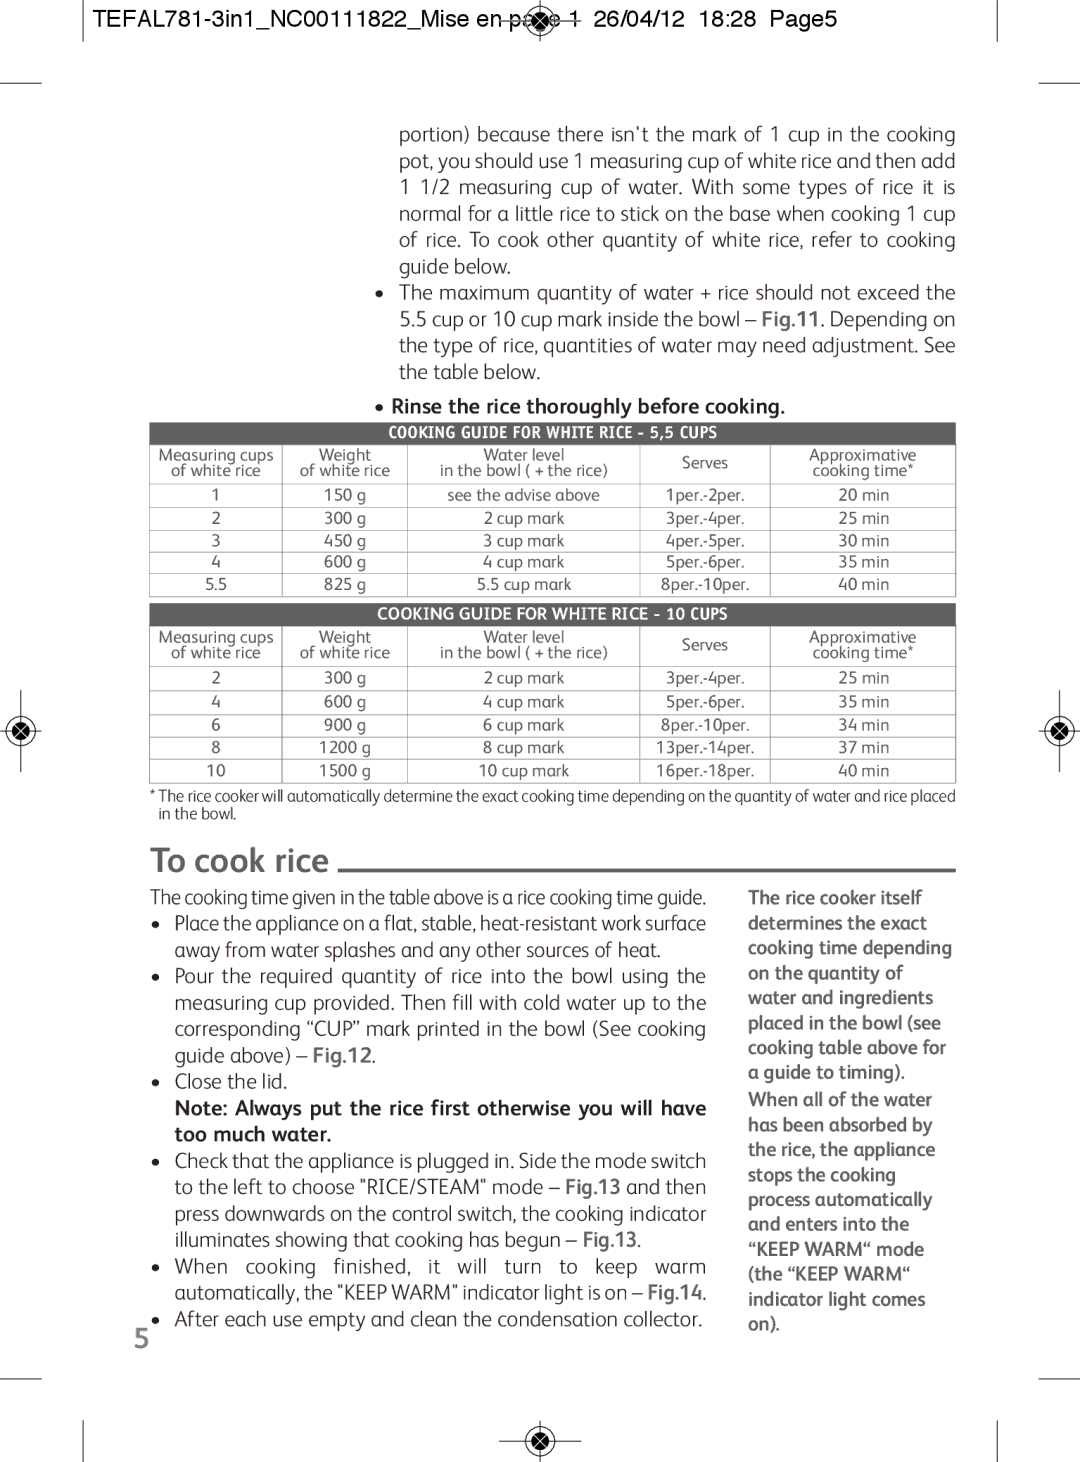
•Rinse the rice thoroughly before cooking.
| COOKING GUIDE FOR WHITE RICE - 5,5 CUPS |
| |||
Measuring cups | Weight | Water level | Serves | Approximative | |
of white rice | of white rice | in the bowl ( + the rice) | cooking time* | ||
| |||||
1 | 150 g | see the advise above | 20 min | ||
|
|
|
|
| |
2 | 300 g | 2 cup mark | 25 min | ||
3 | 450 g | 3 cup mark | 30 min | ||
4 | 600 g | 4 cup mark | 35 min | ||
5.5 | 825 g | 5.5 cup mark | 40 min | ||
| COOKING GUIDE FOR WHITE RICE - 10 CUPS |
| |||
Measuring cups | Weight | Water level | Serves | Approximative | |
of white rice | of white rice | in the bowl ( + the rice) | cooking time* | ||
| |||||
2 | 300 g | 2 cup mark | 25 min | ||
|
|
|
|
| |
4 | 600 g | 4 cup mark | 35 min | ||
|
|
|
|
| |
6 | 900 g | 6 cup mark | 34 min | ||
8 | 1200 g | 8 cup mark | 37 min | ||
10 | 1500 g | 10 cup mark | 40 min | ||
*The rice cooker will automatically determine the exact cooking time depending on the quantity of water and rice placed in the bowl.
To cook rice
The cooking time given in the table above is a rice cooking time guide.
•Place the appliance on a flat, stable,
•Pour the required quantity of rice into the bowl using the measuring cup provided. Then fill with cold water up to the corresponding “CUP” mark printed in the bowl (See cooking guide above) – Fig.12.
•Close the lid.
Note: Always put the rice first otherwise you will have too much water.
•Check that the appliance is plugged in. Side the mode switch to the left to choose "RICE/STEAM" mode – Fig.13 and then press downwards on the control switch, the cooking indicator illuminates showing that cooking has begun – Fig.13.
•When cooking finished, it will turn to keep warm automatically, the "KEEP WARM" indicator light is on – Fig.14.
•After each use empty and clean the condensation collector.
5
The rice cooker itself determines the exact cooking time depending on the quantity of water and ingredients placed in the bowl (see cooking table above for a guide to timing). When all of the water has been absorbed by the rice, the appliance stops the cooking process automatically and enters into the “KEEP WARM“ mode (the “KEEP WARM“ indicator light comes on).