1 TROUBLESHOOTING FOR THE HARDWARE
Messages Displayed on the Touch Panel
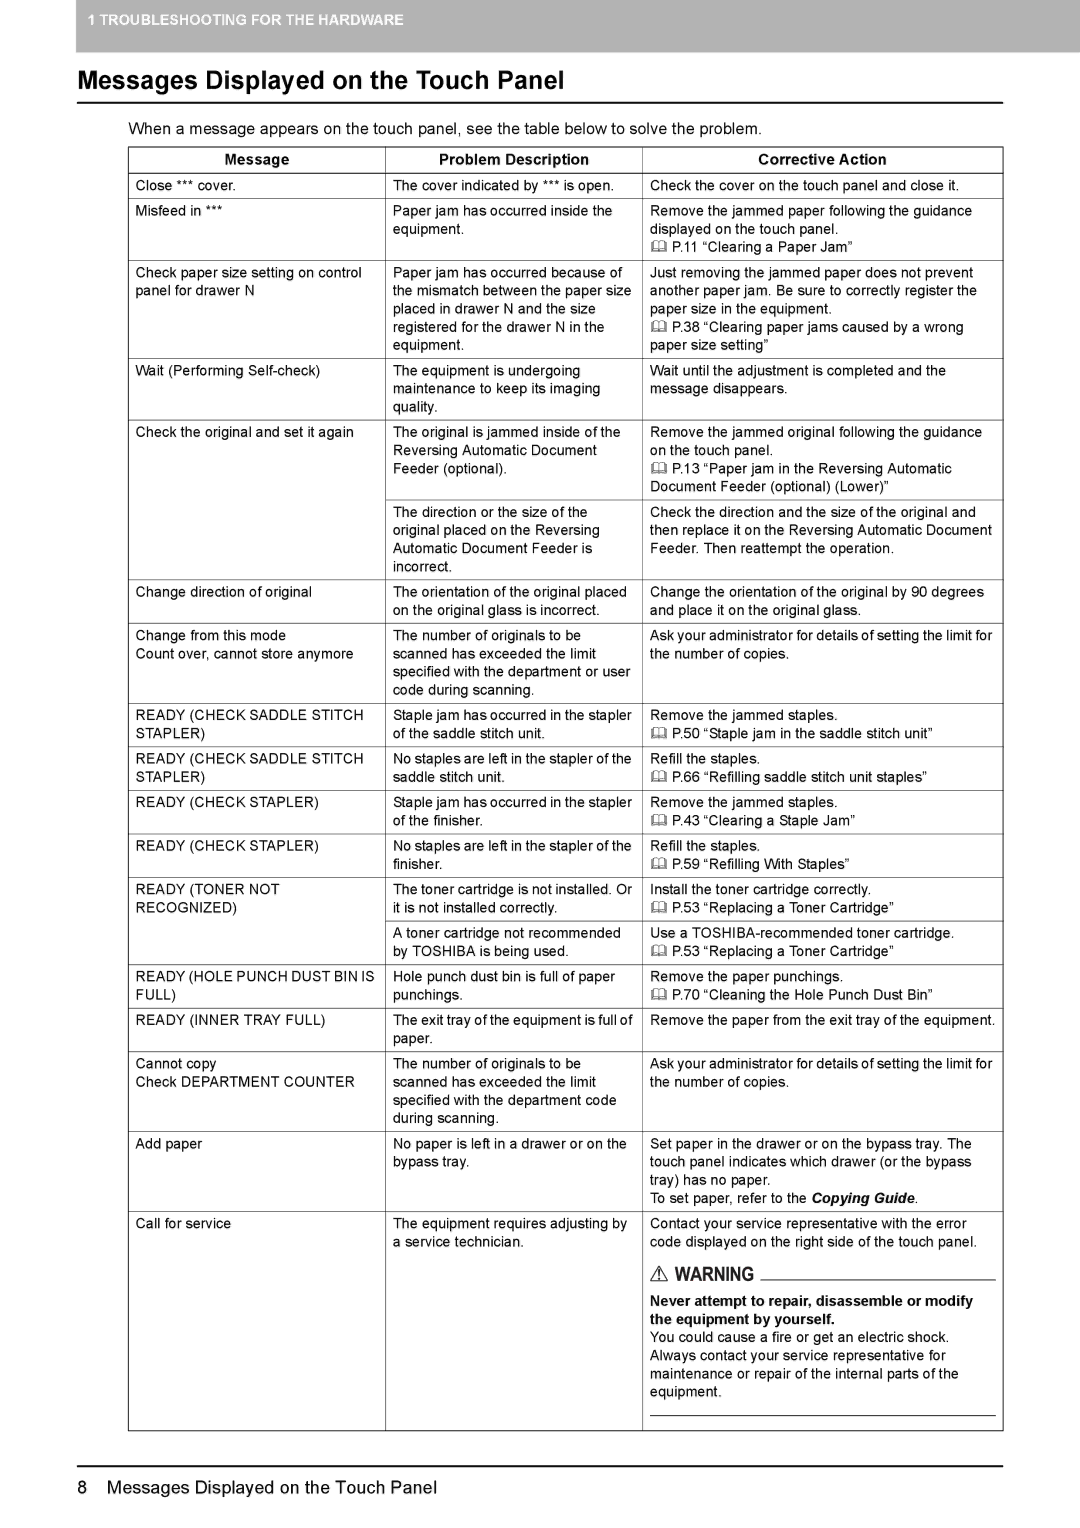
When a message appears on the touch panel, see the table below to solve the problem.
| Message | Problem Description |
|
| Corrective Action |
| |
|
|
|
|
| |||
| Close *** cover. | The cover indicated by *** is open. | Check the cover on the touch panel and close it. |
| |||
|
|
|
|
|
| ||
| Misfeed in *** | Paper jam has occurred inside the |
| Remove the jammed paper following the guidance |
| ||
|
| equipment. |
| displayed on the touch panel. |
| ||
|
|
|
| P.11 “Clearing a Paper Jam” |
| ||
|
|
|
|
|
| ||
| Check paper size setting on control | Paper jam has occurred because of |
| Just removing the jammed paper does not prevent |
| ||
| panel for drawer N | the mismatch between the paper size |
| another paper jam. Be sure to correctly register the |
| ||
|
| placed in drawer N and the size |
| paper size in the equipment. |
| ||
|
| registered for the drawer N in the |
| P.38 “Clearing paper jams caused by a wrong |
| ||
|
| equipment. |
| paper size setting” |
| ||
|
|
|
|
|
| ||
| Wait (Performing | The equipment is undergoing |
| Wait until the adjustment is completed and the |
| ||
|
| maintenance to keep its imaging |
| message disappears. |
| ||
|
| quality. |
|
|
|
|
|
|
|
|
|
|
| ||
| Check the original and set it again | The original is jammed inside of the |
| Remove the jammed original following the guidance |
| ||
|
| Reversing Automatic Document |
| on the touch panel. |
| ||
|
| Feeder (optional). |
| P.13 “Paper jam in the Reversing Automatic |
| ||
|
|
|
| Document Feeder (optional) (Lower)” |
| ||
|
|
|
|
|
| ||
|
| The direction or the size of the |
| Check the direction and the size of the original and |
| ||
|
| original placed on the Reversing |
| then replace it on the Reversing Automatic Document |
| ||
|
| Automatic Document Feeder is |
| Feeder. Then reattempt the operation. |
| ||
|
| incorrect. |
|
|
|
|
|
|
|
|
|
|
| ||
| Change direction of original | The orientation of the original placed |
| Change the orientation of the original by 90 degrees |
| ||
|
| on the original glass is incorrect. |
| and place it on the original glass. |
| ||
|
|
|
|
|
| ||
| Change from this mode | The number of originals to be |
| Ask your administrator for details of setting the limit for |
| ||
| Count over, cannot store anymore | scanned has exceeded the limit |
| the number of copies. |
| ||
|
| specified with the department or user |
|
|
|
|
|
|
| code during scanning. |
|
|
|
|
|
|
|
|
|
|
| ||
| READY (CHECK SADDLE STITCH | Staple jam has occurred in the stapler |
| Remove the jammed staples. |
| ||
| STAPLER) | of the saddle stitch unit. |
| P.50 “Staple jam in the saddle stitch unit” |
| ||
|
|
|
|
|
| ||
| READY (CHECK SADDLE STITCH | No staples are left in the stapler of the |
| Refill the staples. |
| ||
| STAPLER) | saddle stitch unit. |
| P.66 “Refilling saddle stitch unit staples” |
| ||
|
|
|
|
|
| ||
| READY (CHECK STAPLER) | Staple jam has occurred in the stapler |
| Remove the jammed staples. |
| ||
|
| of the finisher. |
| P.43 “Clearing a Staple Jam” |
| ||
|
|
|
|
|
| ||
| READY (CHECK STAPLER) | No staples are left in the stapler of the |
| Refill the staples. |
| ||
|
| finisher. |
| P.59 “Refilling With Staples” |
| ||
|
|
|
|
|
| ||
| READY (TONER NOT | The toner cartridge is not installed. Or |
| Install the toner cartridge correctly. |
| ||
| RECOGNIZED) | it is not installed correctly. |
| P.53 “Replacing a Toner Cartridge” |
| ||
|
|
|
|
|
| ||
|
| A toner cartridge not recommended |
| Use a |
| ||
|
| by TOSHIBA is being used. |
| P.53 “Replacing a Toner Cartridge” |
| ||
|
|
|
|
|
| ||
| READY (HOLE PUNCH DUST BIN IS | Hole punch dust bin is full of paper |
| Remove the paper punchings. |
| ||
| FULL) | punchings. |
| P.70 “Cleaning the Hole Punch Dust Bin” |
| ||
|
|
|
|
|
| ||
| READY (INNER TRAY FULL) | The exit tray of the equipment is full of |
| Remove the paper from the exit tray of the equipment. |
| ||
|
| paper. |
|
|
|
|
|
|
|
|
|
|
| ||
| Cannot copy | The number of originals to be |
| Ask your administrator for details of setting the limit for |
| ||
| Check DEPARTMENT COUNTER | scanned has exceeded the limit |
| the number of copies. |
| ||
|
| specified with the department code |
|
|
|
|
|
|
| during scanning. |
|
|
|
|
|
|
|
|
|
|
| ||
| Add paper | No paper is left in a drawer or on the |
| Set paper in the drawer or on the bypass tray. The |
| ||
|
| bypass tray. |
| touch panel indicates which drawer (or the bypass |
| ||
|
|
|
| tray) has no paper. |
| ||
|
|
|
| To set paper, refer to the Copying Guide. |
| ||
|
|
|
|
|
| ||
| Call for service | The equipment requires adjusting by |
| Contact your service representative with the error |
| ||
|
| a service technician. |
| code displayed on the right side of the touch panel. |
| ||
|
|
|
|
|
|
| |
|
|
|
|
|
|
|
|
|
|
|
| Never attempt to repair, disassemble or modify |
| ||
|
|
|
| the equipment by yourself. |
| ||
|
|
|
| You could cause a fire or get an electric shock. |
| ||
|
|
|
| Always contact your service representative for |
| ||
|
|
|
| maintenance or repair of the internal parts of the |
| ||
|
|
|
| equipment. |
| ||
|
|
|
|
|
|
|
|
|
|
|
|
|
|
|
|
|
|
|
|
|
|
|
|