Page
Page
‘Super Power Save Mode’ Default Time
‘Low Power Mode’
‘Low Power Mode’ Default Time
‘Sleep Mode’ Default Time
Toshiba Quality is Second to None
Supplies / Parts
General
Toshiba Quality is Second to None
Toners
Preface
Features of the e-STUDIO16/20/25
Preface
Table of Contents
Table of Contents
When the Graphic Symbol Flashes
10-1
Precautions
Installation
Page
Page
Before Making Copies
STUDIO20/25
Description of the Optional Equipment
STUDIO16
Brightness control
Description of the Digital Copier
Main Components
Description of the Digital Copier
Control Panel
Automatic Function Clear Mode
Arrow Keys
Message Display Panel
Paper
Acceptable Paper Types and Sizes
Handling and Storing Paper
Pay attention to the following points
Paper
Changing the Paper Size of the Cassette
Install the cassette into the copier
Tip
Auto Job Start
Turning on the Power Switch / Auto Job Start
Ready message appears
Cassette Size Setting
Select 01.MACHINE Defaults and press the key
Selectkey .DEFAULT Settings and press
Press the key to enter the program menu
Repeat steps 4 to 6 to specify the paper size for other
Paper cassettes, as necessary
Press Key to return to the initial screen for Copying
Enter the 5-digit department code, and press key
Department Codes
Make copies, as you would normally
14BEFORE Making Copies
HOW to Make Copies
General Copying Procedure
Copying Procedure Place originals
Key
Set the desired copy modes
Press
Setting Originals
Originals
Placing the Original on the Glass
Setting Originals
6HOW to Make Copies
Page
Interrupt Copying
Press Key
Place the original
After interrupt copying is finished, press the key again
Basic Menu
Paper Selection
Automatic Paper Selection APS
Select original size A4-R A5-R
Manual Paper Selection
Select desired copy mode and quantity as required
Paper Selection
Bypass Copying
Reset
Place sheets of copy paper on the stack feed bypass
Bypass Copying by Specifying the Copy Size
Select the desired copy size
Using Automatic Magnification Selection AMS Press the key
Reduction and Enlargement Copying
Select the desired image density and copy quantity
Reduction and Enlargement Copying
Reduce/Enlarge
Press Key or
Press Key and go to step
Or key. Then press the key
Select the desired reproduction ratio using
Use the or keys and select Zoom UP DOWN. Press the key
Xxxx-Yxxx% appears next to zoom on the display
Zoom
Key on the control panel
Copying in the Manual Mode Press Key
Copying with Copy Density Selection
Place the original and press Key
Select Manual by pressing the key Then press the key
Copying with Copy Density Selection
Press the or key to select the desired image density
If necessary, adjust the image density
Original Image Quality Selection
Copy quantity
Place the originals on the feed tray or on the glass
16BASIC Menu
Edit Menu
Duplex Copying
Sided Originals 1-Sided Copies default setting
To the initial screen for copying
Confirm that Duplex is highlighted on the screen
Key to return
Confirm thatDUPLEX is highlighted on the screen
Duplex Copying
Sided Originals 2-Sided Copies
How to place originals
Then press Key Select 1 2 by pressing Key. Press
Select the desired paper cassette, image density
Reproduction ratio and copy quantity
Place the first page of the originals first side on
How to place originals on the glass
Press the key on the control panel while
Sided Originals 1-Sided Copies
Place the originals on the feed tray Press the key
Select the desired copy mode using
Book-Type Originals 2-Sided Copies
Press Key Specify the Book Margin then press
Necessary
Key when finished
Press Key to select the desired paper Cassette. Press
Dual page Copying
Initial screen for copying. The Edit Menu screen
Appears Press Key to display the Dual Reverse. Then press
Press the key and select ON. Then press the key
Image Shift Copying
Specify the margin by using Key
Default margin is 7 mm
Edge Erase Copying
Press the key and select 2IN1 or 4IN1 Then press the key
Sided originals IN-1
Copy quantity
IN-1/4-IN-1
Select the desired paper cassette, image density,
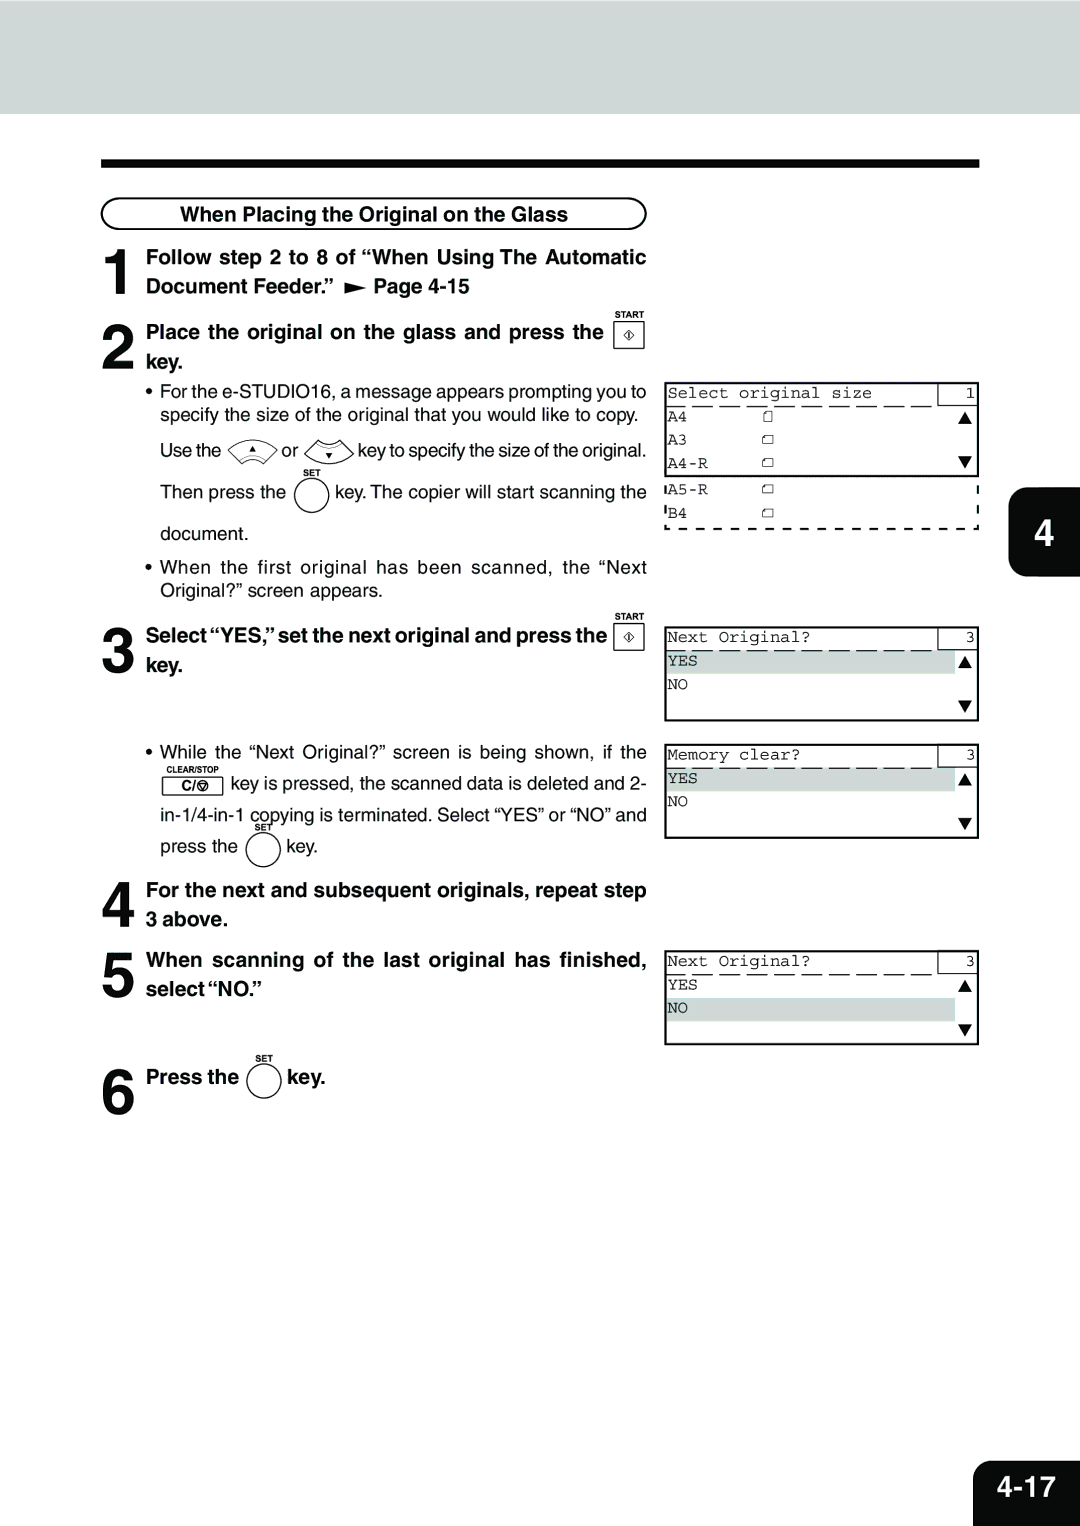
Select YES, set the next original and press the key
While the Next Original? screen is being shown, if
Key and specify whether the originals
Magazine Sort
Are single-side or duplex. Then press Key
Select YES, set the next original and press the key
Magazine Sort
Annotation
Press the key while ANNOTATIONis displayed
Press the key to return to the initial screen for copying
Press the key to display ANNOTATION. Then
Annotation
Editing
Mirror Image
Press the key to displayEDITING. Then press
Press the key to displayMIRROR. Then press
Key Press the key and select NEG/POS. Then
Editing
Negative/Positive Reversal
JOB Build
Place the original on the glass or feed tray and press
Copying Mixed Size Originals
Place the originals on the original feed tray Press the key
JOB Memory
Storing a New Combination of Copy Modes
Select desired copy modes
To MEMORY4. Then press the key
JOB Memory
Paper Type
Menu List
Program Menu
Walkup Screen
Select02.WALKUP SCREENand press the key
Timers
Auto Clear
Timers
Auto Low Power
Select 03. Timers and press the key
Select 2. Auto LOW Power and press the key
Select 01. Machine Defaults and press the key
Select the desired Automatic Sleep Time by using
Automatic Sleep
Select 3. Auto Sleep and press the key
Clearing the Super Energy Saver mode
Clearing the Automatic Sleep mode
Select 2.ON and press the key
Weekly Timer
Select the 04. Weekly Timer and press the key
Weekly Timer Sunday Monday Tuesday
Enter a turn off time for the copier and press the key
Canceling WeeklyTimer
Select01. Machine Defaults and press the key
Select 04. Weekly Timer and press the key
Select 1.OFF, and press Key
Speaker Volume
Repeat steps 5 to 7 to adjust the volume of other
Selectkey. the desired volume control and press
Key to adjust the volume
Department Code Setting
Department Code Setting
Department Code
Select 1.YES or 2.NO and press the key
Department Code
Master Code Entry
Enter the desired master code and press
Department Code Entry Enter a department number and press
Clearing Department Code Counters
Select 4.COUNT Clear and press Key
Deleting Department Code
Select 1.DELETE and press Key
Change Department Code Setting
Enter a department code and press Key
Same department code cannot be entered for other
Report Printing
Select 1.DEPARTMENT Code and press the key
Canceling/Resuming Department Management
Copy Setup
Screen returns to the Copy Setup screen
Copy Setup
Select 02.IMAGE Mode and press
Select 02.COPY Setup and press Key
Key to enter the manual mode
Select 04.FINISHING and press
Select a paper ejection method and press the key
Select 03. Initial SETUP. Then press the key
Date and Time
Select 01. Date & TIME. Then press the key
Set the system for 12 hours or 24 hours operation
Date and Time
Key.Select 04. Month MODE. Then press
Select and minute 00 to 59 by using the numeric
Select AM or PM by using Key
Check that all the settings are correct
Enter the hour 00 to 12 if 12HR format has been
Change Display Panel Language
Select 02.LANGUAGE and press the key
Select the desired display language and press the key
Message display panel
Function List
Total Counter
Finishing Mode Selection
Finishing Mode Selection
Finisher option for e-STUDIO20/25 only
Offset Tray option
Job Separator option
Press the key. TheFINISHING screen appears
NON-SORT Copying
Confirm that Nonsort is displayed. Then press Key
Key and select the sort mode
Sort Copying
Place the originals in the feeder
If Finishingsort is not displayed, press
Copier starts copying and collates the copies into sets
Offset Copying
Alternation
Alternation
Select YES, set the next original and press
Copier starts copying. In this copying mode, as sets
Select the Staple mode
Stapling
Keys
Ratio Press Key
Select Staple from the Finishing menu by pressing
When the optional Stapler kit is installed
Stapling
When the Graphic Symbol Flashes
Description of the Graphic Symbols
Push the cassette straight in until it comes to a stop
Loading Paper
Adding Paper to the Cassettes
Loading Paper
Close the cover of the large-capacity feeder
Replacing Toner Cartridge
Replacing Toner Cartridge
B a a
Additional Explanation
STUDIO16
STUDIO20/25
Replacing Process Unit
Replacing Process Unit
Open the stack feed bypass
Automatic duplexing units
Always hold the Process Unit by the colored handle
Replacing Process Unit
Replacing Ozone Filter
Clearing Paper JAM
Press the button to unlock and open the cover
Page
Clearing Paper JAM
Lift the original tray
Page
Paper Misfeed in the Large-Capacity Feeder
Option for e-STUDIO20/25
Open the cover Remove any misfed paper
Reset the paper on the bypass tray
18WHEN the Graphic Symbol Flashes
Page
Automatic duplexing unit to normal position if installed
Page
It pushing down the blue lever
Page
Adding Staples
Page
Adding Staples
Staple kit option
Insert the cartridge until it clicks
Removing Jammed Staples
Attach the finisher to the copier
Slide forward and lift up the staple cover
Press the lever 1 and pull up the staple guide knob
Removing Jammed Staples
Calling for Service
Periodic Maintenance
User Test Mode
Automatic Test Mode
Auto Test
Individual Test Mode
Individual Test Summary
ADF Test
ADF Test Number CORRECT? YES
KEY Test
Select02.INDIVIDUALTEST and press Key
If even one LED did not light, select the 2.NG
LED Test
If all the LEDs turned on, select the 1.OKand press
LCD Test
If all elements of the LCD turned on and off normally
After checking, press Key
If the volumes are output normally, select1.OK
Speaker Test
Switch Test
Test Print
Printing a Test Result
Maintenance
Items to inspect once a week
Daily Inspection
Items to inspect every morning
Cleaning the Wire
Close the front cover
Cleaning the Wire
Copier does not start
Simple Troubleshooting
Display does not change when keys are pressed
Simple Trouble Shooting
Copies are stained
Copy density is too low
Copy density is too high
Functions cannot be set
Copy images are blurred
Images are partially missing
8MAINTENANCE
Specifications & Options
STUDIO16/20/25 Specifications
Reversing Automatic Document Feeder
Specification of Options
Automatic Document Feeder
Paper Feed Unit
Specification of Options
Automatic Duplexing Unit
Job Separator
Offset Tray
Stapler
Finisher for e-STUDIO20/25 only
Stack Feed Bypass
Memory Kit
Copy Function Combination Matrix
STUDIO16/20/25 Copy Function Combination Table
10-9
10-10SPECIFICATIONS & Options