Page
Mode KEY, with status lamps
Welcome to your fax machine
Line lamp
PC Comm lamp
Contents
Please protect your machine from
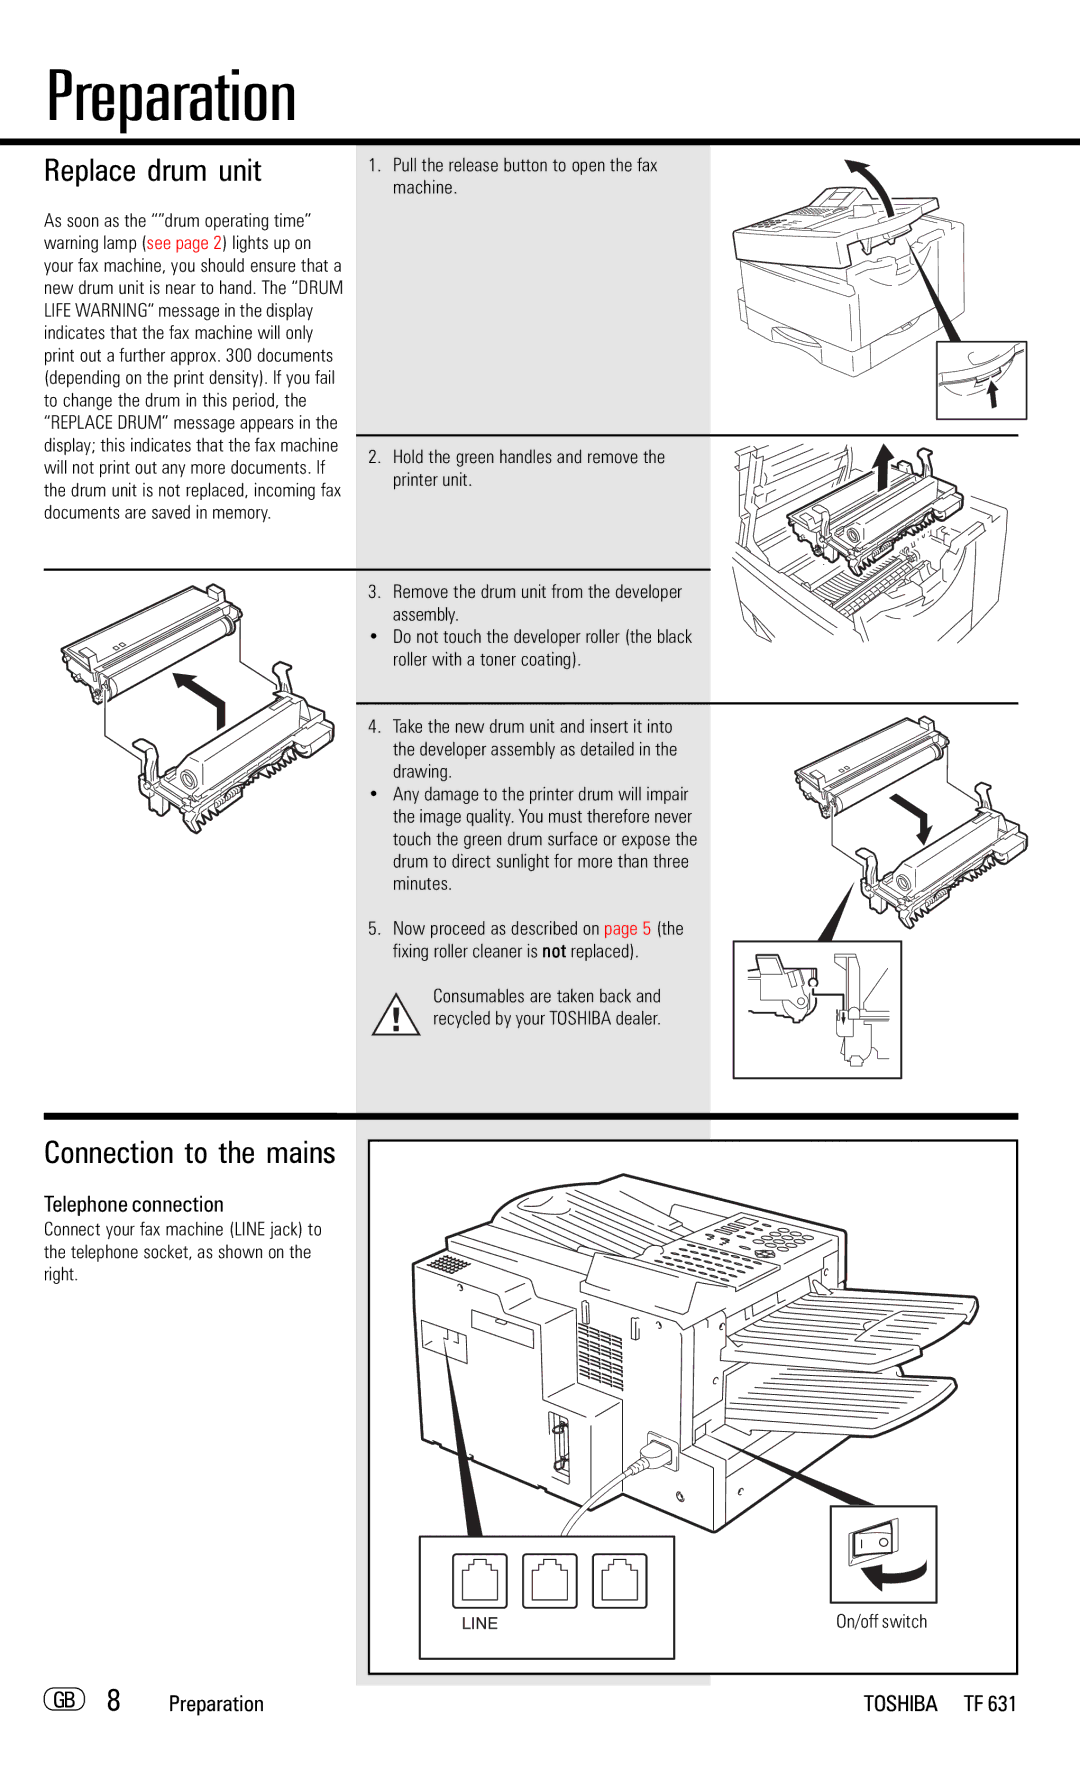
Preparation
Preparation
Prepare and insert
Printer unit
Remove transport fittings
Change toner
Case you come into contact with toner
Then proceed as detailed on
Replace drum unit
Telephone connection
How to insert the recording paper
Install exit paper trays
Remove the paper cassette Insert cassette index A4
Then Slide the cassette into the slot
Switch your fax machine OFF Stack memory is deleted when a
Insert memory card
GB 10 Preparation
Close the cover for the memory modules
Installation
Menu system
GB 12 Installation
Enter user name
User name
Enter the name
Confirm with Start Press STOP, return to standby mode
Installation 13 GB
Enter terminal ID
From Enter user name
Current dialling method is highlighted
Setting dialling method
GB 14 Installation
Enter the digits for obtaining public line
Select a menu item Press STOP, return to standby mode
Installation 15 GB
GB 16 Installation
Set language
Enter the date and the time Confirm with Start
Installation 17 GB
Set date and time
Set standby mode
To set reception mode do the following
Reception of documents
Automatic reception
Reception reduction
19 GB
Reception reduction
Discard ON/OFF
Memory reception
Memory reception ON/ OFF
Display messages for memory reception
Press STOP, return to standby
Enter the security code
21 GB
Go to A1
GB 22 Reception of documents
Enter the old security code Confirm with Start
Enter the new security code Confirm with Start
Enter the period Confirm with Start
23 GB
Enter the current security code
Day
Open the one-touch dial cover
Corresponding function key
Enter the current security code Confirm with Start
Correct sequence print- out
25 GB
Multiple printout
Select the required quantity
Make your selection Number of incoming copies
Example 8 copies
Press the JOB Cancel key
Delete reception
27 GB
Press the JOB Status key
Protection facility has been activated
Reception protection
GB 28 Reception of documents
Local copy
29 GB
Sorter function on
Sorter function OFF
Make your selection Copy reduction on Copy reduction OFF
Copy reduction
GB 30 Reception of documents
Transmit documents
Document format
GB 32 Transmit documents
Automatic fax mes- sages
Enter the fax number
Stack mode
This is different with your fax ma- chine
Transmit documents 33 GB
Job
Useful job management
GB 34 Transmit documents
JOB no
First job
Press the Shift key and then the corresponding function key
Important transmission
Transmit documents 35 GB
GB 36 Transmit documents
Direct transmission
Select a menu item Enter the fax number
Transmission using alpha dial
Activate the dialling key
Enter the alphabet dial number
Transmit documents 37 GB
Toshiba Europe Standby mode
Transmission one-touch dial
Press the one-touch dial key
GB 38 Transmit documents
Faxing with telephone directory
Transmit documents 39 GB
001
Please refer to page 12 for entering letters
GB 40 Transmit documents
Single multi-address transmission
Press the Multi key
Stored broadcast
Enter group number Confirm with Start
SUN 1956 Broadcast via one-touch dial key
Transmit documents 41 GB
Monitoring direkt
Activate monitoring
GB 42 Transmit documents
1234567
Monitoring by job
Transmit documents 43 GB
Dialling the fax partners GB 44 Transmit documents
Set resolution
Press „MODE
Set contrast
Dialling the fax partner
Transmit documents 45 GB
Trast
Correction mode
Fax machine displays the current setting
Transmission options, number of pages
Enter the page number Confirm with Start
Transmit documents 47 GB
Make your selection For the number of pages
Transmission protection
Transmission options, protected transmission
GB 48 Transmit documents
Selected setting is applicable only for the current job
Transmission options, reduced speed
Transmit documents 49 GB
Press the Shift key and then
Refer to page 12 for the procedure
Transmission options, send cover sheet
Select a menu item Enter the addressee
Confirm with Start Enter the sender
Transmit documents 51 GB
Chain dialing
Enter the numbers
Redial
Manual call redial
Manual call redial from memory
Press the REDIAL/PAUSE key
Resend retained job
Enter new fax number Confirm with Start
Transmit documents 53 GB
Selected job is used again
If your fax machine is set to retain job
Cancel a retained job with retain job
Selected job is cancelled
Cancel transmission
Cancel from stack
Press Stop
Job is displayed as follows
Polling
Reserve polling
General
Reserve polling
Polling protection
57 GB
Enter the Toshiba code Confirm with Start
Enter the number Confirm with Start
GB 58 Polling
Reserve polling, perma- nent general infobox
Infobox
Reserve polling, append documents
59 GB
GB 60 Polling
Cancel polling reserva- tion
Select the job which you wish to cancel Confirm with Start
Go to B
Single polling
61 GB
Multiple polling
Select a menu item Press the Multi key
GB 62 Polling
With Toshiba code Without polling protection
63 GB
Multiple polling is stored and carried out as a job
Cancel polling
Selected polling job is cancelled
GB 64 Polling
21-03-97
Enter the period of the week Confirm with Start
65 GB
Enter the periods Confirm with Start
GB 66 Polling
Enter
Go to a Go to B
Enter the menu
Reverse direction
67 GB
Enter the Toshiba codes Confirm with Start
GB 68 Polling
Store numbers
Alphabet dial memory
69 GB
Enter alphabet dial number
Press STOP, return to standby mode GB 70 Store numbers
/ or Skip with Start Confirm with Start
71 GB
Procedure up to this menu item See
Alphabet dial options
Modify ABB numbers
Procedure as described under Enter alphabet dial number See
Press STOP, return to standby mode GB 72 Store numbers
If you want to delete ABB numbers just enter them
Delete ABB numbers
73 GB
Direct configuration of one- touch dial keys
One-touch dial keys
Save fax number directly on one- touch dial key
Fax number input
Skip with Start Confirm with Start
75 GB
Assign alphabet dial number to a one-touch dial key
Cancel one-touch dial keys
Press STOP, return to standby mode GB 76 Store numbers
Enter group number
Define groups
77 GB
Press STOP, return to standby mode GB 78 Store numbers
Make your selection For further group partner
Make your selection Cancel the selected group partner YES
Edit groups
79 GB
Enter an alphabet dial number
Cancel groups
Press STOP, return to standby mode GB 80 Store numbers
Group is cancelled
Example group number 444, name Supergroup
Report prints
Program selection list
Transmission reports
81 GB
Various transmission reports and related options
GB 82 Report prints
Transmission report
83 GB
Select the entry which you wish to print Press the Copy key
GB 84 Report prints
Multi transmission report
Multi polling report
85 GB
Manual output of journalStandby mode
Transmission and reception journal
Select a menu item For manual output
GB 86 Report prints
87 GB
GB 88 Report prints
Reservation list
Function list
89 GB
Required lists are printed out
Dial number lists
GB 90 Report prints
Due to a lengthy power failure
Department list
Mains failure report
91 GB
Delayed fax job
GB 92 Advanced settings
Nnnnnn
23 33
Advanced settings
Set transmission header position
93 GB
Make your selection For transmission header position
Advanced settings
GB 94 Advanced settings
Reception trailer RTI
Permanent monitoring
Advanced settings 95 GB
Call redial
Go to a
Period between call redial at- tempts
Advanced settings
Set ringer volume
Power saver stand by
97 GB
GB 98 Advanced settings
Activate cost centre management Deactivate mode
Cost centre manage- ment
Divider sheet
Use master code when first entered
Department code
99 GB
Enter the department name Confirm with Start
Press STOP, return to standby mode GB 100 Advanced settings
Modify or delete a department
Enter ! master code Confirm with Start Start the menu
Enter the department number Confirm with Start
Fax machine is permanently enabled
Disable department code
Accessed by entering the mas- ter code
GB 102 Advanced settings
Cover sheet is activated Cover sheet is cancelled
Document is saved as the cover sheet diagram
Cover sheet
Input retaining time
Preset retaining time is displayed
Retain jobs
Query job status
Cancel current status
GB 104 Advanced settings
Display the basic setting
Basic setting, document length
Basic setting, transmis- sion memory
Basic setting, resolution and contrast
Display the basic setting for resolution
Transmission of documents is re- stricted
Basic setting, ECM er- ror correction mode
Basic setting, protected transmission
Print Resolution
Additional features SUB, SEP, PWD
When all data have been entered end with
Additional paper cas- settes optional
Selection of required menu item
Possible problems
Error messages in the display
Display Cause How to correct
Code
Error codes in journal
GB 112 Possible problems
Code Cause How to correct
Problem
Solutions
GB 114 Possible problems
Possible causes
Receiving problems
Problem Possible causes
Cleaning document scanner
Document jam
How to clear a
Cleaning the corona
Recording paper jam
After opening
Connection to Pabx
Remote maintenance Comline
GB 118 Possible problems
UK Connection information
Index
GB 120 Index