P5 |
| Suitable mounting surface |
| ||||
Preparing the Opening | 2” x 6” lumber minimum |
| |||||
|
|
|
|
|
| ||
| Header board |
|
|
|
| ||
| If you just removed your existing door or you are installing a | 2” x 6” lumber |
|
|
|
| |
Tools Needed: | preferred |
|
|
|
| ||
new door, complete all steps in PREPARING THE OPENING. |
|
|
|
| |||
Recommended |
|
|
|
|
|
| |
To ensure secure mounting of track brackets, side |
|
|
|
| Door | ||
tools from | and center brackets, or steel angles to new or |
|
|
|
| ||
page 5 | construction, it is recommended to follow the procedures |
| Level header | height | |||
|
|
| |||||
| outlined in DASMA Technical Data Sheets #156, #161 and | Plumb jambs |
|
|
| ||
| #164 at www.dasma.com. |
|
|
| |||
|
|
|
|
|
|
| |
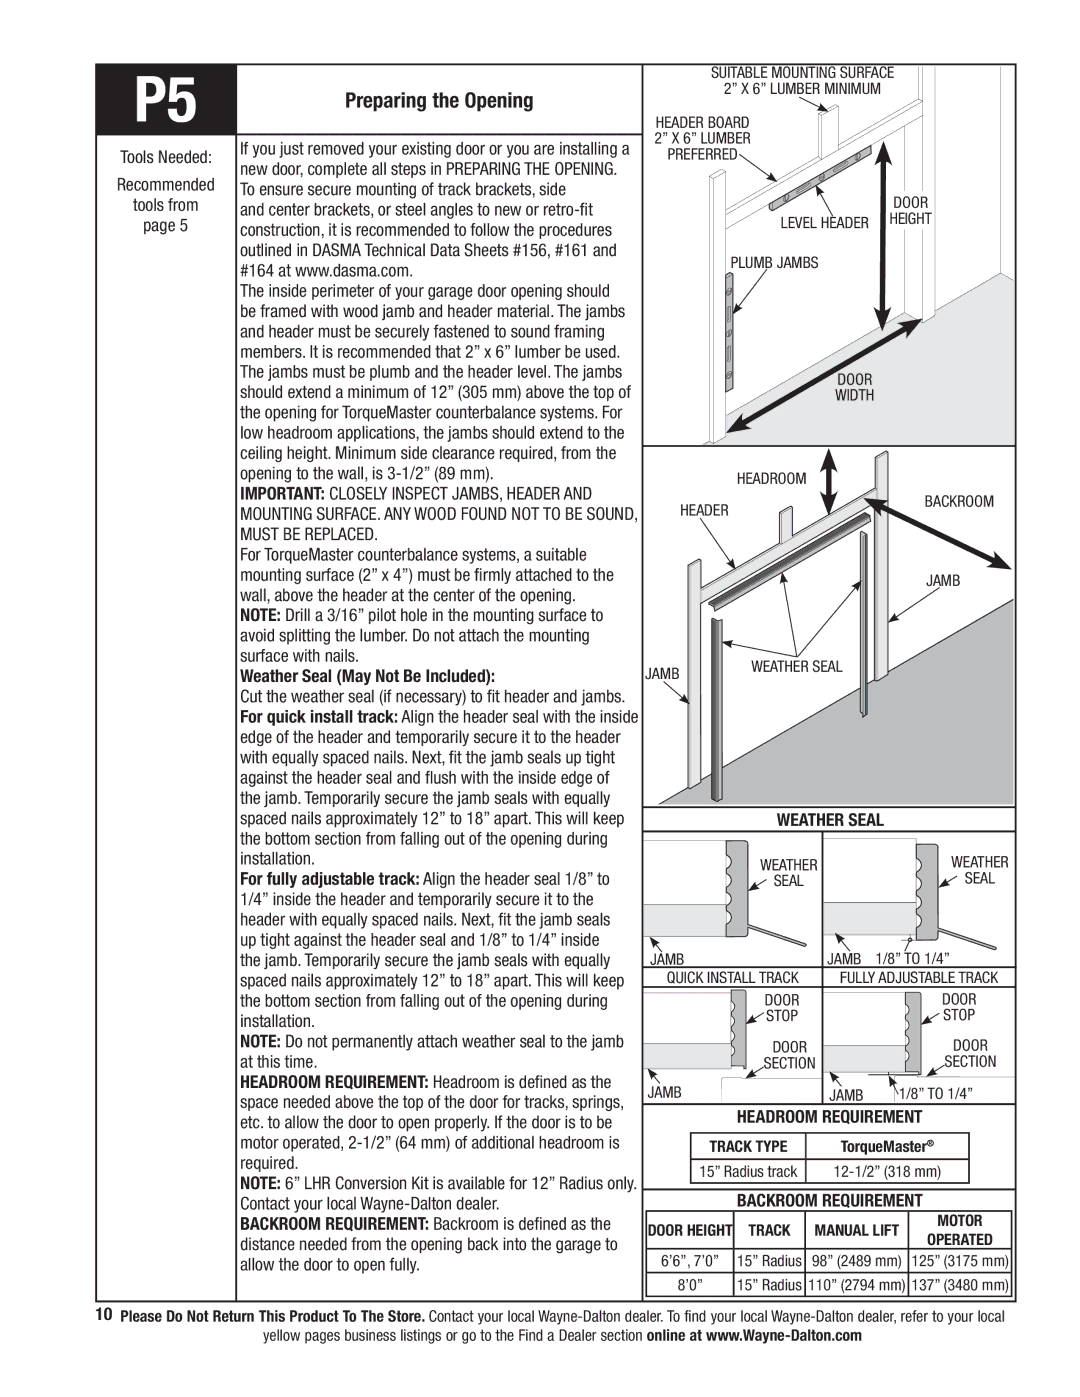
| The inside perimeter of your garage door opening should |
|
|
|
|
|
|
| be framed with wood jamb and header material. The jambs |
|
|
|
|
|
|
| and header must be securely fastened to sound framing |
|
|
|
|
|
|
| members. It is recommended that 2” x 6” lumber be used. |
|
|
|
|
|
|
| The jambs must be plumb and the header level. The jambs |
|
|
| Door |
|
|
| should extend a minimum of 12” (305 mm) above the top of |
|
|
|
|
| |
|
|
|
| Width |
|
| |
| the opening for TorqueMaster counterbalance systems. For |
|
|
|
|
|
|
| low headroom applications, the jambs should extend to the |
|
|
|
|
|
|
| ceiling height. Minimum side clearance required, from the |
|
|
|
|
|
|
| opening to the wall, is |
| Headroom |
|
|
|
|
| IMPORTANT: Closely inspect jambs, header and | Header |
|
|
|
| Backroom |
| mounting surface. Any wood found not to be sound, |
|
|
|
| ||
|
|
|
|
|
| ||
| must be replaced. |
|
|
|
|
|
|
| For TorqueMaster counterbalance systems, a suitable |
|
|
|
|
|
|
| mounting surface (2” x 4”) must be firmly attached to the |
|
|
|
|
| Jamb |
| wall, above the header at the center of the opening. |
|
|
|
|
| |
|
|
|
|
|
|
| |
| NOTE: Drill a 3/16” pilot hole in the mounting surface to |
|
|
|
|
|
|
| avoid splitting the lumber. Do not attach the mounting |
|
|
|
|
|
|
| surface with nails. | Jamb | WEATHER SEAL |
|
| ||
| Weather Seal (May Not Be Included): |
|
| ||||
|
|
|
|
|
| ||
| Cut the weather seal (if necessary) to fit header and jambs. |
|
|
|
|
|
|
| For quick install track: Align the header seal with the inside |
|
|
|
|
|
|
| edge of the header and temporarily secure it to the header |
|
|
|
|
|
|
| with equally spaced nails. Next, fit the jamb seals up tight |
|
|
|
|
|
|
| against the header seal and flush with the inside edge of |
|
|
|
|
|
|
| the jamb. Temporarily secure the jamb seals with equally |
|
|
|
|
|
|
| spaced nails approximately 12” to 18” apart. This will keep |
| Weather seal |
| |||
| the bottom section from falling out of the opening during |
|
|
|
|
|
|
| installation. |
| Weather |
|
| Weather | |
| For fully adjustable track: Align the header seal 1/8” to |
| seal |
|
|
| seal |
| 1/4” inside the header and temporarily secure it to the |
|
|
|
|
|
|
| header with equally spaced nails. Next, fit the jamb seals |
|
|
|
|
|
|
| up tight against the header seal and 1/8” to 1/4” inside |
|
|
| jamb | 1/8” to 1/4” | |
| the jamb. Temporarily secure the jamb seals with equally | Jamb |
|
| |||
| spaced nails approximately 12” to 18” apart. This will keep | Quick Install Track |
| Fully adjustable Track | |||
| the bottom section from falling out of the opening during |
| Door |
|
|
| Door |
| installation. |
| stop |
|
|
| stop |
|
|
|
|
|
|
| |
| NOTE: Do not permanently attach weather seal to the jamb |
| Door |
|
|
| Door |
| at this time. |
| Section |
|
| Section | |
| HEADROOM REQUIREMENT: Headroom is defined as the | Jamb |
|
| Jamb | 1/8” to 1/4” | |
| space needed above the top of the door for tracks, springs, |
|
| ||||
|
| Headroom requirement |
| ||||
| etc. to allow the door to open properly. If the door is to be |
|
| ||||
|
|
|
|
|
|
| |
| motor operated, | TRACK TYPE |
| TorqueMaster® | |||
| required. | 15” Radius track |
| ||||
| NOTE: 6” LHR Conversion Kit is available for 12” Radius only. |
| |||||
|
| Backroom requirement |
| ||||
| Contact your local |
| MOTOR | ||||
| BACKROOM REQUIREMENT: Backroom is defined as the | DOOR HEIGHT | TRACK | MANUAL LIFT | |||
| distance needed from the opening back into the garage to | OPERATED | |||||
|
|
|
|
|
| ||
| allow the door to open fully. | 6’6”, 7’0” | 15” Radius | 98” (2489 mm) 125” (3175 mm) | |||
|
| 8’0” | 15” Radius 110” (2794 mm) 137” (3480 mm) | ||||
10Please Do Not Return This Product To The Store. Contact your local
yellow pages business listings or go to the Find a Dealer section online at