|
|
|
| TorqueMaster® Plus Reset | |
|
|
|
| Instructions Continued... | |
|
|
|
|
|
|
|
|
|
| To adjust spring(s), only add or remove a | |
| Tools Needed: |
| |||
|
|
| maximum of 3/10 of a turn (three teeth of | ||
|
|
|
| ||
|
|
|
| ratchet wheel) at a time. Both sides need | |
|
|
| |||
|
|
|
| to be adjusted equally on double spring | |
|
|
|
| doors. | |
|
|
|
| NOTE: Single spring applications require | |
|
|
|
| no spring winding on left hand side. | |
|
|
|
| Clamp a pair of vice clamps on the vertical | |
|
|
|
| tracks just above the second roller on one | |
|
|
|
| side and just below the second roller on | |
|
|
|
| the other side. This will prevent the door | |
|
|
|
| from raising or lowering while adjusting | |
|
|
|
| the spring(s). | |
|
|
|
|
|
|
|
|
|
| WARNING | |
|
|
|
| Prior to winding or making | |
|
|
|
| adjustments to the springs, ensure | |
|
|
|
| you’re winding in the proper | |
|
|
|
| direction as stated in the | |
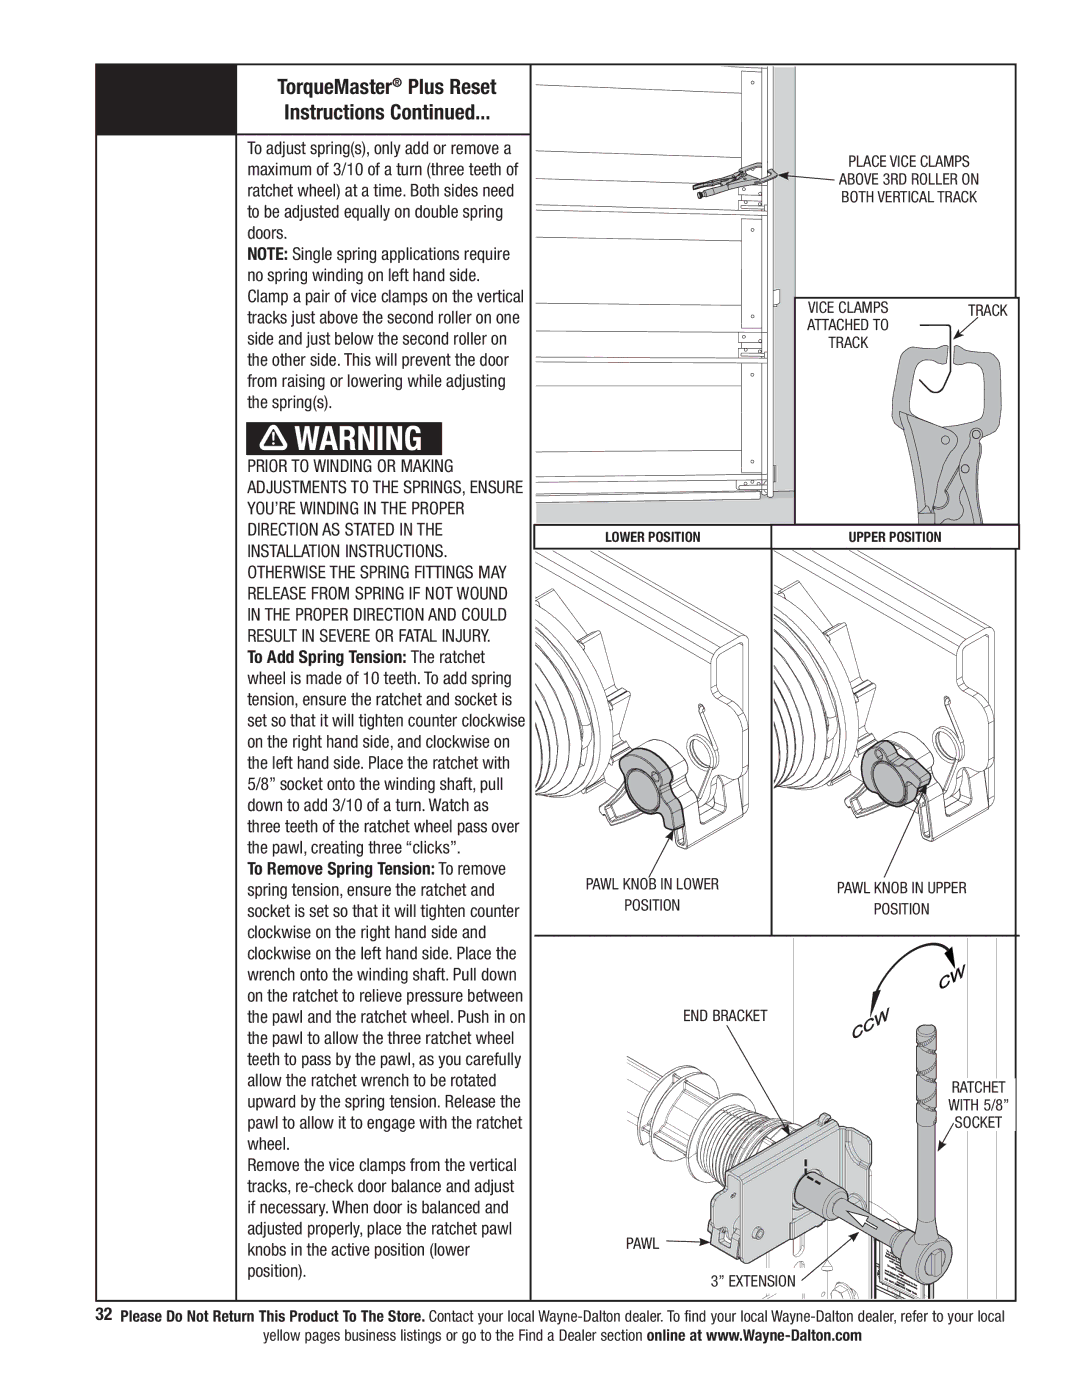
Place vice clamps
![]() above 3rd Roller on both vertical track
above 3rd Roller on both vertical track
Vice clamps | Track |
attached to |
|
track |
|
Installation Instructions. |
Otherwise the spring fittings may |
release from spring if not wound |
in the proper direction and could |
result in severe or fatal injury. |
To Add Spring Tension: The ratchet |
wheel is made of 10 teeth. To add spring |
tension, ensure the ratchet and socket is |
set so that it will tighten counter clockwise |
on the right hand side, and clockwise on |
the left hand side. Place the ratchet with |
5/8” socket onto the winding shaft, pull |
down to add 3/10 of a turn. Watch as |
three teeth of the ratchet wheel pass over |
the pawl, creating three “clicks”. |
To Remove Spring Tension: To remove |
spring tension, ensure the ratchet and |
socket is set so that it will tighten counter |
clockwise on the right hand side and |
clockwise on the left hand side. Place the |
wrench onto the winding shaft. Pull down |
Lower Position
Pawl knob in Lower
Position
UPPER Position
Pawl knob in upper
Position
on the ratchet to relieve pressure between |
the pawl and the ratchet wheel. Push in on |
the pawl to allow the three ratchet wheel |
teeth to pass by the pawl, as you carefully |
allow the ratchet wrench to be rotated |
upward by the spring tension. Release the |
pawl to allow it to engage with the ratchet |
wheel. |
Remove the vice clamps from the vertical |
tracks, |
if necessary. When door is balanced and |
adjusted properly, place the ratchet pawl |
knobs in the active position (lower |
position). |
End Bracket
Ratchet with 5/8” Socket
PAWL | To |
|
|
|
|
|
| |
| fatal |
|
|
|
|
|
| |
|
|
| , |
|
|
|
|
|
|
| until |
| DO |
|
|
| |
|
| from |
|
|
| |||
| To | spr |
|
|
|
|
| |
|
| safely |
|
|
|
|
| |
| and follow | read |
|
|
| |||
3” Extension | installationthe |
|
|
|
| |||
DO | No space | REMOVE. ns/ownersthe |
| |||||
|
| NOT | instructiotions | in |
| e | ||
|
|
| manual |
|
| |||
|
| Ratchet | Pawla |
| THIS | TA |
|
|
|
| Cable | Drum |
|
| G. | Ratchet | |
|
|
| DISENGAGED S |
|
| um | ||
32Please Do Not Return This Product To The Store. Contact your local
yellow pages business listings or go to the Find a Dealer section online at