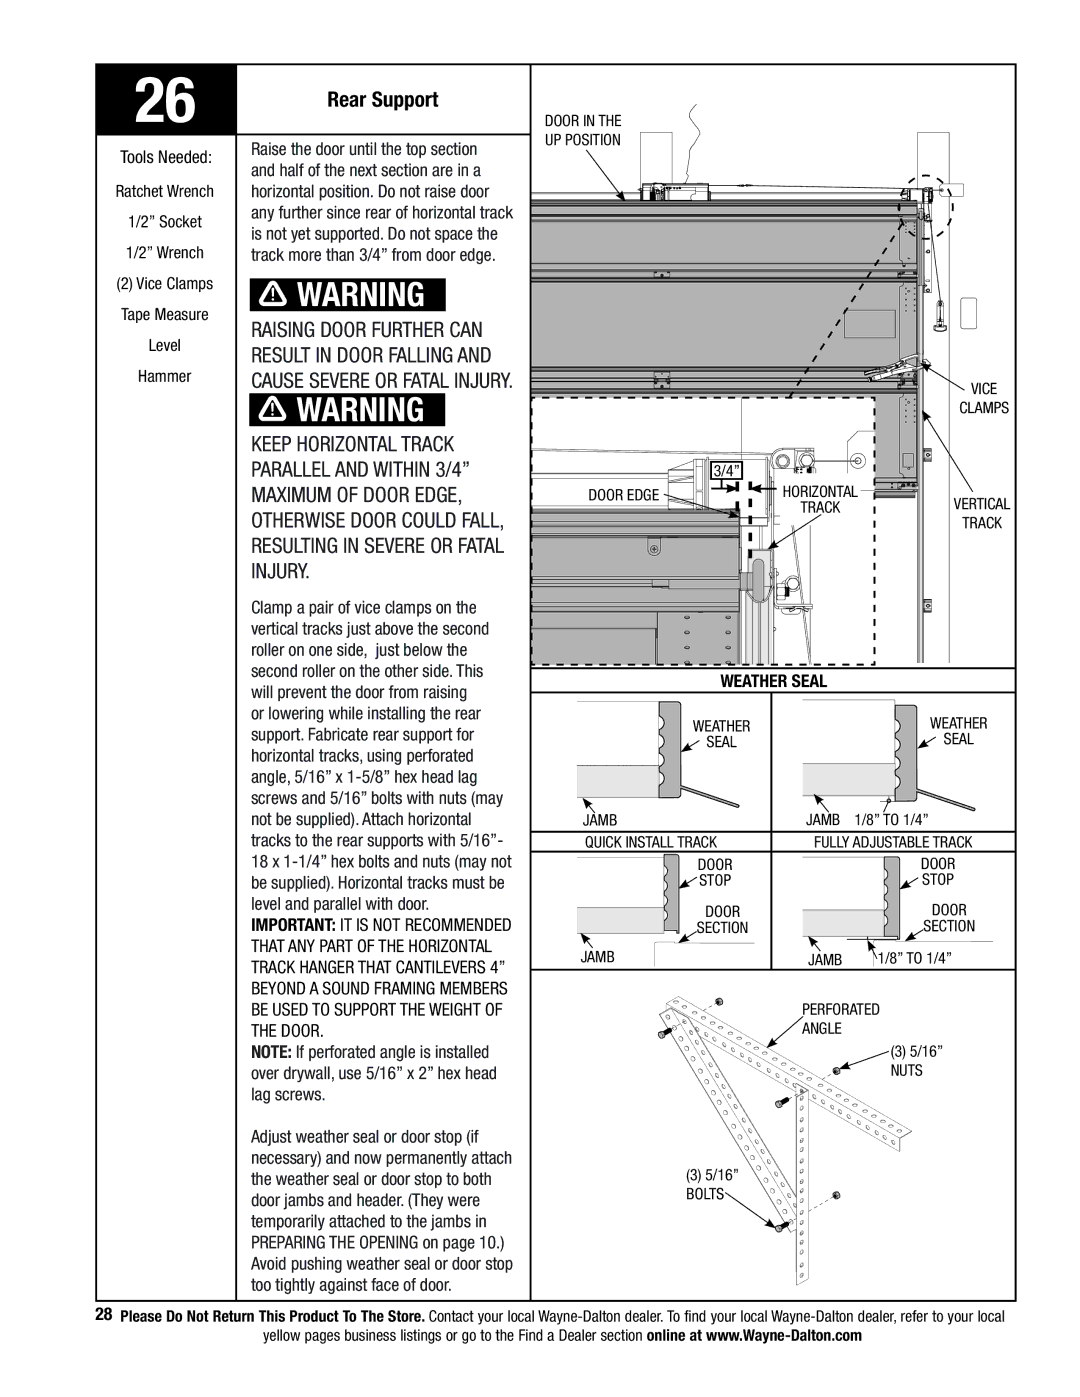
26 | Rear Support |
|
|
|
|
| DOOR IN THE |
|
|
| |
Tools Needed: | Raise the door until the top section | UP POSITION |
|
|
|
|
|
|
| ||
and half of the next section are in a |
|
|
|
| |
|
|
|
|
| |
Ratchet Wrench | horizontal position. Do not raise door |
|
|
|
|
1/2” Socket | any further since rear of horizontal track |
|
|
|
|
is not yet supported. Do not space the |
|
|
|
| |
1/2” Wrench |
|
|
|
| |
track more than 3/4” from door edge. |
|
|
|
| |
(2) Vice Clamps | WARNING |
|
|
|
|
Tape Measure |
|
|
|
| |
Raising door further can |
|
|
|
| |
Level |
|
|
|
| |
result in door falling and |
|
|
|
| |
Hammer |
|
|
|
| |
cause severe OR FATAL INJURY. |
|
|
| Vice | |
| WARNING |
|
|
| |
|
|
|
| clamps | |
|
|
|
|
| |
| Keep horizontal track |
|
|
|
|
| parallel and within 3/4” | 3/4” |
|
|
|
| maximum of door edge, | DOOR EDGE | HORIZONTAL | Vertical | |
| otherwise door could fall, |
| TRACK |
| |
|
|
|
| TRACK | |
| resulting in severe OR FATAL |
|
|
|
|
| INJURY. |
|
|
|
|
| Clamp a pair of vice clamps on the |
|
|
|
|
| vertical tracks just above the second |
|
|
|
|
| roller on one side, just below the |
|
|
|
|
| second roller on the other side. This | Weather seal |
|
| |
| will prevent the door from raising |
|
| ||
|
|
|
|
| |
| or lowering while installing the rear | Weather |
|
| Weather |
| support. Fabricate rear support for |
|
| ||
| seal |
|
| seal | |
| horizontal tracks, using perforated |
|
| ||
|
|
|
|
| |
| angle, 5/16” x |
|
|
|
|
| screws and 5/16” bolts with nuts (may |
|
|
|
|
| not be supplied). Attach horizontal | Jamb | Jamb | 1/8” to 1/4” | |
| tracks to the rear supports with 5/16”- | Quick Install Track | Fully adjustable Track | ||
| 18 x | Door |
|
| Door |
| be supplied). Horizontal tracks must be | stop |
|
| stop |
| level and parallel with door. | Door |
|
| Door |
| IMPORTANT: IT IS NOT RECOMMENDED |
|
| ||
| Section |
|
| Section | |
| THAT ANY PART OF THE HORIZONTAL | Jamb | Jamb |
| 1/8” to 1/4” |
| TRACK HANGER THAT CANTILEVERS 4” |
| |||
|
|
|
|
| |
| BEYOND A SOUND FRAMING MEMBERS |
|
|
|
|
| BE USED TO SUPPORT THE WEIGHT OF |
| PERFORATED | ||
| THE DOOR. |
| ANGLE |
|
|
| NOTE: If perforated angle is installed |
|
|
| (3) 5/16” |
| over drywall, use 5/16” x 2” hex head |
|
|
| NUTS |
| lag screws. |
|
|
|
|
| Adjust weather seal or door stop (if |
|
|
|
|
| necessary) and now permanently attach | (3) 5/16” |
|
|
|
| the weather seal or door stop to both |
|
|
| |
| door jambs and header. (They were | BOLTS |
|
|
|
|
|
|
|
| |
| temporarily attached to the jambs in |
|
|
|
|
| PREPARING The OPENING on page 10.) |
|
|
|
|
| Avoid pushing weather seal or door stop |
|
|
|
|
| too tightly against face of door. |
|
|
|
|
28Please Do Not Return This Product To The Store. Contact your local
yellow pages business listings or go to the Find a Dealer section online at
