24 |
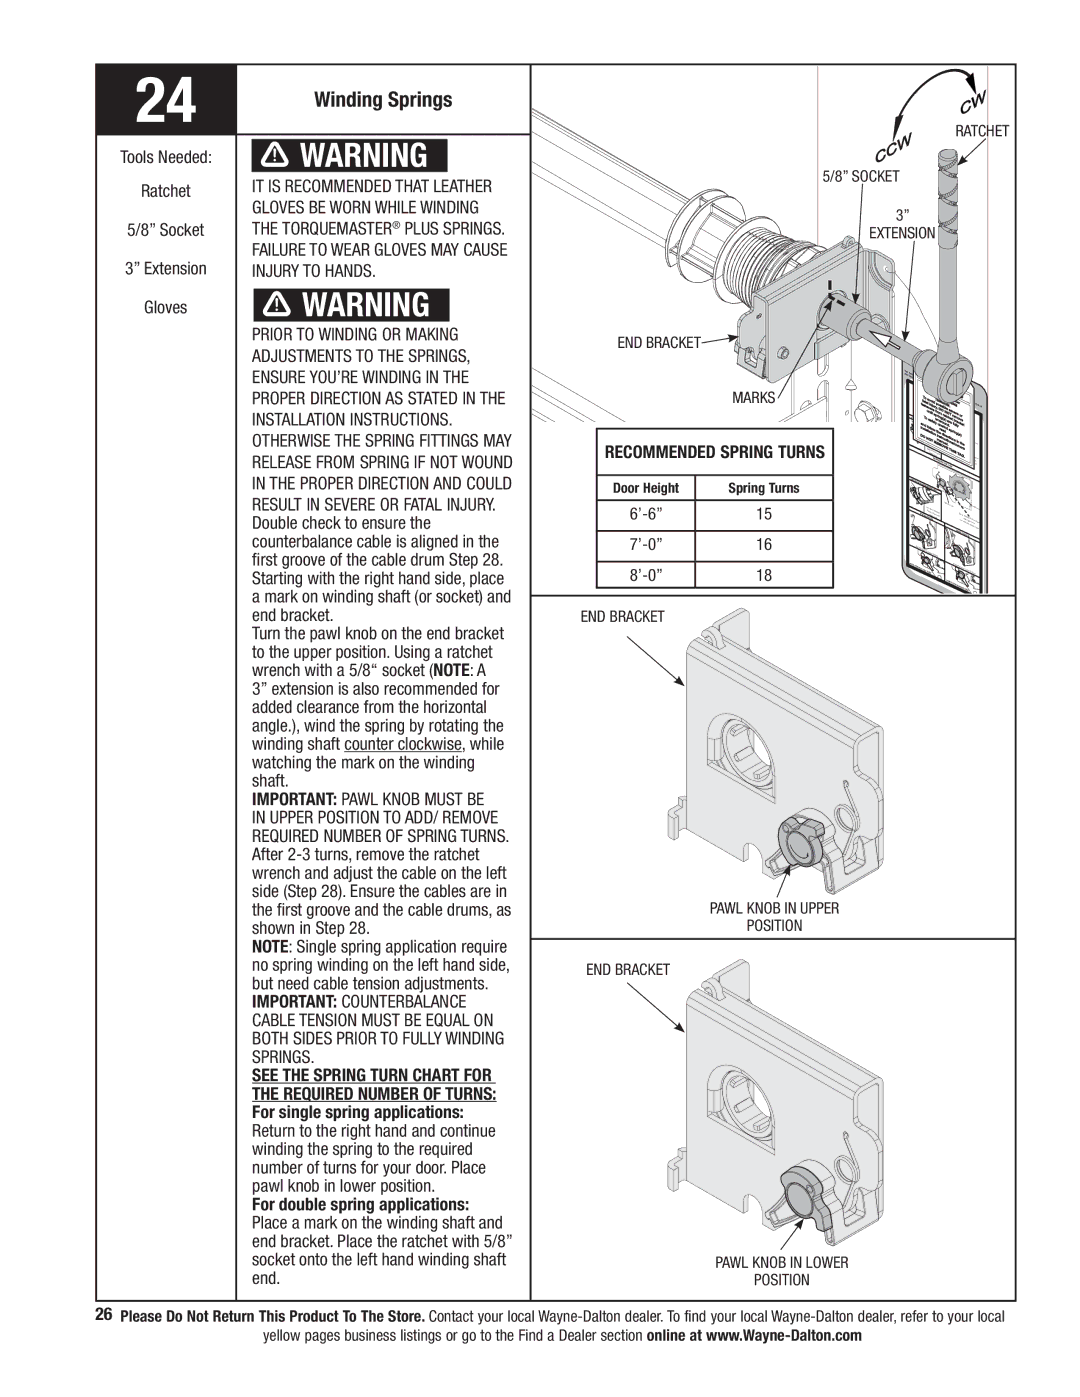
| Winding Springs | ||
|
|
|
| |
|
|
|
|
|
Tools Needed: |
| WARNING | ||
Ratchet |
| It is recommended that leather | ||
|
| gloves be worn while winding | ||
5/8” Socket |
| the TorqueMaster® Plus springs. | ||
3” Extension |
| Failure to wear gloves may cause | ||
| injury to hands. | |||
|
|
|
| |
Gloves |
| WARNING | ||
|
| Prior to winding or making | ||
|
| adjustments to the springs, | ||
Ratchet
5/8” Socket
3”
Extension
End Bracket![]()
ensure you’re winding in the |
proper direction as stated in the |
Installation Instructions. |
Otherwise the spring fittings may |
release from spring if not wound |
in the proper direction and could |
result in severe or fatal injury. Double check to ensure the counterbalance cable is aligned in the first groove of the cable drum Step 28. Starting with the right hand side, place a mark on winding shaft (or socket) and
Marks
RECOMMENDED SPRING TURNS
Door Height | Spring Turns |
|
|
| 15 |
|
|
| 16 |
|
|
18 | |
|
|
Use this
these label
| To |
|
|
|
|
|
|
|
|
|
|
|
|
|
|
|
|
|
|
|
|
| fatalavoid |
|
|
|
|
|
| N |
|
|
|
|
|
|
| er si |
| ||||
|
| injurypossible, | sev |
|
|
|
|
|
|
|
|
|
| ||||||||
| fasteners |
| DO |
| G |
|
|
|
|
|
|
|
| de of | |||||||
|
| until |
| from |
| N. |
|
|
|
|
|
|
|
|
| ||||||
|
|
|
| NO |
| erelly | or |
|
|
|
|
|
| ||||||||
|
|
|
| spr |
|
| T |
|
|
|
|
|
| ||||||||
| To |
|
|
|
|
| ratchets) removb |
|
|
|
|
|
|
| |||||||
|
|
|
|
| ing( |
|
|
| furacket |
|
|
|
|
|
| ||||||
| and |
|
|
| wnwound. |
|
|
|
|
|
| ||||||||||
|
| safely |
|
| are |
|
|
|
|
|
|
|
|
|
|
| |||||
|
| fo |
|
|
|
| wind |
|
| ng(s) |
|
|
|
|
|
|
| ||||
| installationthe |
|
|
|
|
|
|
|
|
|
|
| |||||||||
| DO |
| llow | read | spri |
|
|
|
|
|
|
|
|
|
| ||||||
| NOT |
| in | dire |
|
|
|
|
|
|
|
|
|
|
|
|
| ||||
|
|
| mastruction tions in |
|
|
|
|
| e |
|
| ||||||||||
|
| Ratc |
| REMOVE Tns/owners |
|
|
|
| Drum |
| |||||||||||
|
|
| ce |
|
|
| ual. |
|
|
|
| the |
|
|
|
|
| ||||
|
|
|
|
| nd |
|
|
| HIS |
|
|
|
|
|
|
|
|
| |||
|
| Cable |
|
|
|
|
|
|
|
|
|
|
| R |
|
| |||||
|
|
| het | Pawla n |
|
|
|
|
|
| TAG. |
|
|
|
|
|
| ||||
|
|
|
| Drum |
|
|
|
|
|
|
|
|
|
| Dratchet | ||||||
|
|
|
| DIS |
|
|
|
|
|
|
|
|
|
|
|
|
| ||||
|
|
|
|
| ENGAGED | SIDE |
|
|
|
|
|
|
|
|
|
|
| um |
| ||
|
|
|
|
|
|
|
| VIEW |
|
|
|
|
|
|
|
|
| t |
| ||
|
|
|
|
|
|
|
|
|
|
|
|
|
|
|
|
|
|
|
| ||
DISE | NGAGED U |
|
|
|
|
|
|
|
|
|
|
|
|
|
|
|
|
|
|
|
|
|
|
|
|
|
|
|
|
|
|
|
|
|
|
|
|
|
|
|
|
| |
| NDER |
|
|
|
|
|
|
|
|
|
|
|
|
|
|
|
|
|
|
|
|
|
| NEATH |
|
|
|
|
|
|
|
|
|
|
|
|
|
|
|
|
|
| |
|
|
| VIEW |
|
|
|
|
|
|
|
|
|
|
|
|
|
|
|
| ||
|
|
|
|
|
|
|
| Ratchet | Pawl |
|
|
|
|
|
|
|
| l |
| ||
|
| No |
| b |
|
|
|
|
|
|
|
|
|
|
| Cab | e Dr |
| |||
|
| Ratspace |
|
|
|
|
|
|
|
|
|
|
|
|
|
|
|
|
| um | |
| UPPER | cheltPawetweenla |
|
|
|
|
|
| Spa |
|
|
|
|
|
| ||||||
| Cabe Dr | um | nd |
|
|
|
|
|
|
|
| ce betweC | en D |
|
| ||||||
|
| POSITION |
|
|
|
|
|
|
|
|
|
| iand |
|
|
| |||||
|
|
|
|
|
|
|
|
|
|
|
|
|
| ableRatchet P |
| ||||||
|
|
|
|
|
|
|
|
|
|
|
|
|
|
|
| cates |
| rum | awl | ||
|
|
|
|
|
|
|
|
|
|
|
|
| W |
|
|
|
| engagem | ent | ||
|
|
|
|
|
|
|
|
|
|
|
| LO |
| ER | POSITION |
|
|
|
| ||
|
|
|
|
|
|
|
|
|
|
|
|
|
|
|
|
|
|
| |||
| t |
|
|
|
|
|
|
|
|
|
|
|
|
|
|
|
|
|
|
|
|
| Ra chet |
|
|
|
|
|
|
|
|
|
|
|
|
|
|
|
|
|
|
|
|
| Pawlin | p |
|
|
|
|
|
|
|
|
|
|
|
|
|
|
|
|
|
| |
|
| Up | er |
|
|
|
|
|
|
|
|
|
|
|
|
|
|
|
|
|
|
|
|
| Position |
|
|
|
|
|
|
|
|
|
|
|
|
|
|
|
| ||
UPPER | POSITION S |
|
|
|
|
|
|
|
|
| Rat | chet Pawlin |
|
|
|
|
|
| |||
|
|
|
|
|
|
|
|
|
|
| LowerPo |
|
|
| |||||||
| IDE | VIEW |
|
|
|
|
|
|
|
|
|
|
|
| sition |
| |||||
|
|
|
|
|
|
|
| LO | W |
|
|
|
|
|
|
|
|
|
|
|
|
|
|
|
|
|
|
|
| ER |
|
|
|
|
|
|
|
|
|
|
| ||
|
|
|
|
|
|
|
|
|
|
| POSITION |
| E |
|
|
|
|
| |||
|
|
|
|
|
|
|
|
|
|
|
|
|
| SIDE |
|
|
|
|
| ||
|
|
|
|
|
|
|
|
|
|
|
|
|
|
|
| W |
|
|
|
| |
end bracket.
Turn the pawl knob on the end bracket to the upper position. Using a ratchet wrench with a 5/8“ socket (NOTE: A 3” extension is also recommended for added clearance from the horizontal angle.), wind the spring by rotating the winding shaft counter clockwise, while watching the mark on the winding shaft.
IMPORTANT: pawl knob must be in upper position to add/ remove required number of spring turns. After
NOTE: Single spring application require no spring winding on the left hand side, but need cable tension adjustments.
IMPORTANT: Counterbalance cable tension must be equal on both sides prior to fully winding springs.
See the Spring Turn chart for the required number of turns: For single spring applications:
Return to the right hand and continue winding the spring to the required number of turns for your door. Place pawl knob in lower position.
For double spring applications: Place a mark on the winding shaft and end bracket. Place the ratchet with 5/8” socket onto the left hand winding shaft end.
End Bracket
Pawl Knob in Upper
Position
End Bracket
Pawl Knob in Lower
Position
26Please Do Not Return This Product To The Store. Contact your local
yellow pages business listings or go to the Find a Dealer section online at