RECORDING FROM AN EXTERNAL COMPONENT ONTO THE HDD
Recording from the Analog Components
You can make recordings from the component such as a cassette deck and a turntable connected to this unit.
Note
•Recording onto the HDD is made in the unit called “disc”. The maximum length of one disc on the HDD is 99 minutes 59 seconds. If the recording has been made exceeding the maximum length, the recording will be made continuously to the next available disc.
4 JKL 5 MNO 6 PQR
7 STU 8 VWX 9 YZ
OPEN/CLOSE
0 +10
SPACE SYMBOL BOOKMARK
COPYING
|
|
|
|
|
|
| 6 |
|
|
| 3 |
|
|
|
|
|
|
|
|
|
|
| |
NATURAL SOUND HDD/CD RECORDER |
|
|
|
| MULTI JOG |
|
|
| |||
|
|
|
|
| PUSH ENTER |
|
|
| |||
|
|
|
| TEXT/TIME |
| MODE |
|
| MENU | 4 | |
POWER |
|
|
|
|
|
|
|
|
|
| |
|
|
|
| TRACK NO. | COMPLETE |
|
| CLEAR | |||
|
|
|
|
|
|
|
|
|
|
| |
|
|
|
| BOOKMARK |
|
|
|
|
|
| |
|
|
|
|
|
|
| DIGITAL REC LEVEL |
|
|
| |
| HDD | CDR | COPY |
|
|
|
|
|
|
|
|
PHONES | LEVEL |
|
|
|
|
| INPUT | ANALOG REC LEVEL |
| ||
|
|
| REC | FINALIZE | ERASE | OPTICAL |
|
|
|
| |
|
|
| A.M.Q.R. |
|
|
| COAXIAL |
|
|
|
|
|
|
|
|
|
|
| ANALOG |
|
|
|
|
MIN | MAX |
|
|
|
|
|
| MIN | MAX |
| |
1 | 2 |
| 3 |
|
|
| 4 5 |
| 8 | ||
COPY | TIMER REC |
| REC |
|
|
| ||
|
|
|
|
|
|
| REPEAT | RANDOM INTRO |
A.M.Q.R. | FINALIZE | ERASE |
|
|
| |||
TEXT/TIME | INPUT | TRACK NO. |
|
|
| |||
WRITE |
|
| GROUP SKIP | |||||
|
|
|
|
|
|
|
| |
MODE |
|
| MENU |
|
|
| ||
COMPLETE |
|
|
|
|
|
|
| |
|
|
|
|
|
| 2 | HDD | CDR |
CLEAR |
|
| ENTER |
|
| |||
1 | ABC | 2 | DEF | 3 | GHI |
|
|
|
4 | JKL | 5 | MNO | 6 | PQR |
|
|
|
7 | STU | 8 | VWX | 9 | YZ |
|
|
|
6
6
8
AND RECORDING ONT
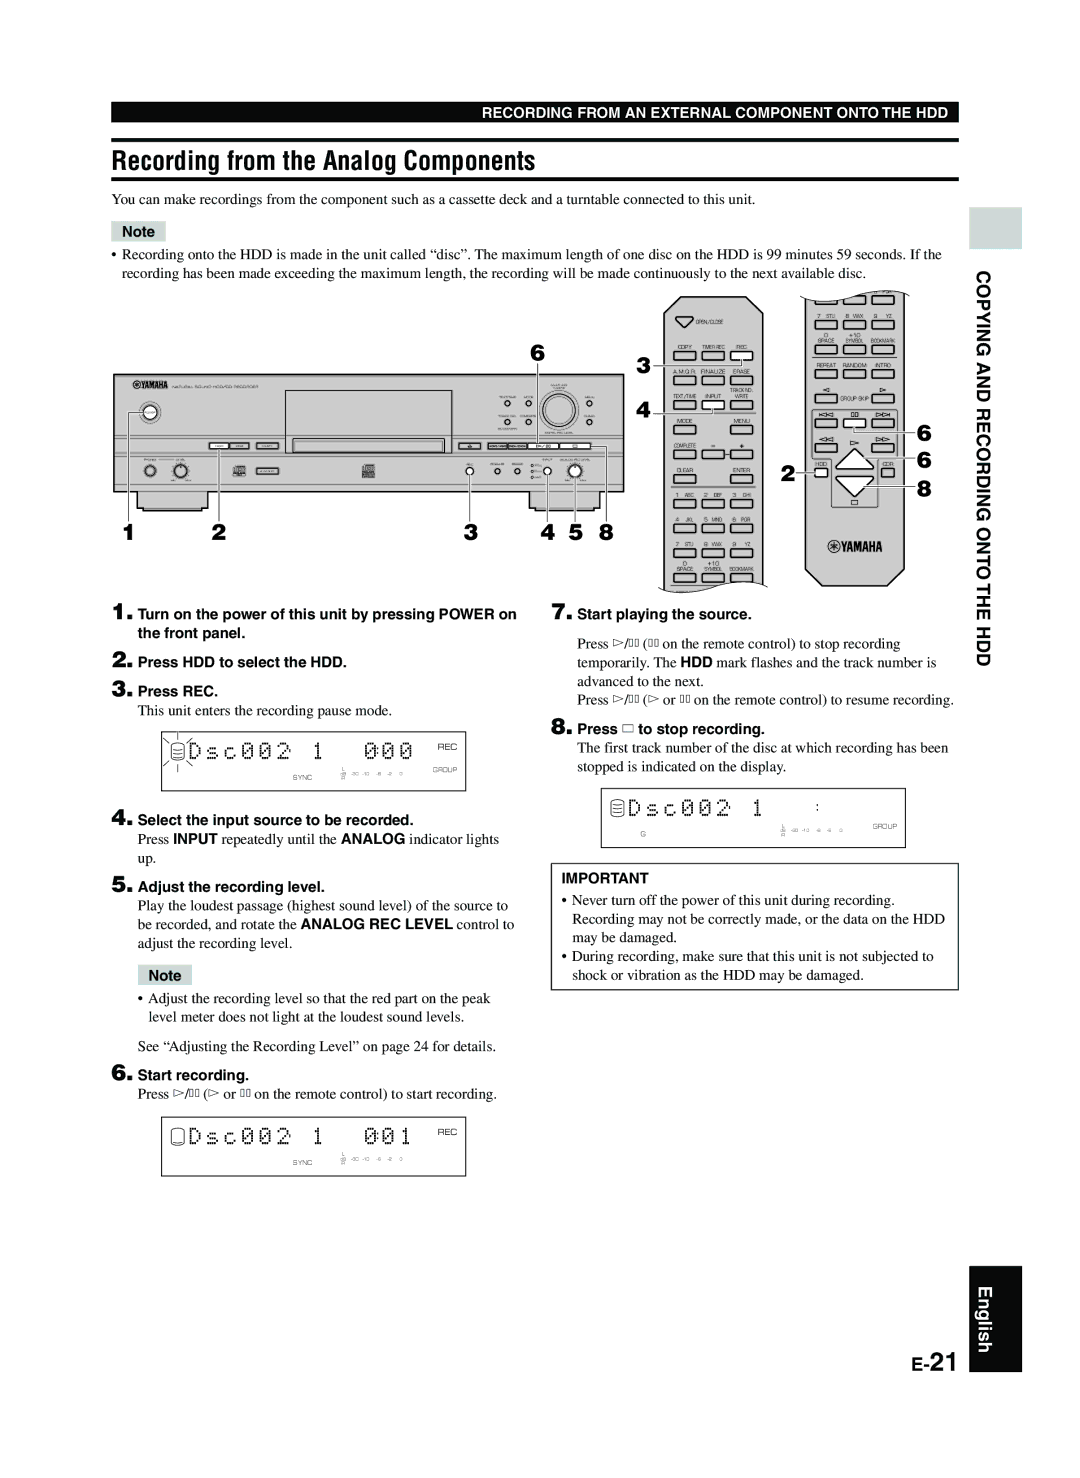
1. Turn on the power of this unit by pressing POWER on the front panel.
2. Press HDD to select the HDD.
3. Press REC.
This unit enters the recording pause mode.
D s c 0 0 2 1 |
| 0 0 0 REC |
| L | GROUP |
SYNC | dB | |
R |
| |
|
|
|
4. Select the input source to be recorded.
Press INPUT repeatedly until the ANALOG indicator lights up.
5. Adjust the recording level.
Play the loudest passage (highest sound level) of the source to be recorded, and rotate the ANALOG REC LEVEL control to adjust the recording level.
Note
•Adjust the recording level so that the red part on the peak level meter does not light at the loudest sound levels.
See “Adjusting the Recording Level” on page 24 for details.
6. Start recording.
Press w/d (w or d on the remote control) to start recording.
0 +10
SPACE SYMBOL BOOKMARK
REPEAT RANDOM NTRO
7. Start playing the source.
Press w/d (d on the remote control) to stop recording temporarily. The HDD mark flashes and the track number is advanced to the next.
Press w/d (w or d on the remote control) to resume recording.
8. Press a to stop recording.
The first track number of the disc at which recording has been stopped is indicated on the display.
D s c 0 0 2 | 1 |
|
| L | GROUP |
G | dB | 0 |
R |
| |
|
|
|
IMPORTANT
•Never turn off the power of this unit during recording. Recording may not be correctly made, or the data on the HDD may be damaged.
•During recording, make sure that this unit is not subjected to shock or vibration as the HDD may be damaged.
O THE HDD
D s c 0 0 2 1 | 0 0 1 REC |
| L |
SYNC | dB |
R | |
|
|
English