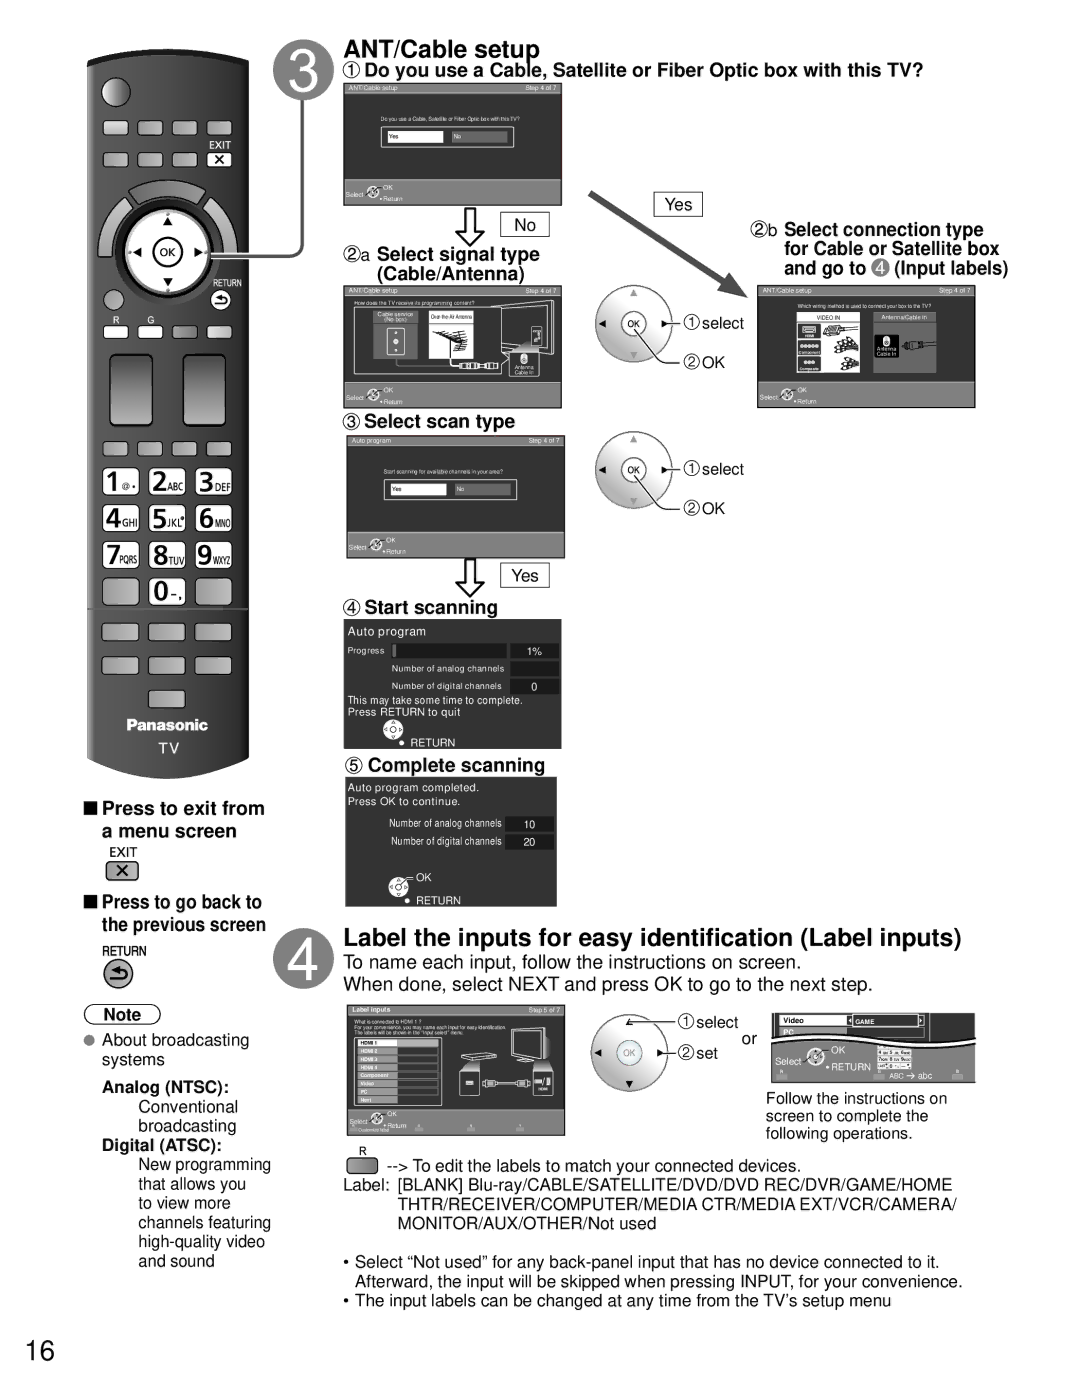
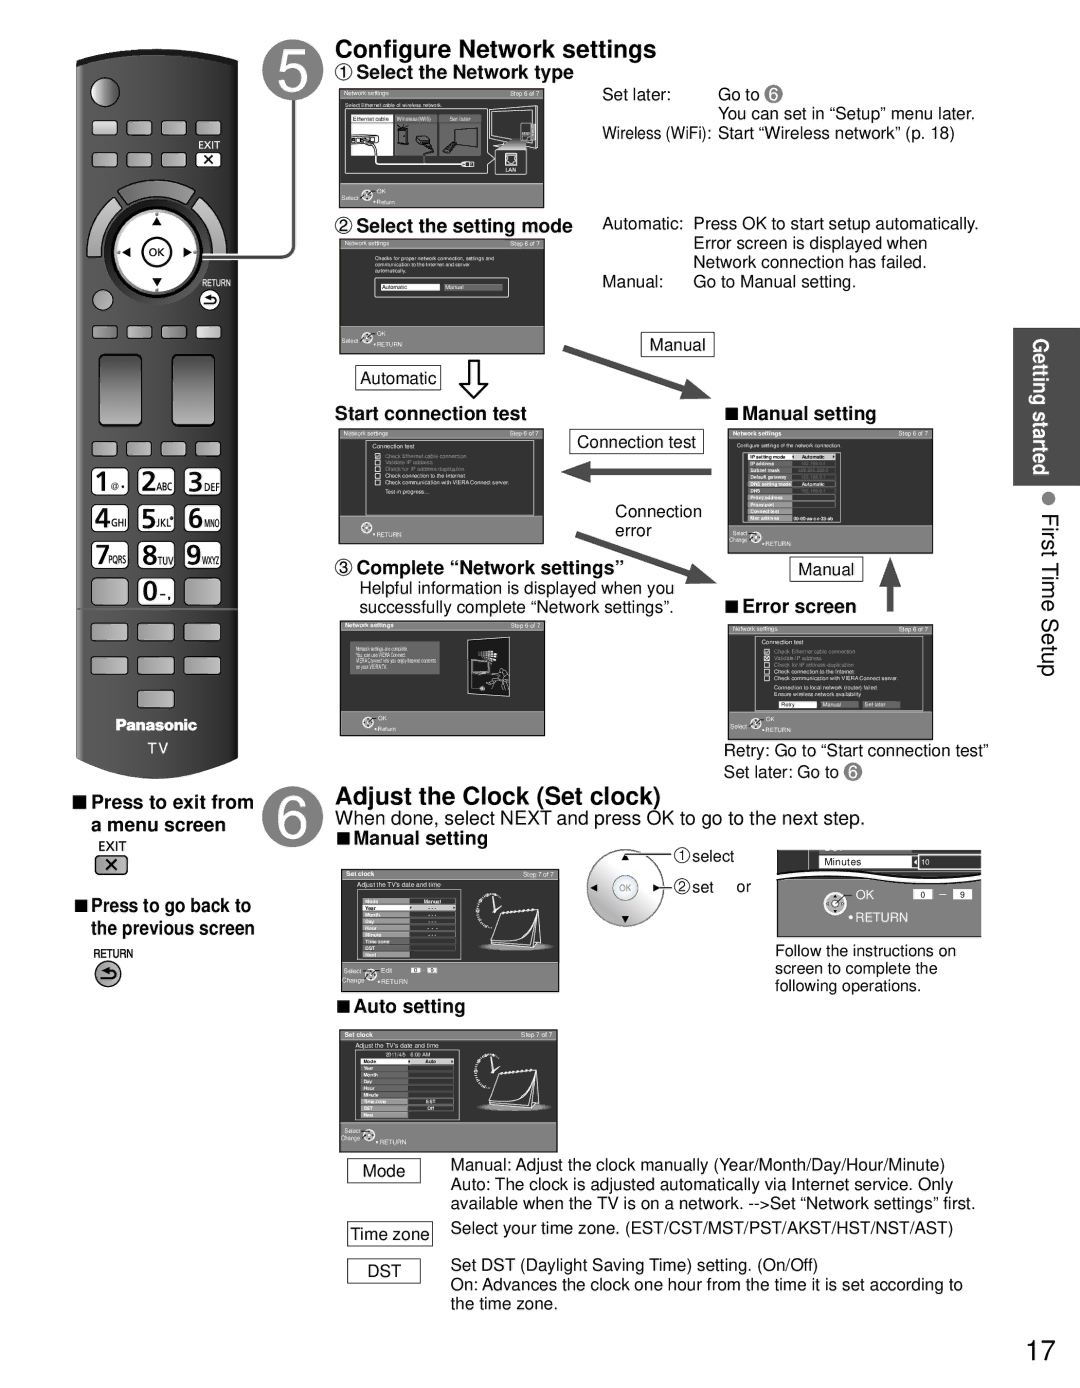
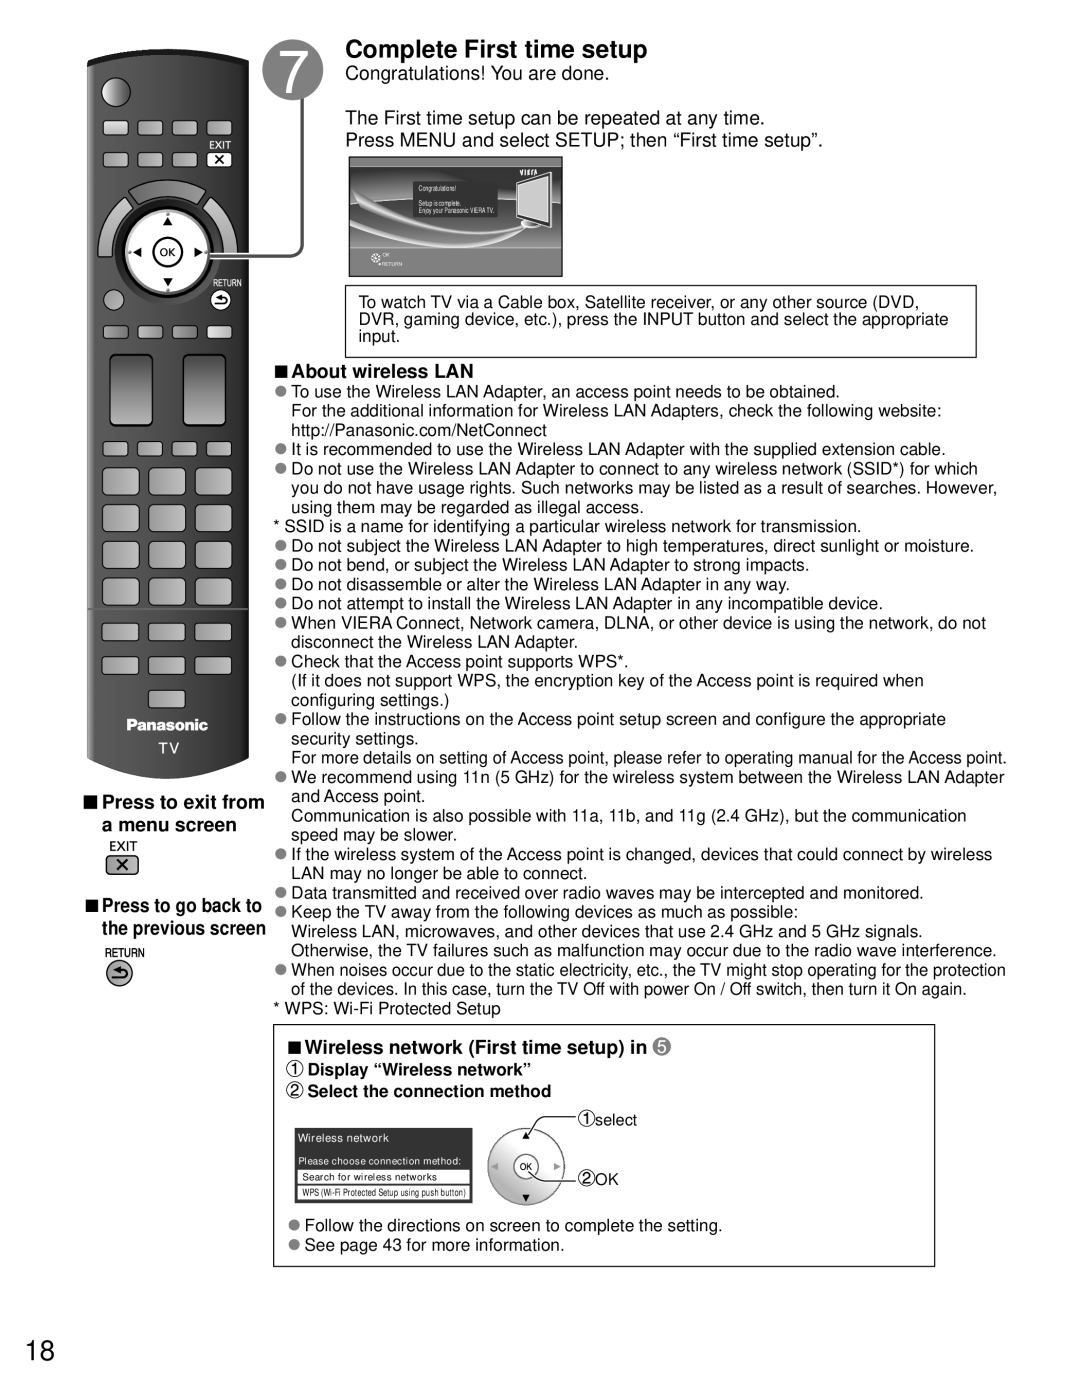
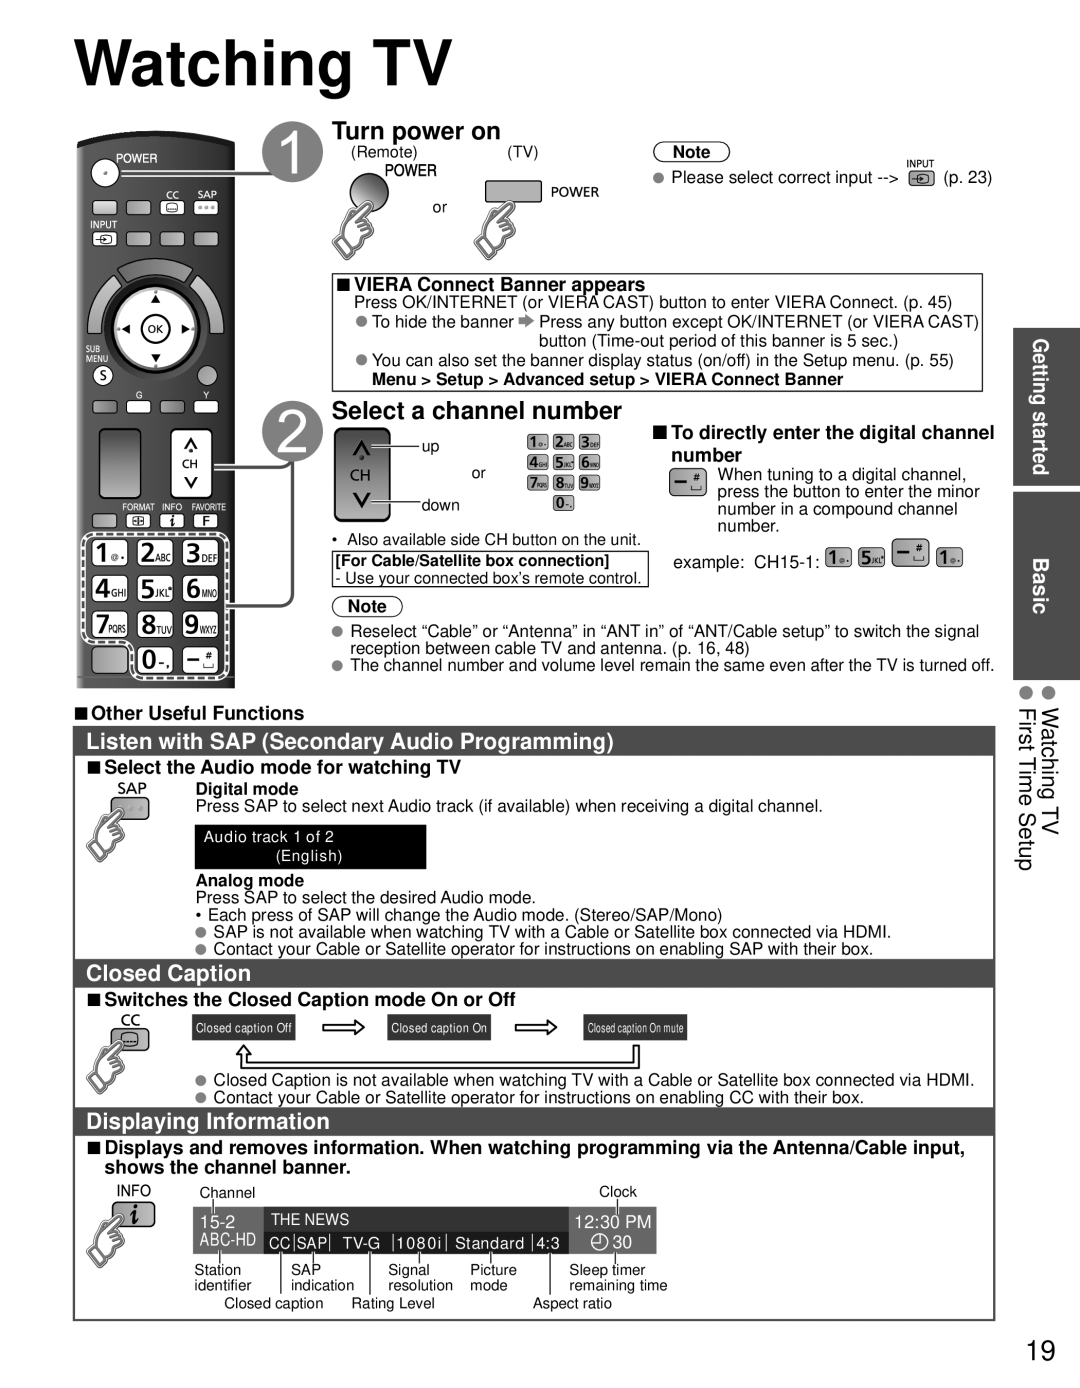
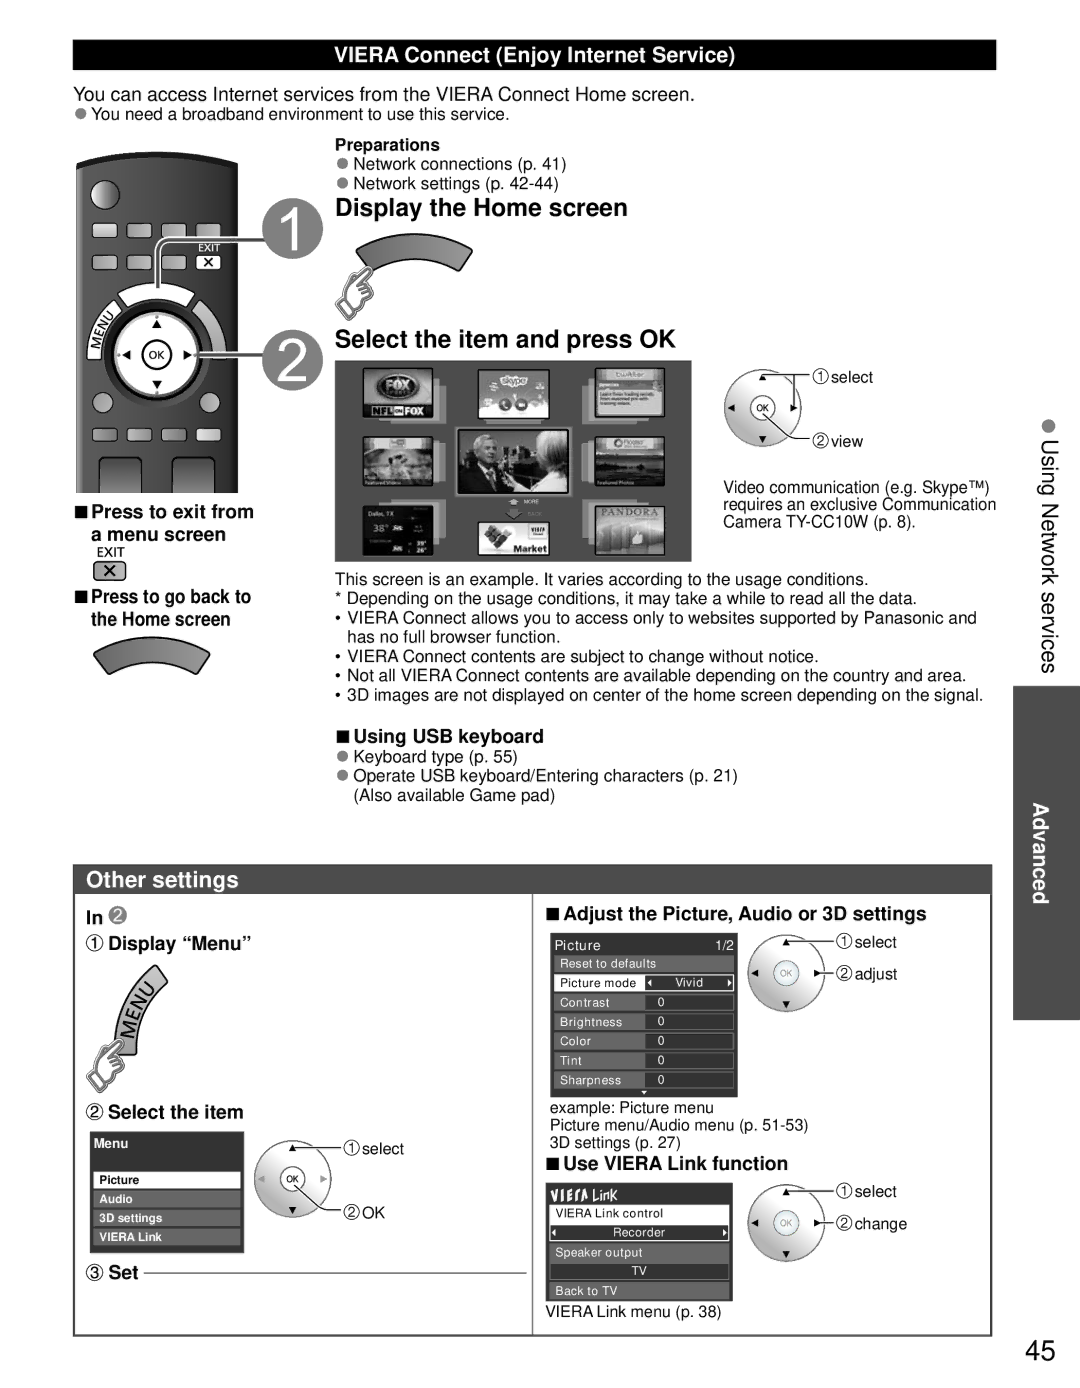
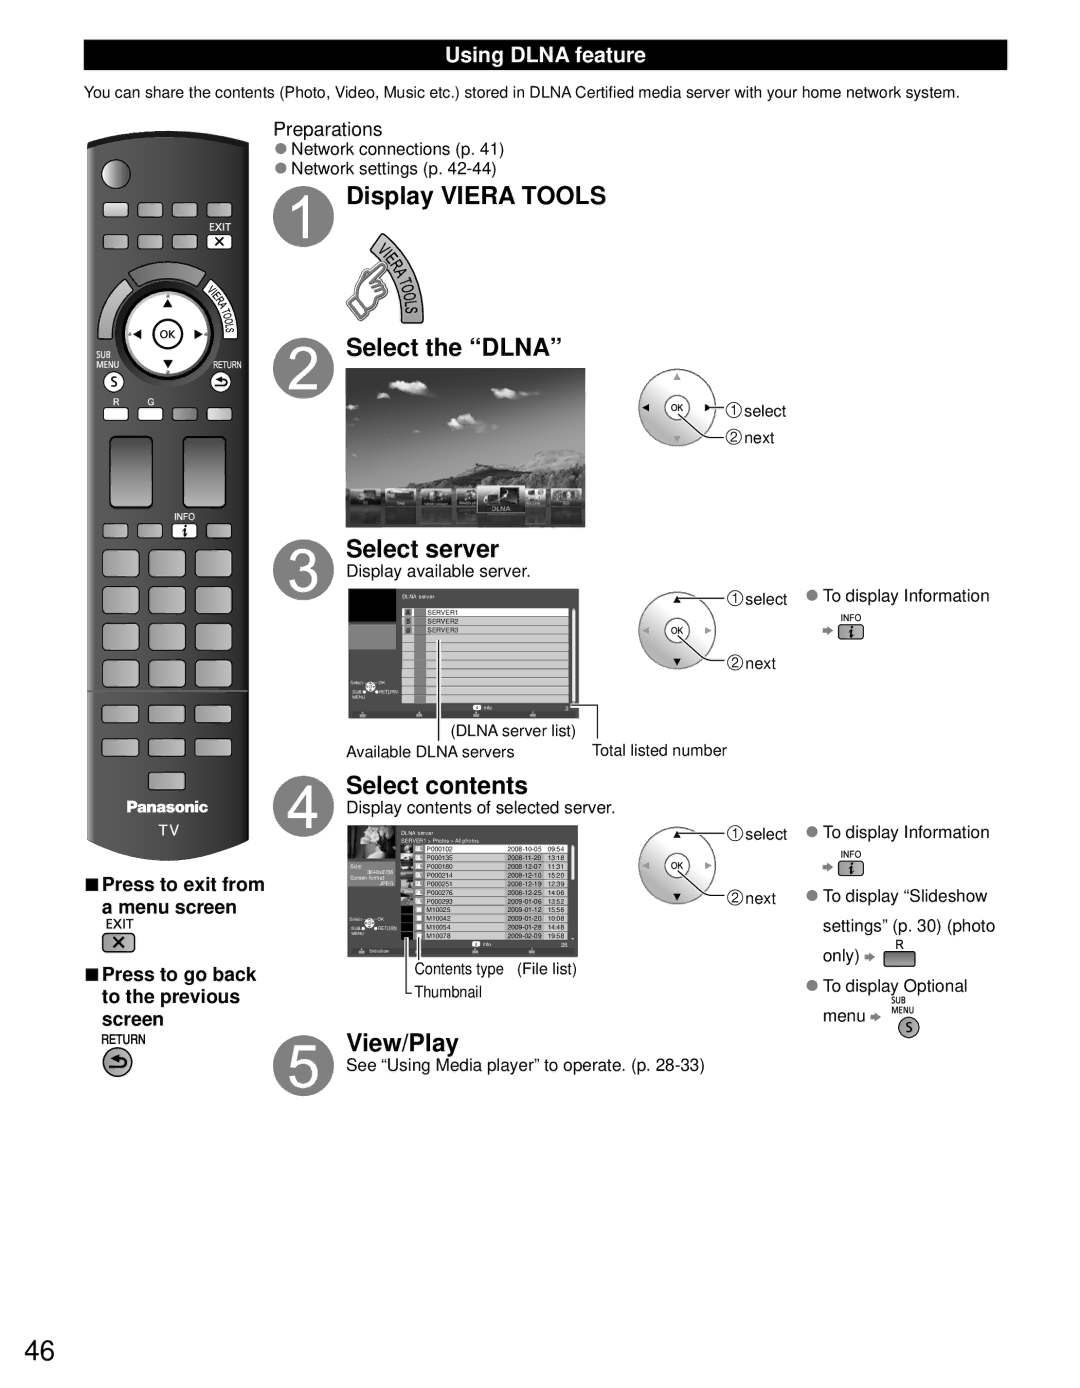
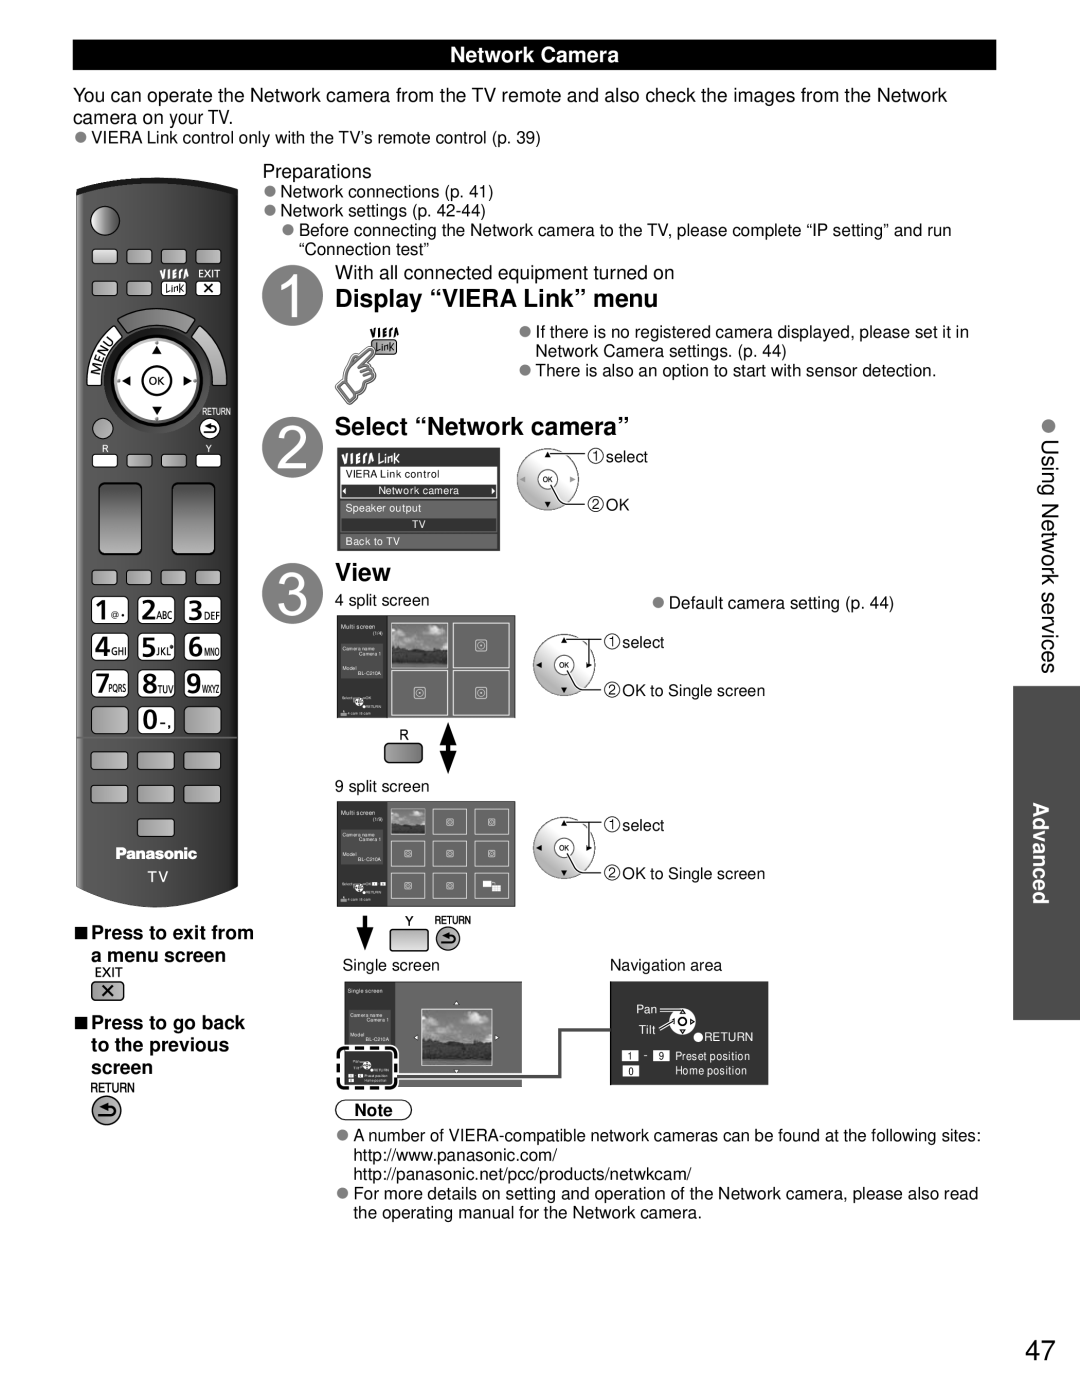
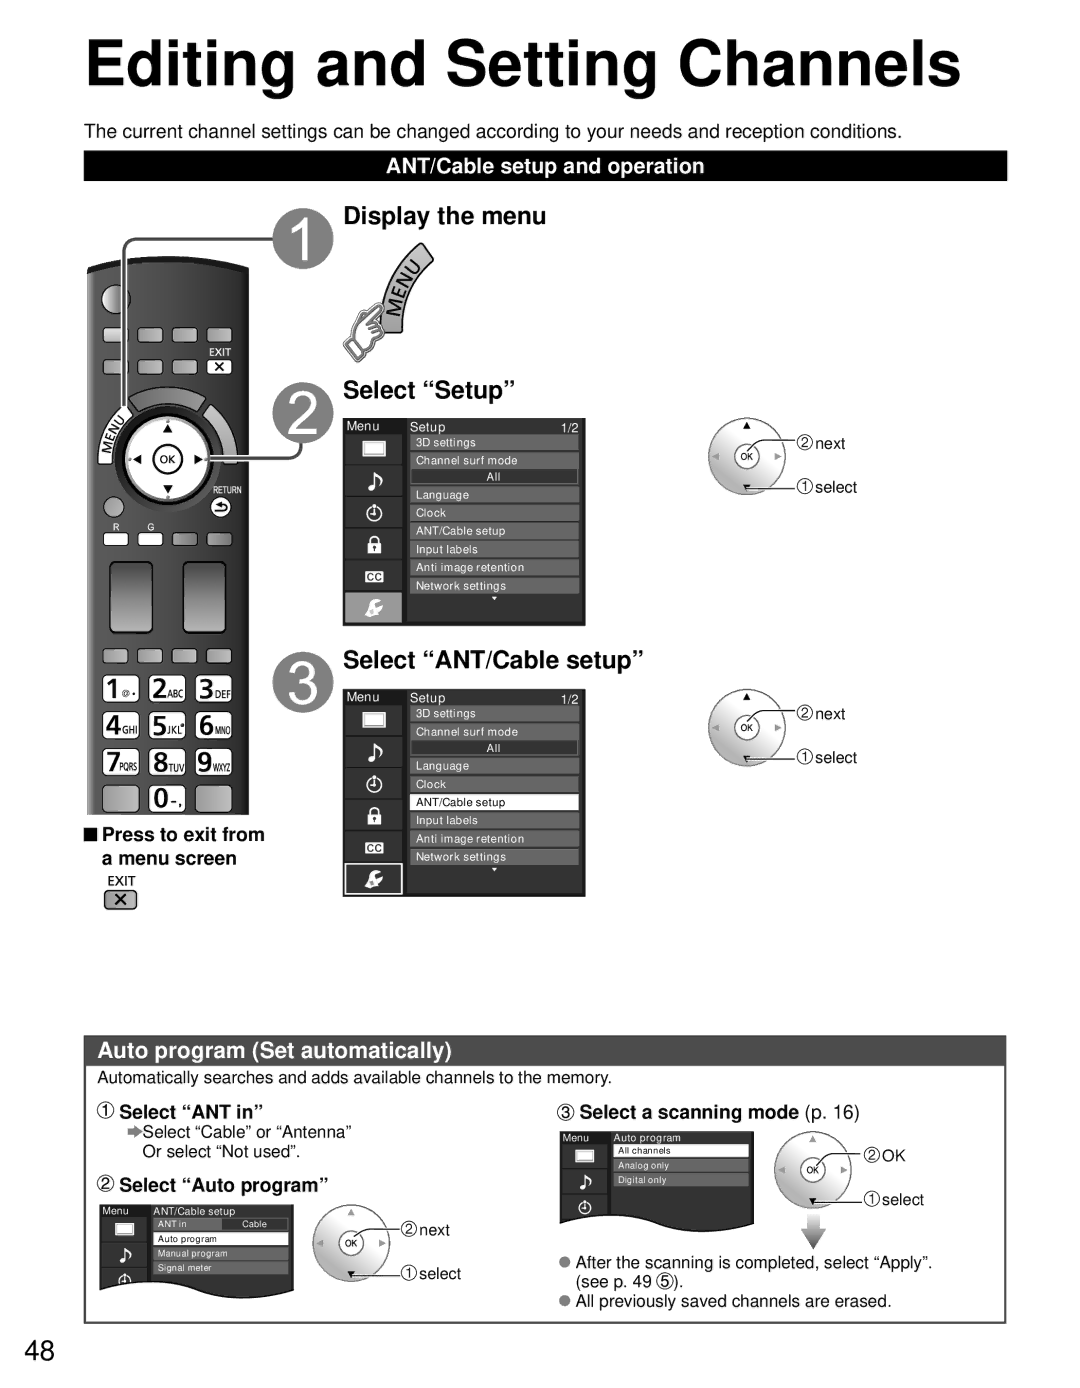
Panasonic TC-P65VT30 Change the view 3D⇔2D, 3D images on TV, 3D settings Adjust 3D images

Page 27

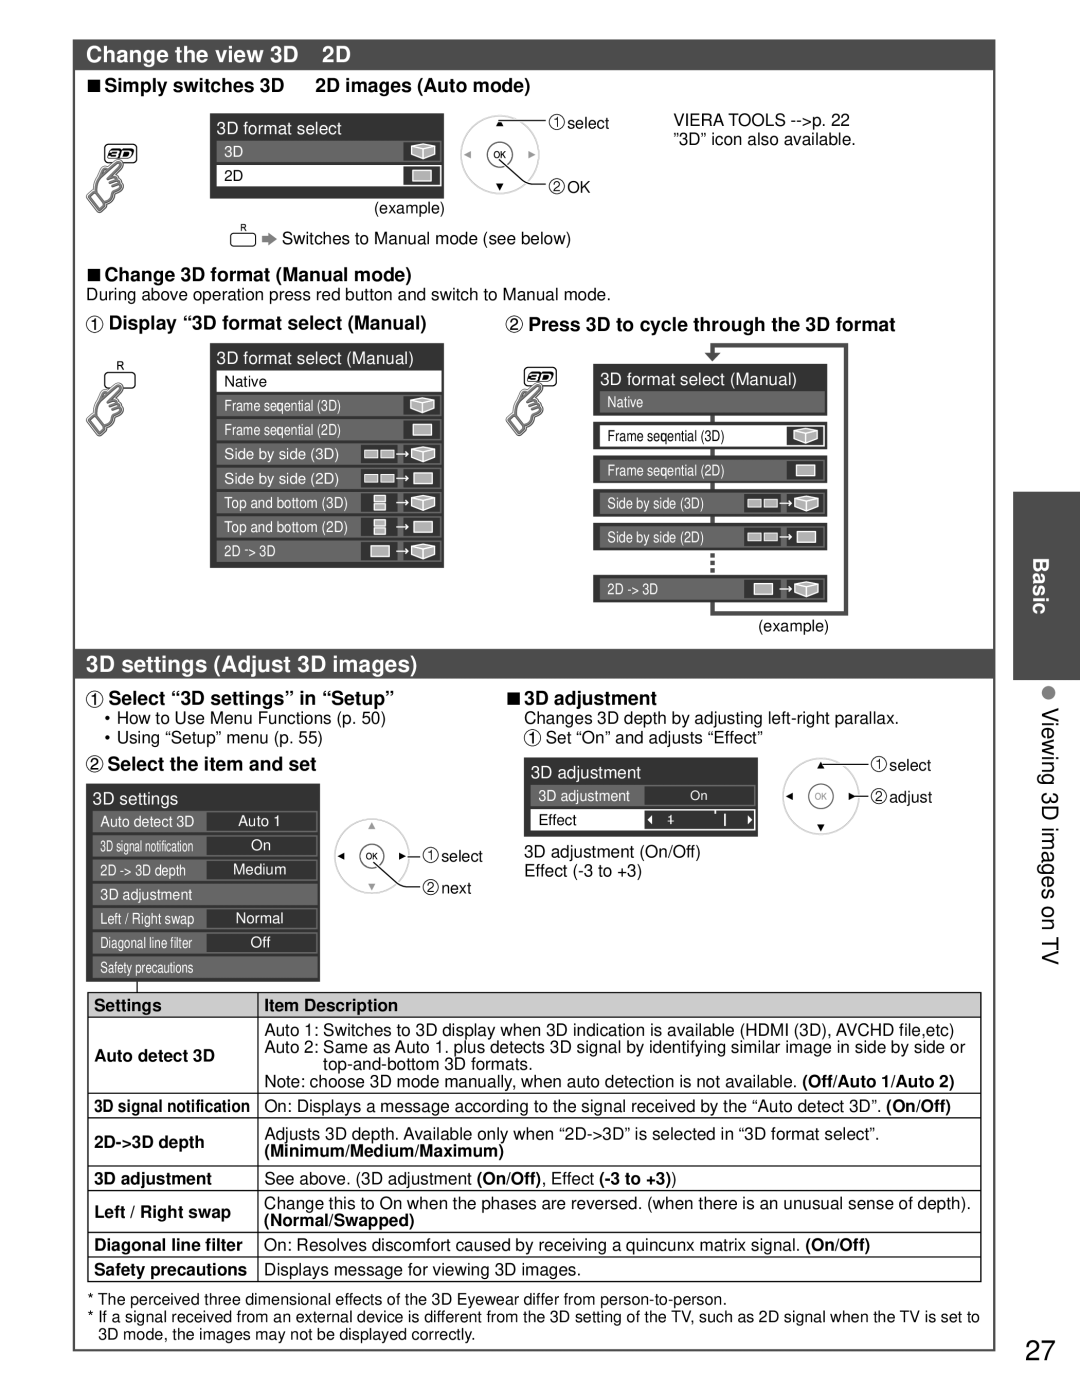
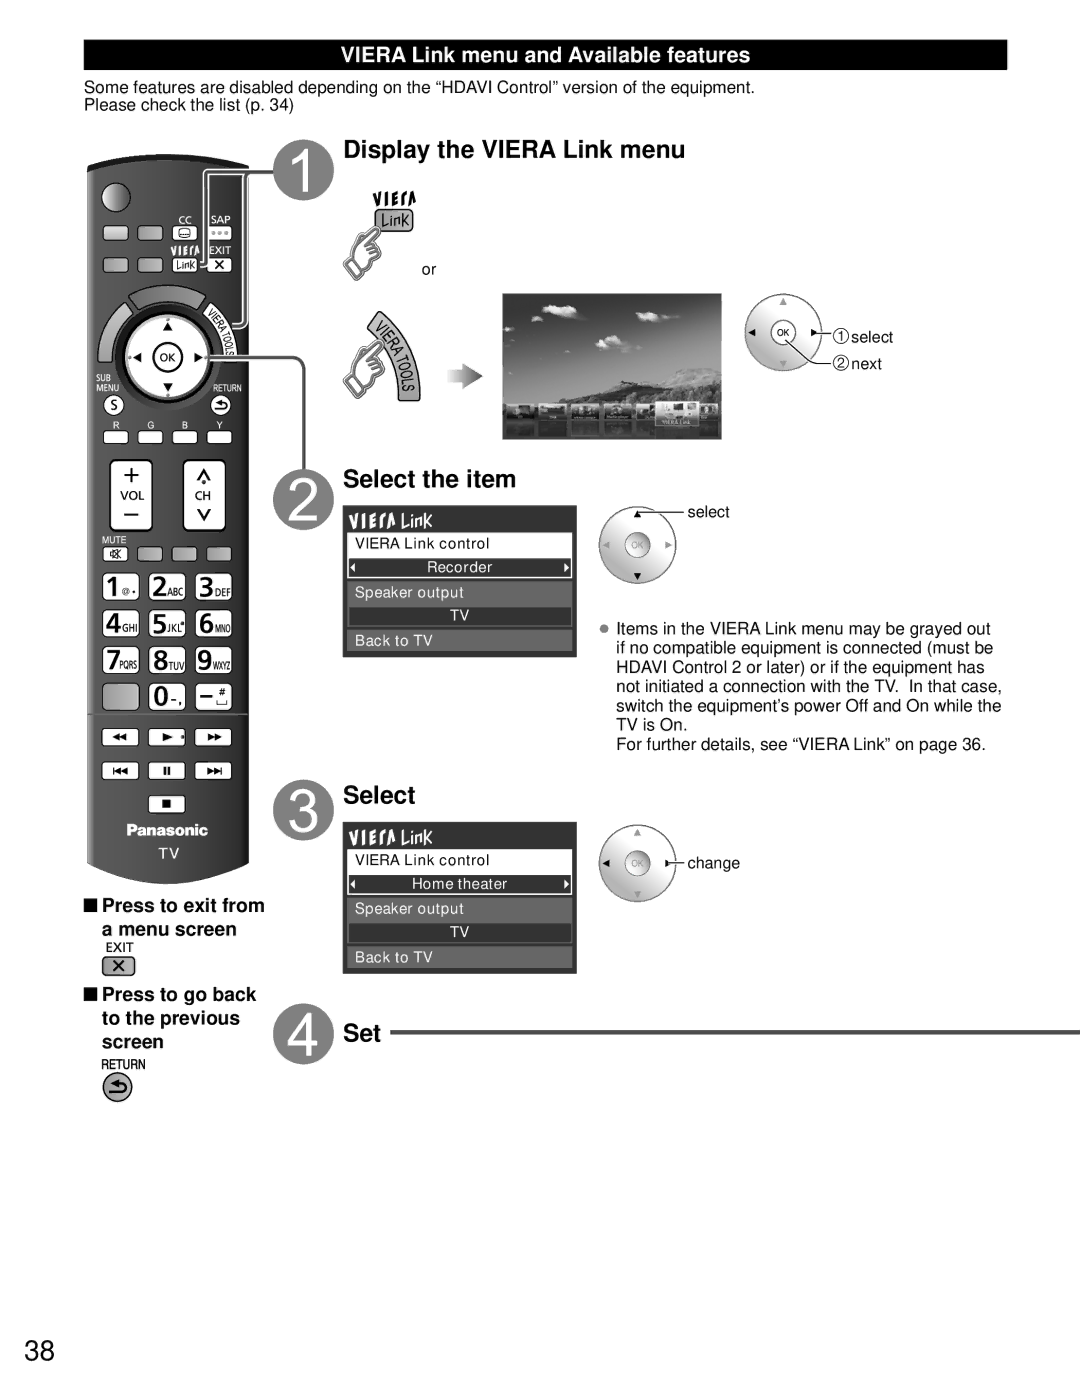
Change the view 3D2D

Simply switches 3D 2D images (Auto mode)

3D format select

select

VIERA TOOLS -->p. 22

3D


”3D” icon also available.


2D

OK


(example)


Switches to Manual mode (see below)

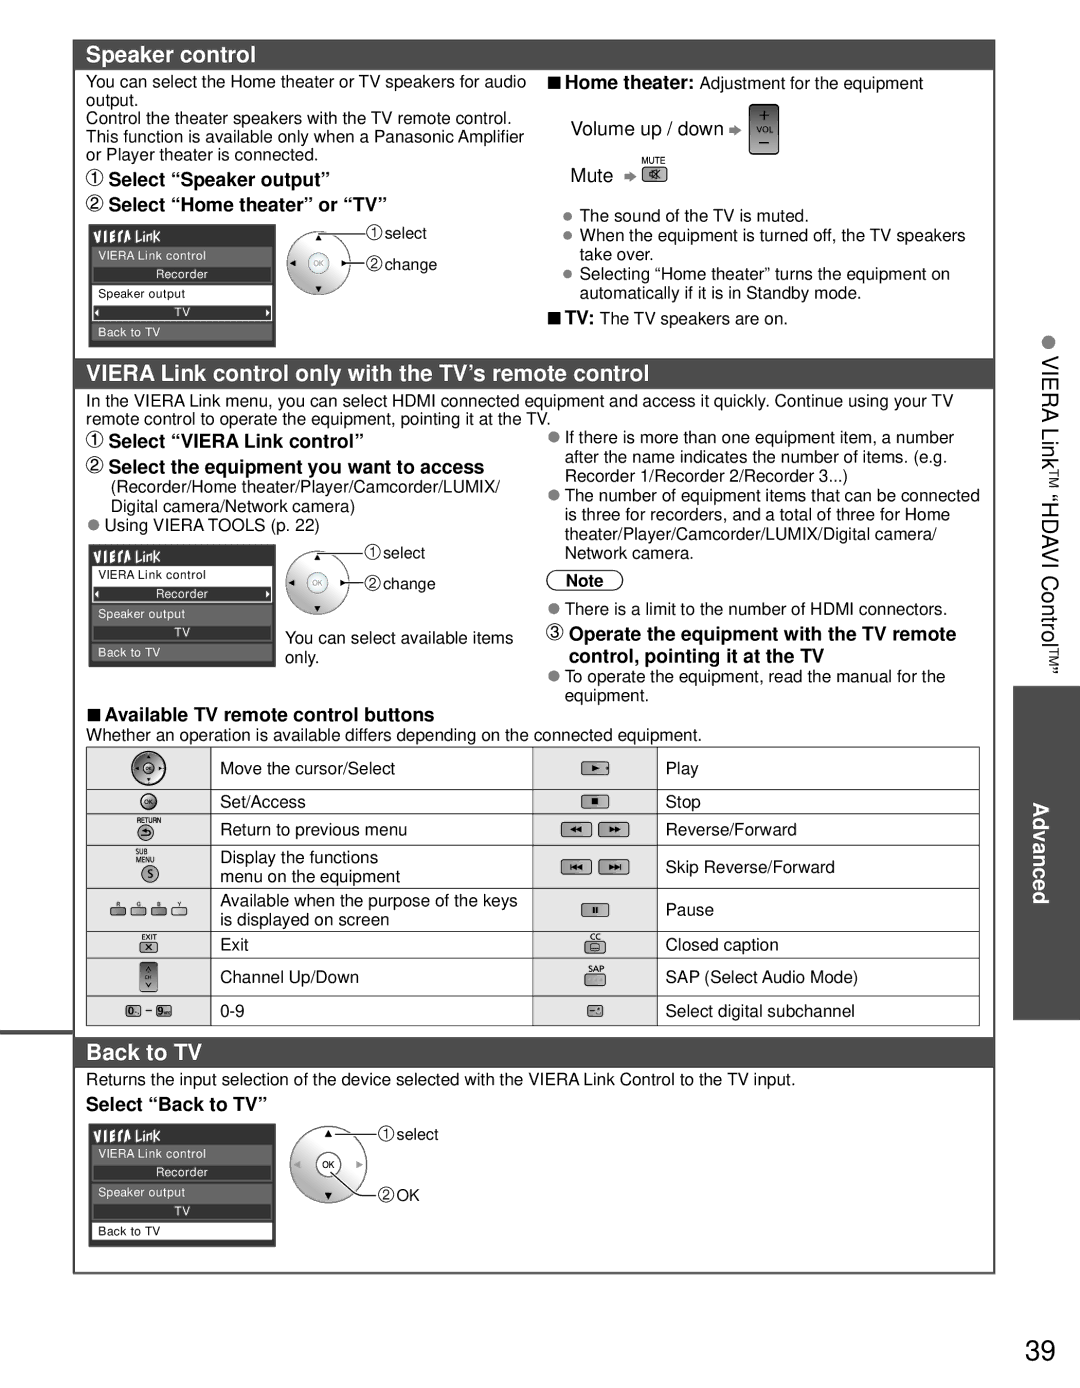
Change 3D format (Manual mode)

During above operation press red button and switch to Manual mode.

Display “3D format select (Manual)

3D format select (Manual)

Native

Frame sequential (3D) Frame sequential (2D) Side by side (3D) Side by side (2D) Top and bottom (3D) Top and bottom (2D) 2D -> 3D

Press 3D to cycle through the 3D format

3D format select (Manual)

Native

Frame sequential (3D)

Frame sequential (2D)

Side by side (3D)

Side by side (2D)

2D -> 3D

Basic


(example)


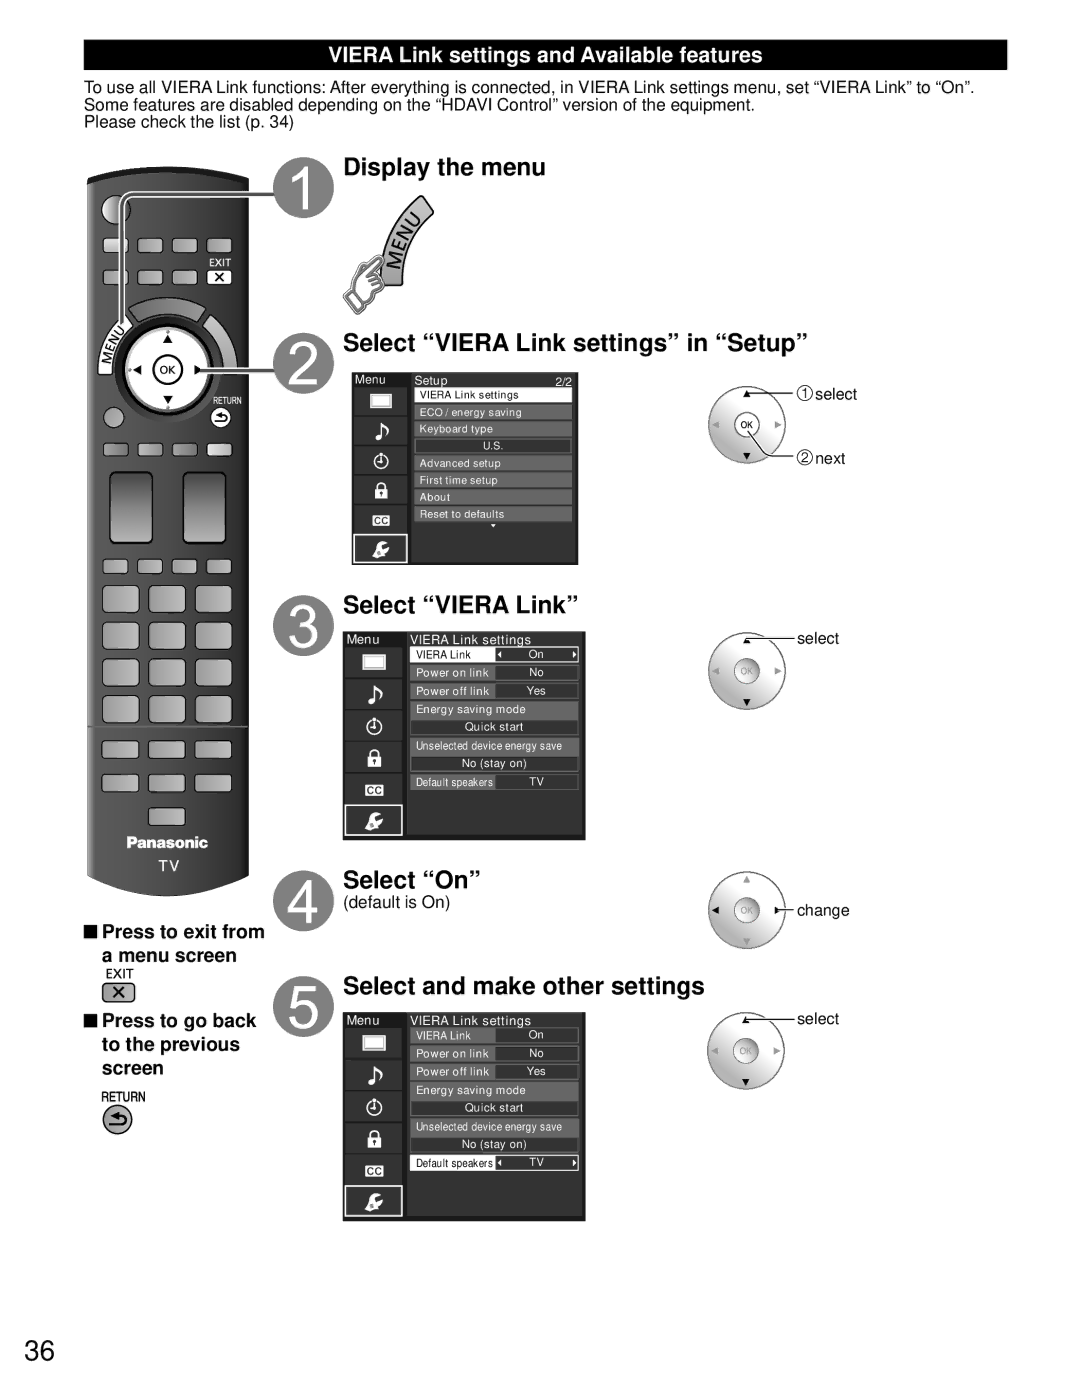
3D settings (Adjust 3D images)

3D adjustment

Select “3D settings” in “Setup”

• How to Use Menu Functions (p. 50)

Changes 3D depth by adjusting left-right parallax.

• Using “Setup” menu (p. 55)

Set “On” and adjusts “Effect”

Viewing

Select the item and set

3D settings

Auto detect 3D

Auto 1

3D signal notification

On

2D -> 3D depth

Medium

3D adjustment


Left / Right swap

Normal

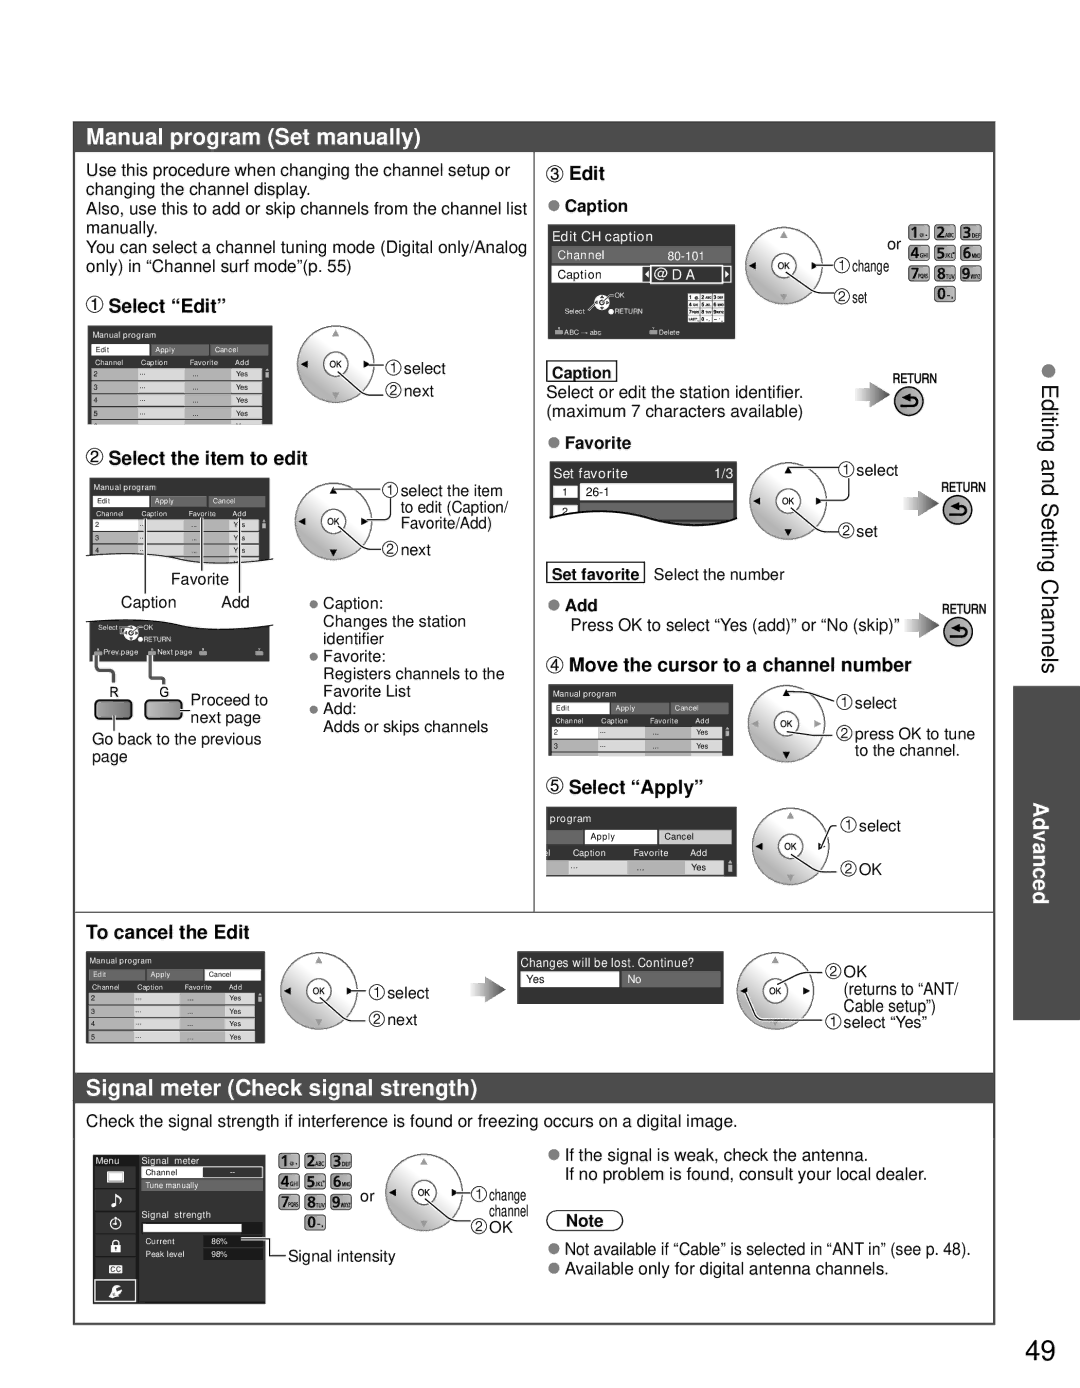
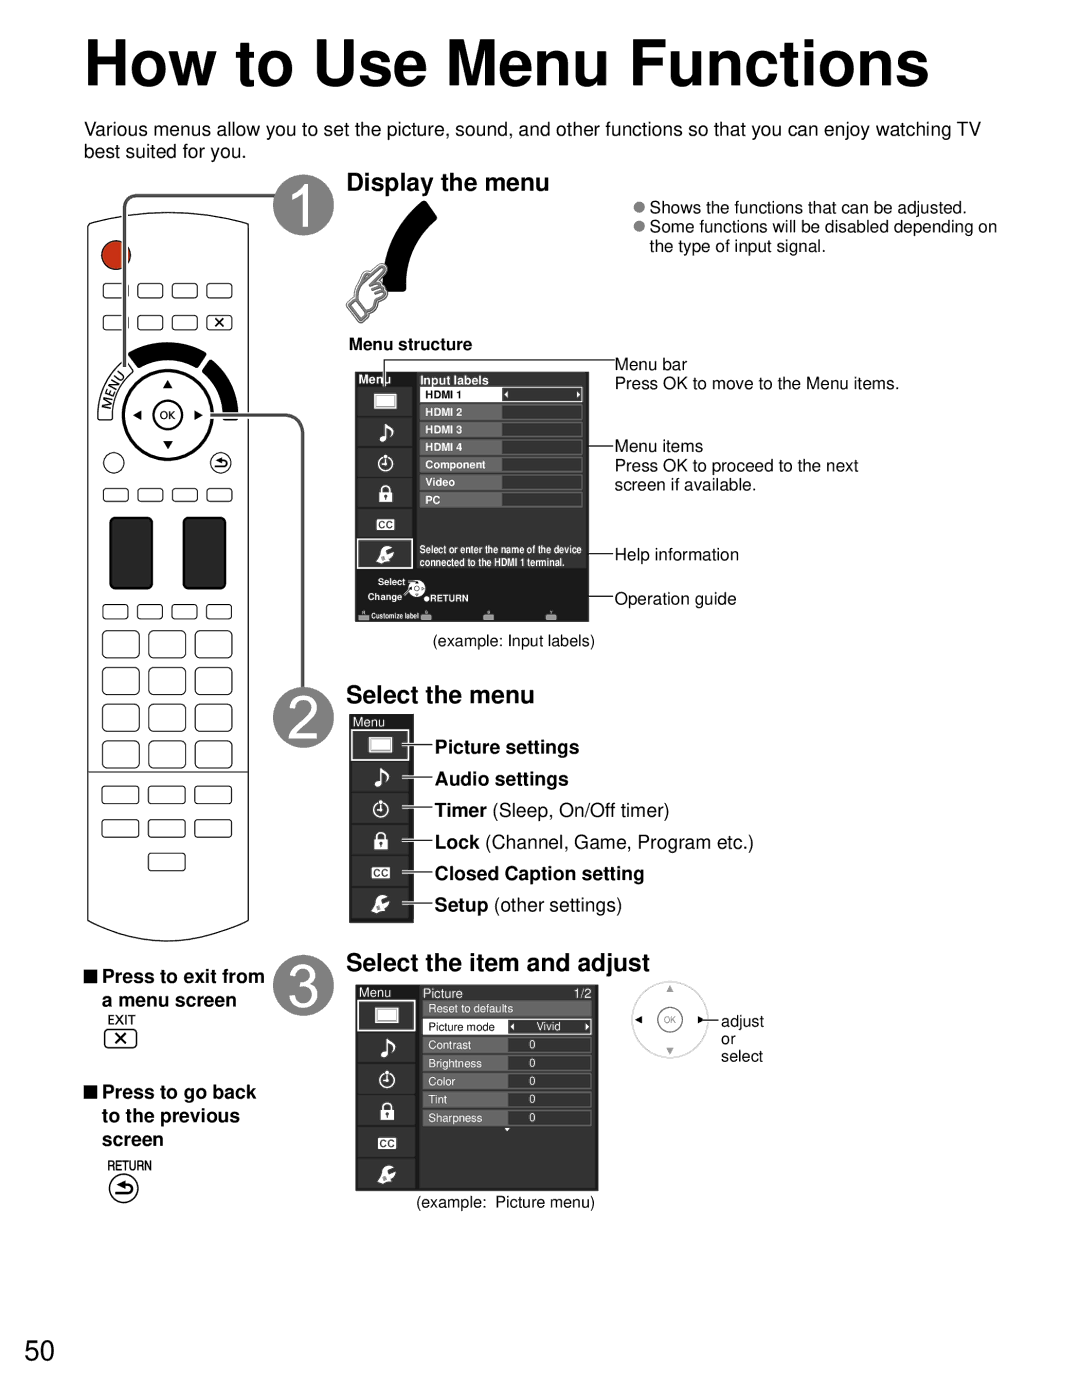
Diagonal line filter

Off

Safety precautions


3D adjustment


select


3D adjustment

On


adjust


Effect

+1


select

3D adjustment (On/Off)


Effect (-3 to +3)


next

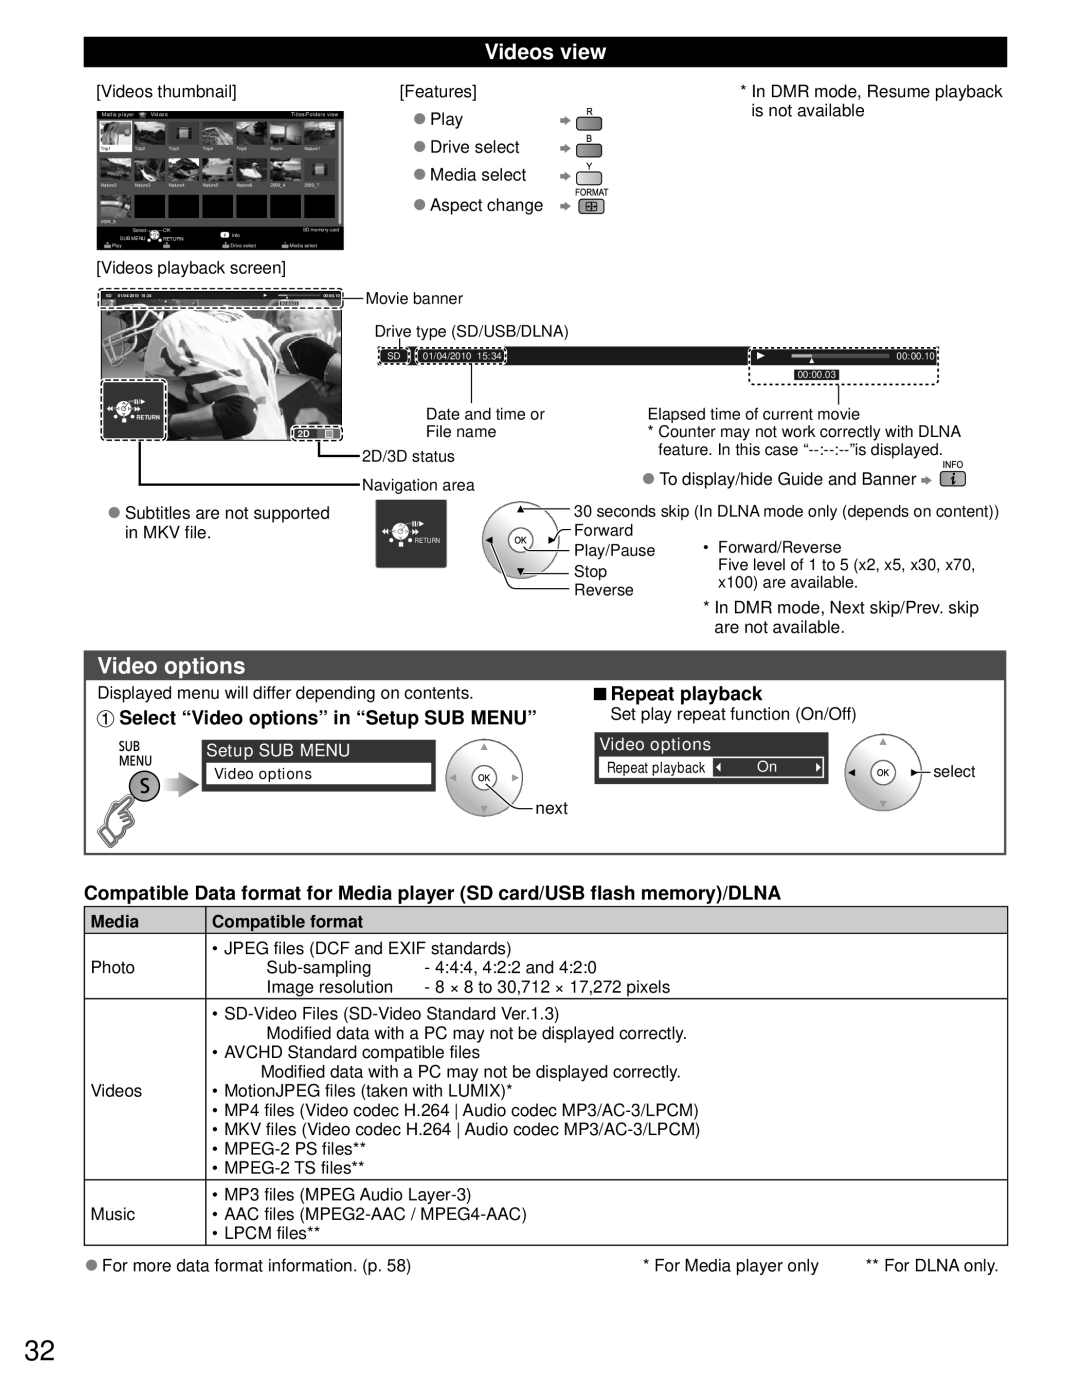
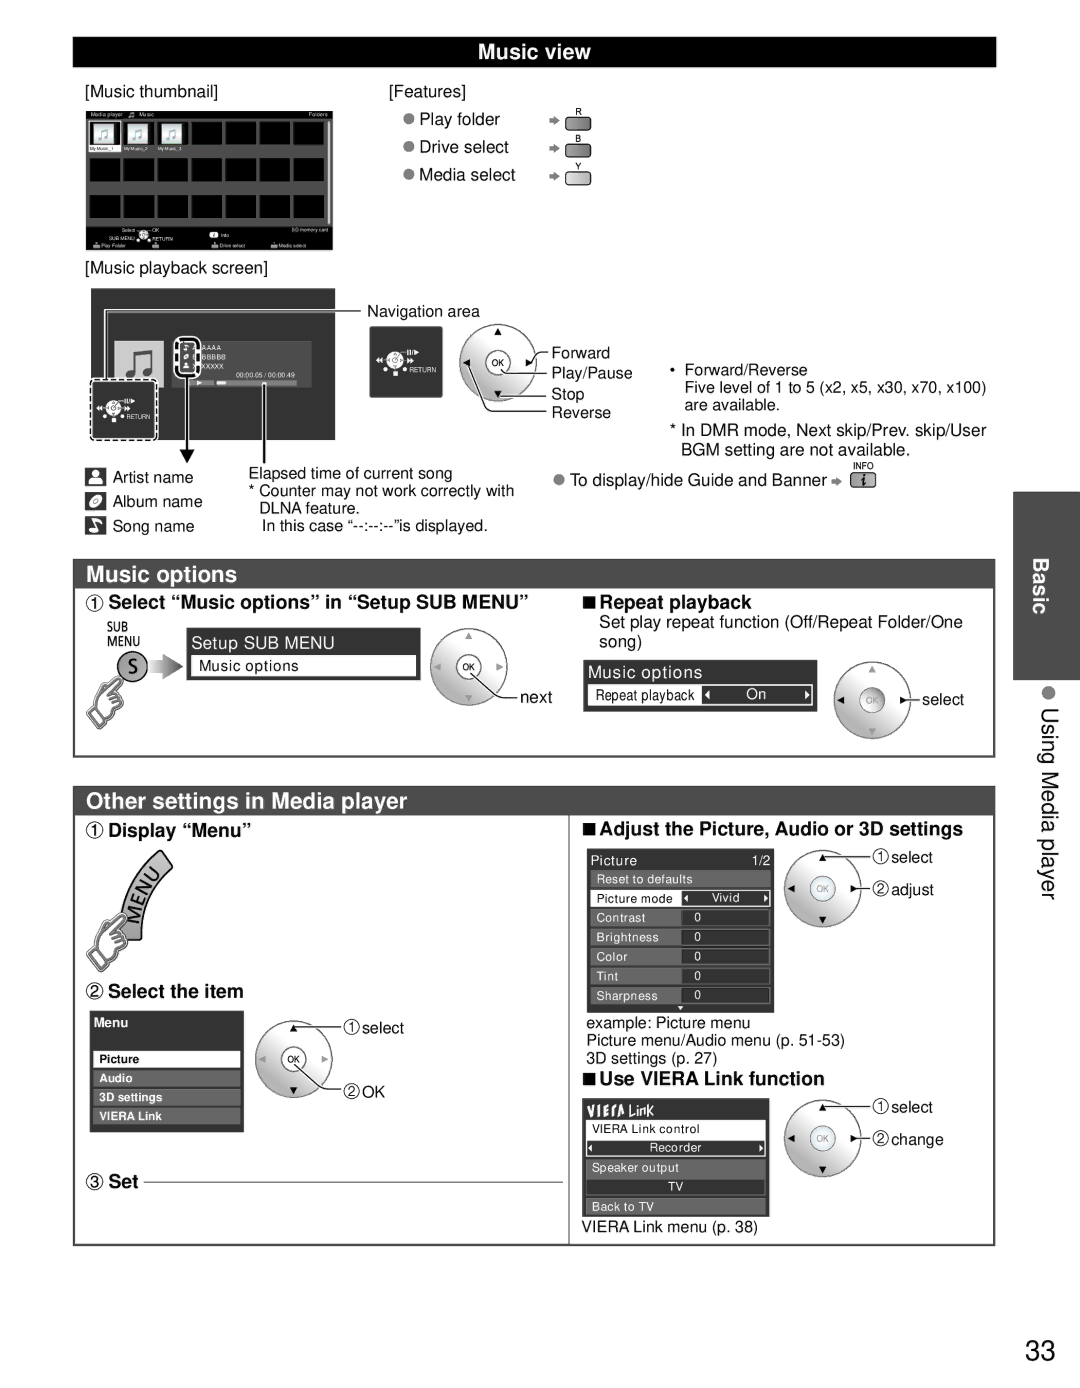
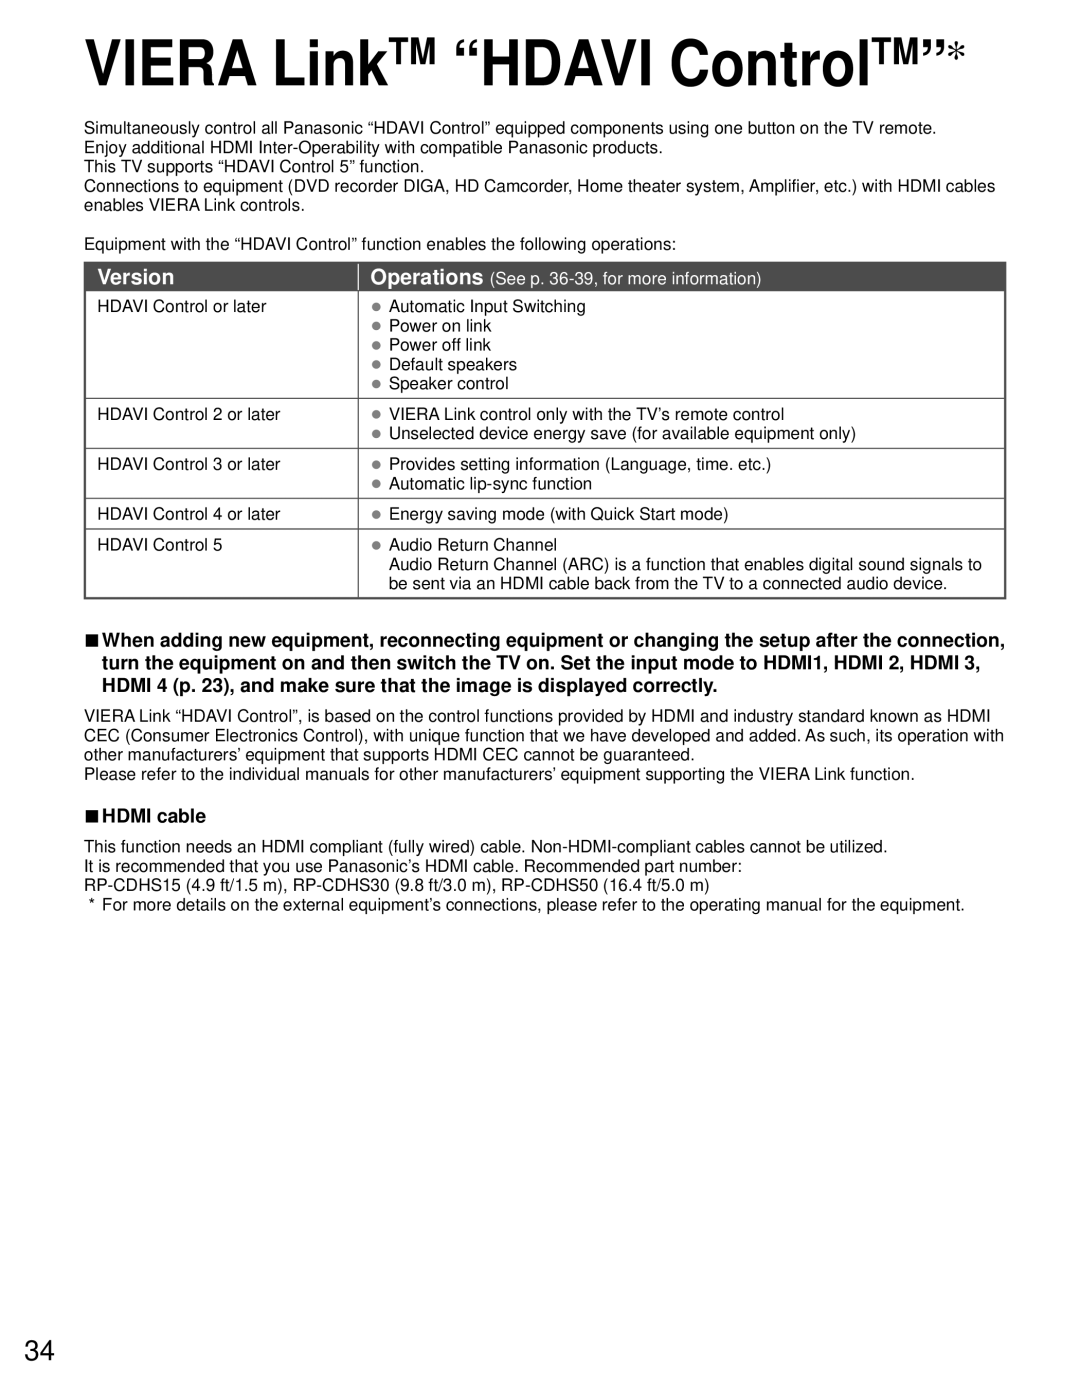
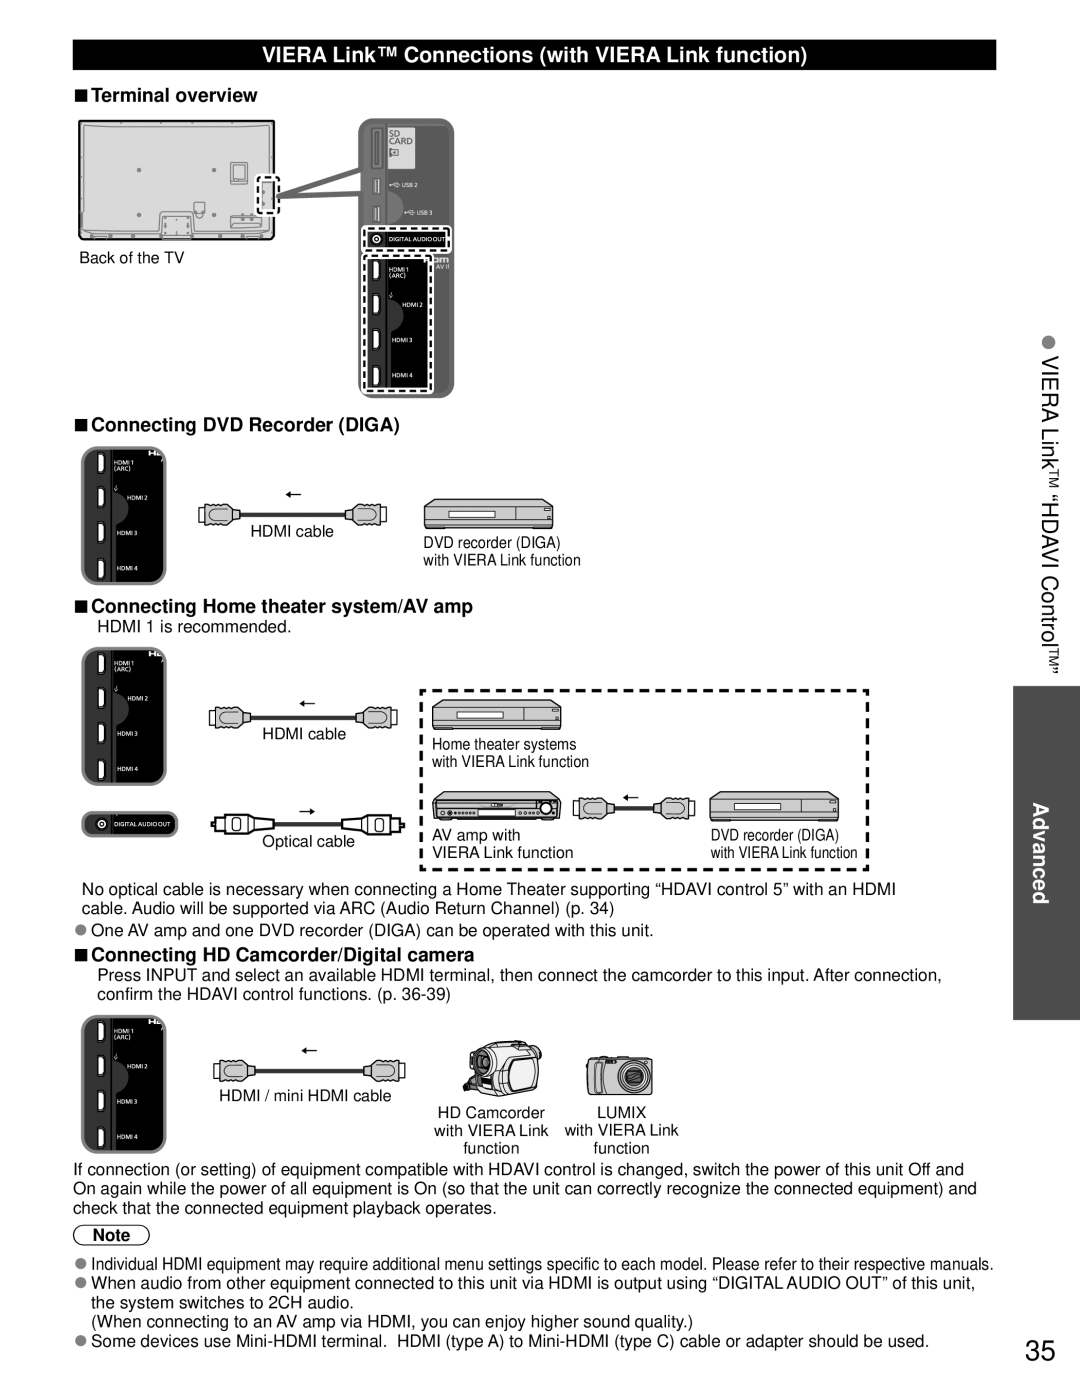
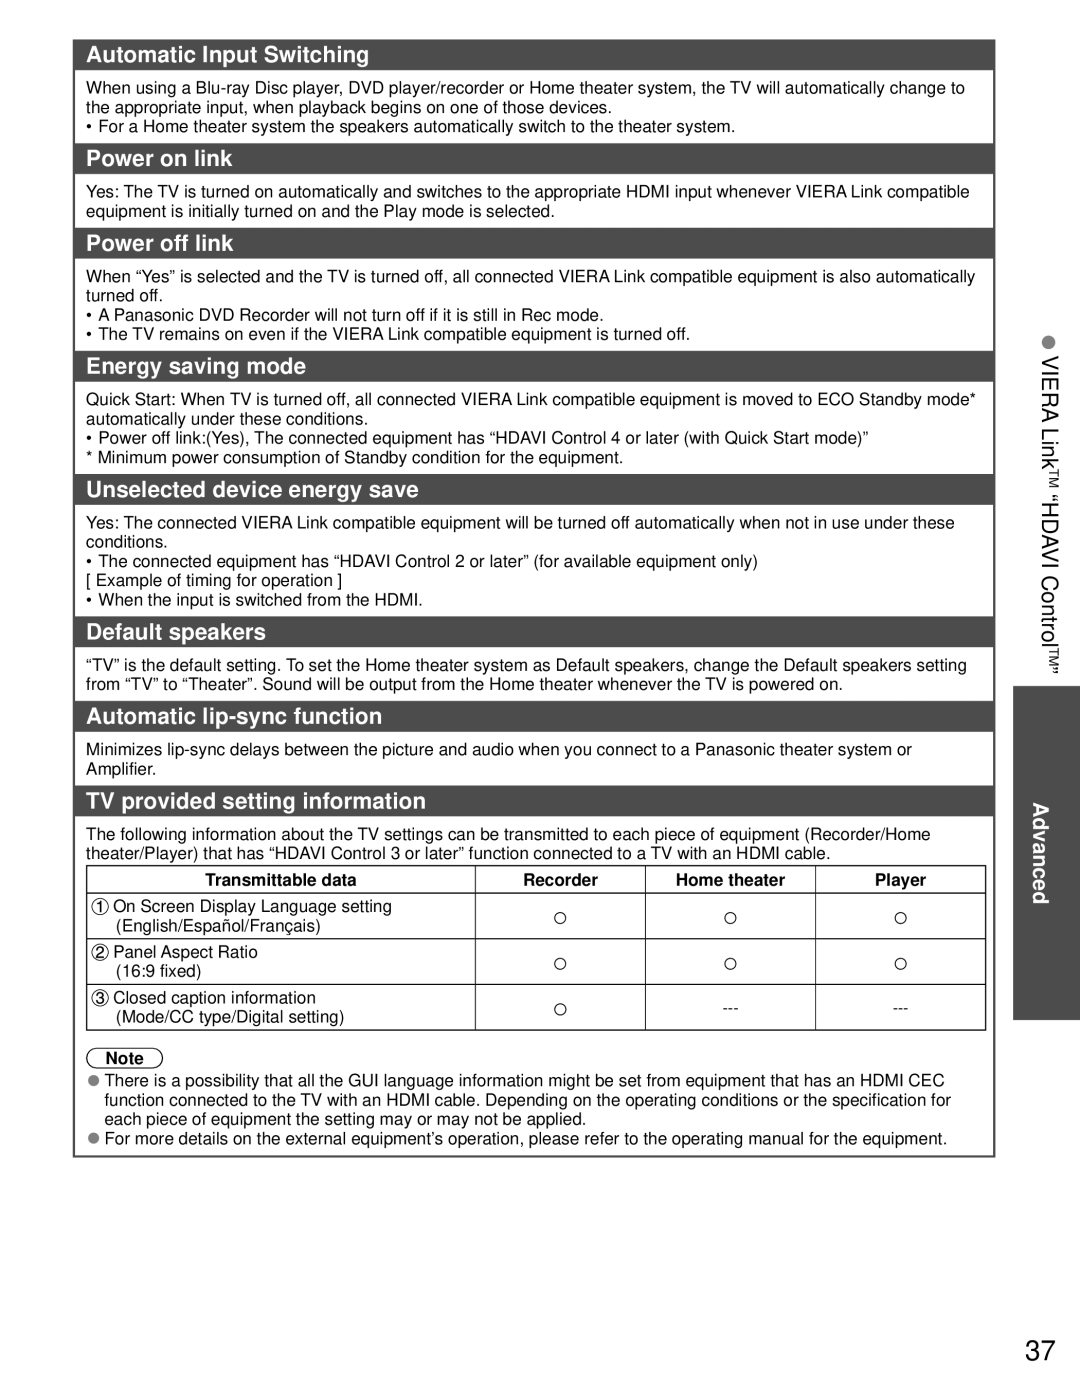
3D images on TV


Settings

Item Description


Auto 1: Switches to 3D display when 3D indication is available (HDMI (3D), AVCHD file,etc)

Auto detect 3D

Auto 2: Same as Auto 1. plus detects 3D signal by identifying similar image in side by side or

top-and-bottom 3D formats.


Note: choose 3D mode manually, when auto detection is not available. (Off/Auto 1/Auto 2)

3D signal notification

On: Displays a message according to the signal received by the “Auto detect 3D”. (On/Off)

2D->3D depth

Adjusts 3D depth. Available only when “2D->3D” is selected in “3D format select”.

(Minimum/Medium/Maximum)


3D adjustment

See above. (3D adjustment (On/Off), Effect (-3 to +3))

Left / Right swap

Change this to On when the phases are reversed. (when there is an unusual sense of depth).

(Normal/Swapped)


Diagonal line filter

On: Resolves discomfort caused by receiving a quincunx matrix signal. (On/Off)

Safety precautions

Displays message for viewing 3D images.

*The perceived three dimensional effects of the 3D Eyewear differ from person-to-person.

*If a signal received from an external device is different from the 3D setting of the TV, such as 2D signal when the TV is set to 3D mode, the images may not be displayed correctly.

27
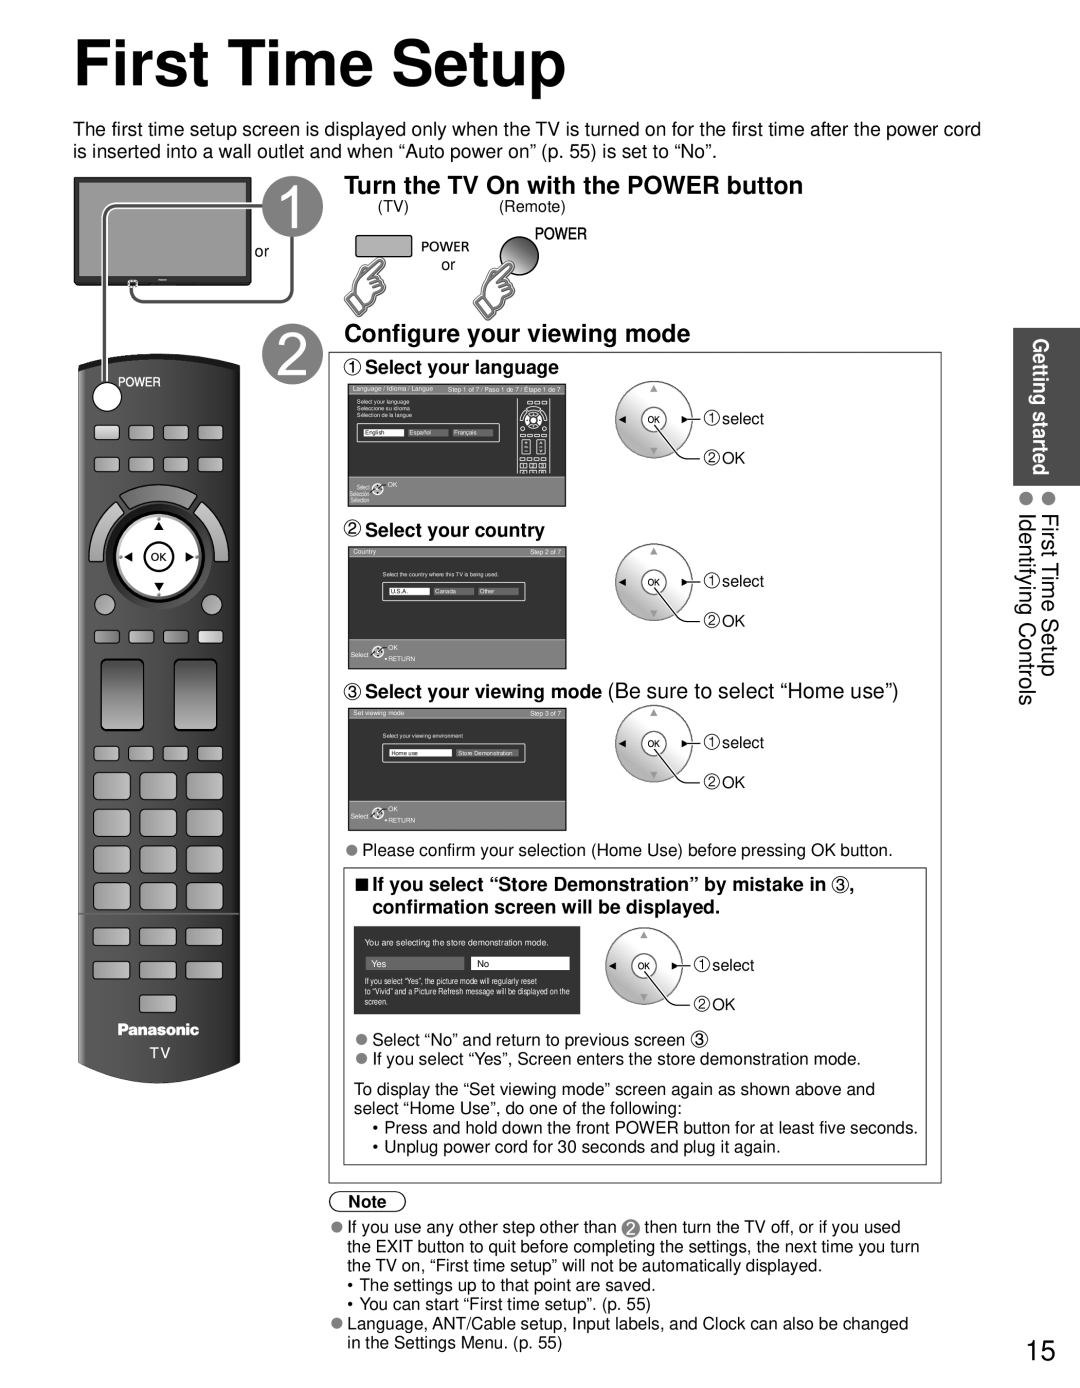
Image 27
Contents Viera English Español55.1/64.7 inches measured diagonally 55,1/64,7 pulgadas medidas diagonalmenteSet up Do not display a still picture for a long timeTypical still images Contents Important Safety Instructions Safety PrecautionsTo prevent fire or electric shock AC Power Supply CordHandling the power supply cord When Moving the Plasma TVAbout Prevention of Accidental Ingestion About Prohibition of DisassemblyHeating About 3D EyewearFCC Statement Accessories Optional AccessoriesAccessories Removing the pedestal from the TV Getting started Accessories/Optional AccessoriesAssembly screws Attaching the pedestal to TVDo not disassemble or modify the pedestal Installing the remote’s batteriesConnection Panels Connections Accessories/OptionalAccessories ConnectionsVideo adapter white AV cable connectionCable Binding Instructions Audio connectionPC / Computer connection VGA RS232C connectionIdentifying Controls TV controls/indicatorsRemote control Switches TV On or Off Standby Displays 3D settings. pIdentifying Controls First Time SetupTurn the TV On with the Power button Configure your viewing modeSelect scan type ANT/Cable setupSelect signal type Cable/Antenna Label the inputs for easy identification Label inputsStarted First Time Configure Network settingsAdjust the Clock Set clock SetupWPS Wi-Fi Protected Setup Complete First time setupAbout wireless LAN Wireless network First time setupTurn power on Watching TVSelect a channel number Change aspect ratio and Zoom the picture Display the SUB MenuCall up a favorite channel Watching TV Password setting/enteringEntering characters Operate USB keyboardSelect the item Set each item Using Viera ToolsDisplay the Input select menu Select the input mode Press Game to switch to the game screenExternal devices Viewing 3D images on TV 3D Eyewear 3D Eyewear case Viewing 3D images on TVAttaching Ferrite Core Charging the 3D EyewearAfter Use Using PrecautionsWearing the 3D Eyewear View3D settings Adjust 3D images Change the view 3D⇔2D3D images on TV Using Media player Basic features for Media playerMedia information Select the data Photos/Videos/Music Using MediaInsert Media SD card or USB flash memory Display Media player Select DrivePhotos view Slideshow settingsSoundtrack settings SlideshowUsing Media player SortPhoto options Repeat playback Select Video options in Setup SUB MenuVideo options Videos viewMedia player UsingOther settings in Media player Music optionsEquipment only Viera LinkTM Hdavi ControlTMVersion Hdmi cableViera Link Connections with Viera Link function Viera LinkTM Hdavi ControlTMSelect Viera Link Display the menu Select Viera Link settings in SetupSelect and make other settings Viera Link settings and Available featuresEnergy saving mode Automatic Input SwitchingPower on link Power off linkPress to go back to the previous ScreenSet Viera Link menu and Available featuresDisplay the Viera Link menu Select the item SelectViera Link control only with the TV’s remote control Speaker controlBack to TV Using Network camera p Using Network servicesUsing Dlna feature Home network p Dlna remote controlUsing Network services Contact your Broadband service providerSelect wired or wireless connection Connecting to the InternetConnection test Display the menu Select Network settingsSelect the settings and set Wireless network Confirm Current settings and statusWireless network Wireless network setting IP address/DNS settingsProxy setting Edit the name and press OK Select Software updateEdit the name of this TV Select Viera network nameDisplay the Home screen ServicesOther settings Viera Connect Enjoy Internet ServiceView/Play Select contentsDisplay Viera Tools Select the Dlna Select serverDisplay Viera Link menu Viera Link control only with the TV’s remote control pDefault camera setting p Network CameraANT/Cable setup and operation Editing and Setting ChannelsDisplay the menu Select Setup Select ANT/Cable setupSetting Channels Signal meter Check signal strengthManual program Set manually Select the menu How to Use Menu FunctionsSelect the item and adjust Display the menuHow to Use Menu Functions Hdmi settings Settings ItemsAdjustments Adjustments PC adjustmentsAudio settings Adjust Audio quality Mode On/Off Settings Items Item Description Mode OffChannel Mode Program ModeSetup Other function settings Movie Ratings Mpaa Ratings List for parental controlAspect Ratio Technical InformationAspect Ratio Format SizeData format information SD Card/USB flash memory warning messages2D→3D Simulated 3D Digital Audio OUT terminal Technical Information Support InformationViera LinkTM Hdavi ControlTM Hdmi connectionInput signal that can be displayed Side barsPC Input Terminals Pedestal Care and CleaningDisplay panel CabinetHow to remove the battery Do not disassemble this product except when disposing of itDisposal Questions Answers Frequently Asked QuestionsDisposalFAQ Support InformationQuestions Why is the sound unusualDistorted, low volume or NetworkingNetworking Frequently Asked Questions FAQ Support InformationFeatures SpecificationsSpecifications Support Information Page Index Support Information IndexLimited Warranty for U.S.A. and Puerto Rico only Customer Services Directory United States and Puerto Rico Accessory Purchases United States and Puerto RicoFor hearing or speech impaired TTY users, TTY Panasonic Product Limited Warranty Limited Warranty for CanadaSupport Information Limited Warranty for CanadaCustomer’s Record Anotación del clienteAmbler Drive