Coleman 9928 Series manual Installing 1 lb. Disposable Cylinders, Venturi tubes and the venturi

Page 7

13. After cleaning or inspection,

Fig. 15

return the burners down to the

proper position. Check that all


the burner venturi are set over


the valve outlets correctly. The


valve orifices must be inside the


venturi tubes and the venturi


tubes must be inside the burner


tubes (Fig. 15). Reinstall the


burner screws.


Burner Tube

Venturi

Tube

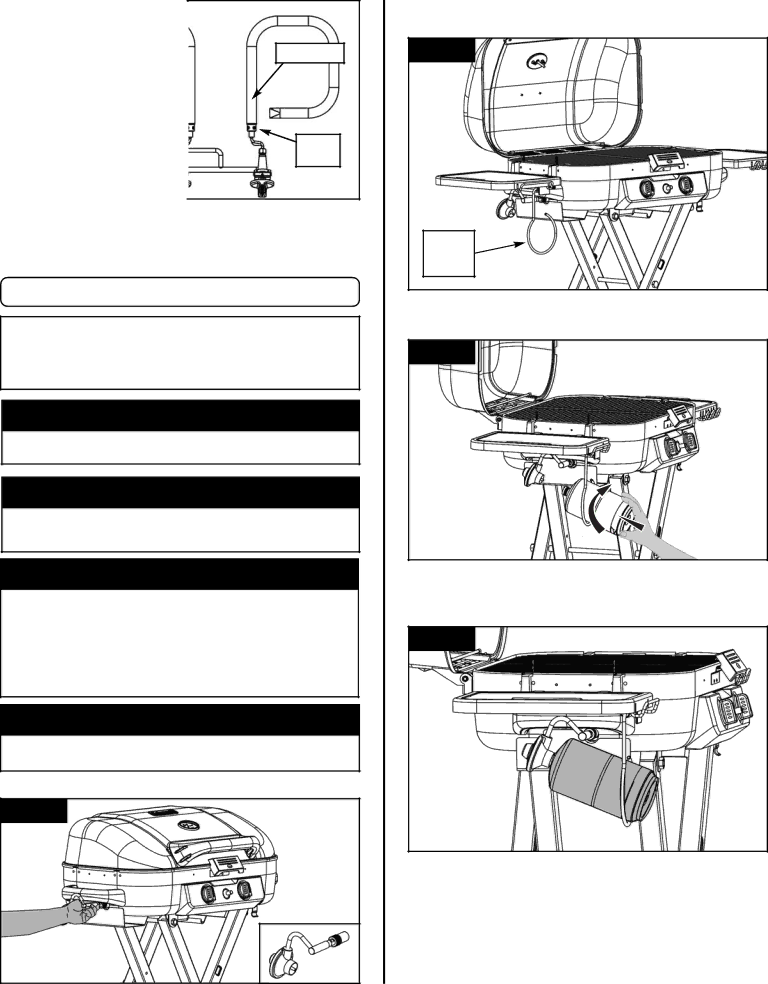
2.Open the grill lid and extend the side tables. Lower the propane bottle support (Fig. 17).

Fig. 17

14.Before lighting the grill, reassemble and make sure all parts are in their proper working position.

Installing 1 lb. Disposable Cylinders

NOTE: Your 9928 Series grill is set up from the

factory to use a 1 lb. disposable propane cylinder.

WARNING

Only cylinders marked “Propane” must be used.

WARNING

This procedure MUST be performed OUTDOORS only! Read and follow the directions on the cylinder.

DANGER

NEVER store a spare L.P. gas supply cylinder under the grill body or inside the grill enclosure or in the vicinity of any heat producing appliance.

Failure to follow this information exactly could result in an explosion and/or fire causing death or serious injury.

CAUTION

Tighten by hand only. DO NOT use tools.

1. Screw the regulator into the grill hand tight (Fig. 16).

Fig. 16

Propane

Bottle

Support

3.Remove the plastic cap from the propane bottle and screw the propane bottle into the regulator hand tight (Fig. 18).

Fig. 18

4.The cylinder must be arranged for vapor withdrawal. Illustration (Fig. 19) shows the propane bottle properly installed.

Fig. 19

English-7

Image 7
Contents Use, Care & Assembly Manual Technical Characteristics ContentsGeneral Safety Information Read labels on the L.P. Gas Supply Cylinder General InstallationCylinder Specifications Portable L.P. Gas Barbecue CylindersGrill Features Assemble the Towing Handle Grill AssemblyExtend the Grill Support English-6 Interior Parts Use and CareTubes . Reinstall Burner screws Installing 1 lb. Disposable CylindersVenturi tubes and the venturi Fixing a Fuel Leak How to Check for LeaksStart-Up Check List Lighting The Burners Lighting InstructionsMatch Lighting Burner Flame Shutting Off the GrillGeneral Use and Correct Burner Flames Condition The GrillCase of Grease Fire Grilling Tips and HintsCooking Methods Suggested Cleaning Materials Care, Maintenance and CleaningComponent Cleaning Steps For Cleaning Venturi Cleaning the VenturiReinstall the heat tents and the cooking grates Moving and Storage TroubleshootingColeman¨ Grill Warranty Registration Card Congratulations on Your NEW Coleman Grill Purchase 9928-3921 Heat Tent 9928-5641 Replacement Parts List 9928 Series9928-1151 Control Knob 9928-2351 Igniter Limited Three Year Warranty WarrantyBarbecue à gaz Ne vous servez PAS du gril à gaz à l’intérieur Table des matièresCaractéristiques techniques Généralités de sécuritéConsultez les étiquettes apposées sur les bouteilles de GPL Généralités d’installationBouteilles portatives de gaz propane Normes applicables aux bouteillesCaractéristiques du gril La manette de verrouillage doit enclencher le piètement fig Assemblage du grilAssemblage de la poignée de traction Dépliez le piètement du grilFrançais-6 Utilisation et soins à apporter aux pièces intérieuresAprès le nettoyage ou Installez une bouteille jetable de 465 gFonctionnement. Assurez-vous Liste de vérification de mise en marche Détection des fuites Bouteilles de propane jetablesDétection des fuites Élimination des fuitesAllumage des brûleurs Instructions d’allumageAllumage avec une allumette Préparation du gril Extinction du grilFlamme du brûleur En cas de feu de friture Conseils pratiques de grillageModes de cuisson Produits de nettoyage suggérés Nettoyage, soins et entretienNettoyage des éléments Examinez et nettoyez le brûleur, si nécessaire Nettoyage du diffuseurNettoyage du diffuseur Retirez les grilles de cuisson et mettez-les de côté figDépannage Déplacement et remisageDépannage suite Nomenclature Série Garantie limitée de trois ans GarantieManual de Uso, Cuidado Y Ensamblaje Características Técnicas ContenidoInformación General de Seguridad Especificaciones del Cilindro Instalación GeneralNo mueva la parrilla mientras está encendida Ilustración Representativa Caracteristícas de la Parrilla Ensamble el Asa para Remolcar Ensamblaje de la ParrillaExtienda el Soporte de la Parrilla Español-7 Uso y Cuidado de las Partes InterioresSólo debe usar cilindros marcados Propano Instalacion de Cilindros Desechables De 1 libra .45 kgComprobación de Fugas Cilindros de Gas LP Desechables Como Verificar por FugasReparando Una Fuga de Combustible Lista de Comprobación InicialEncendiendo los Quemadores Instrucciones Para EncenderEncendido con Fósforos La Llama del Quemador Apagando la ParrillaUso General y Llamas Correctas en el Quemador Prepare La ParrillaEn Caso de un Fuego de Grasa Sugerencias y Consejos para AsarMétodos para Cocinar Limpieza de los Componentes Cuidado, Mantenimiento y LimpiezaLimpieza del Venturi Materiales de Limpieza SugeridosPasos Para Limpiar El Venturi Transporte y AlmacenajeSolución de Problemas continuación Solución de ProblemasAsa de la Tapa Lista de Partes de Repuesto SeriesInoxidable Español-17 Garantía Limitada De Tres Años Garantía