IntraSwitch
Copyright 1998 by Asanté Technologies, Inc
Table of Contents
LED Indicators
Installation
Console Management
Setting Up For Management
Status Monitoring and Statistics
Advanced Management
Troubleshooting
Supported MIBs
Management Menu Tree Technical Support Index
Technical Specifications
About This Manual
Chapter contents Document conventions Audience
About This Manual
Chapter Contents
Document Conventions
About This Manual
Introduction
Introduction
IntraSwitch
IntraSwitch Components
Console/Telnet Management
Configuration/ Management
Web Browser Management
SNMP-Based Management
Switching Capacity
Introduction
Package Contents
Action Tool/Material Required
Tools Materials
Pin Assignments
Pin Assignments
Factory Defaults
Installation
Installation Guidelines
Installing the IntraSwitch
Power Requirements
Environmental Requirements
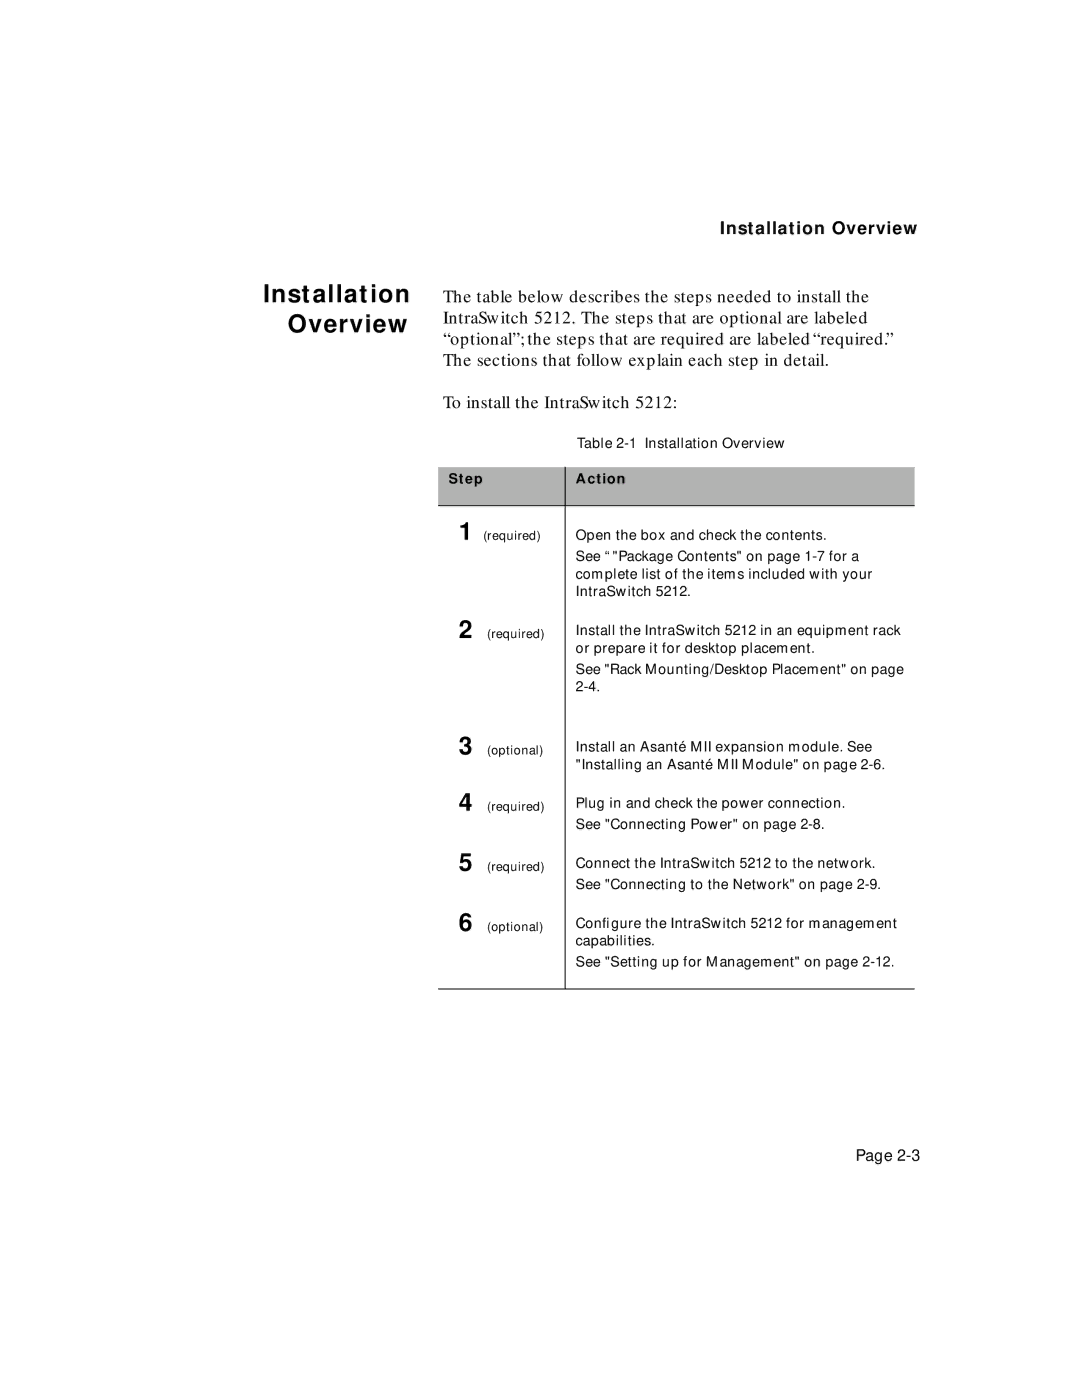
Step Action
Installation Overview
Equipment Rack Installation
Rack Mounting Desktop Placement
Rack Mounting/Desktop Placement
Installing an Asanté MII Module
Slide the Asanté MII module into the expansion
Connecting the power cord to the IntraSwitch
Connecting Power
10Base-T Ports Connecting to the Network
Connecting Network
Connecting To Cable Required
10/100TX Port
Connecting To Cable Required ST Connector
Installation Asanté MII Ports
10/100TX Module
100Base-FX Module
IntraSwitch 5212 cabling scenarios
Diagram
Setting up for Management
Connecting to the Console port
IntraSwitch Local Management Interface Main Menu
Setting up for Management
Setting up for Management
LED Indicators Port LEDs Power LED Diagnostic LEDs
LED Indicators
LED Indicators
LED Indicators
Port LEDs
Power LED Diagnostic LEDs
Setting Up For Management
IntraSwitch Management
Management
Out-of-Band Management
If configuring with a Macintosh computer
In-Band Management
In-Band Management Web Browser Management
In-Band Management
Console Management
Console Management
Console Management
Configuration and Management Tasks
Configuration Management Tasks
Configuration Task
Management Task
Local Management Interface
Accessing a Submenu Exiting a
Main Menu
General Information Menu
Accessing the General Information Menu
Logging into the Configuration Menu
Configuration Menu
Logging into the Configuration Menu
Menu Item Description
Provides a brief overview of each menu
Menu Item Description
Current Settings
Configuring System Administration Information
Press Return
Configuring TCP/IP Parameters
TCP/IP Parameter Settings
Configuring TCP/IP Parameters Changing TCP/IP Information
BootStrap Parameter Menu
Configuring Bootstrap Parameters
Bootstrap Parameter Settings
Configuring Bootstrap Parameters
Console Management Performing a Software Upgrade
Configuring Snmp Parameters
Configuring Snmp Parameters
Snmp Parameter Settings
Enabling Traps
Configuring Snmp Parameters Changing Community Strings
Deleting a Trap Receiver Entry
Console Management Adding a Trap Receiver Entry
Configuring Port Parameters
Configuring Port Parameters
Console Management
Port Parameter Settings
Configuring Full Duplex
Console Management Enabling/Disabling a Port
Configuring Auto-Negotiation
Configuring MAC Forwarding Table Parameters
Configuring Rmon Parameters
Finding an Entry in the MAC Forwarding Table
Configuring MAC Forwarding Table Parameters
Setting the Age Out Timer
Configuring Spanning Tree Parameters
Configuring Spanning Tree Parameters
Spanning Tree Parameter Settings
12 is an example of the Spanning Tree Port Parameter Menu
Enabling/Disabling Spanning Tree on a Single Port
Press Return
Setting Telnet Idle Time Out
Setting Telnet Idle Time Out
14 Set Console Password command line
Setting Console Password
15 Reset Eeprom to Default command line
Resetting Eeprom to Default
Resetting the IntraSwitch
Statistics Menu
Accessing the Statistics Menu
Console Management
Status Monitoring and Statistics
Viewing Current Operating Information
Monitoring the IntraSwitch
Status Monitoring and Statistics
Viewing the Current Operating Information
Setting Description
Counter Description
Statistics screen page one of two
Viewing Statistics
Status Monitoring and Statistics Selecting a Port
Resetting Statistics
Monitoring Counters
Exiting the Statistics Menu
Viewing Statistics Stopping Statistics
Counter Descriptions
Status Monitoring and Statistics
Viewing Statistics
Status Monitoring and Statistics
Advanced Management
Rmon Overview Benefits
Advanced Management
Advanced Management
Parameters
Configuring
Rmon History Group Menu
Advanced Management Rmon History Group
Data Source Interface Number
Adding an Rmon History Control Group Entry
Requested Buckets
Sampling Interval
Screen similar to -4 appears
Granted Buckets
Displaying an Rmon History Statistic Entry
Local Management Interface can display
Rmon Alarm Group Menu
Adding an Rmon Alarm Group Entry
Startup Alarm
Adding an Rmon Alarm Group Entry
Data Source Obj ID
Sampling Type
Falling Threshold
Rising Threshold
Rising Event Index
Falling Event Index
Display Rmon Alarm Group entry
Displaying an Rmon Alarm Group Entry
Deleting an Rmon Alarm Group Entry
10 Rmon Event Group Menu
Event Type
Event Description
Event Community String
Displaying an Rmon Event Group Entry
Event Owner String
Displaying the Rmon Event Group Entry Log
Deleting an Rmon Event Group Entry
Advanced Management
LED Indicators
Troubleshooting
Data LED for the port never comes on
Link LED for the port goes off
Troubleshooting
Rmon RFC
Supported MIBs
Statistics
History Group
Alarm Group
Supported MIBs
Event Group
MIB II RFC
System Group
Interface Group
IP Group
Address Trans Group
IP Address Table
IP Routing Table
TCP Connection Table
TCP Group
UDP Group
UDP Listener Table
1493
Bridge MIB
Base Port
Appendix C Technical Specifications
Power Specifications
Weight
Redundant Power Supply
Environmental Specifications
Statistics
Management Menu Tree
Management Menu Tree
Technical Support
Technical Support
Numerics
Index
Description 5-3, 5-4,5-8,5-10
Index
Index
Index
Configuring 5-10, 5-12, 5-14, 5-17
MIB
Default 2-14
Rmon
Snmp
Index
Configuring 5-10, 5-11, 5-12, 5-14, 5-17
Index
Index