Workshop manual
Rider 11, Rider Rider 11 Bio, Rider 13 Bio, Rider
English
Svenska
Troubleshooting chart
Rider 11, Rider Rider 11 Bio, Rider 13 Bio Rider Contents
Workshop manual
Safety regulations
General instructions
Special instructions
IMPORTANT INFORMATION
Special tools
Technical data
Dimensions
Tightening moments
Play
Technical data
Mowing deck
Rear ejector
Side ejector
Control points
Technical data
Pre-delivery service
Delivery and dealer service
After first 5 hours
Dealer service 25 hours service
50 hours service
100 hours service
300 hours service
Maintenance schedule
Maintenance interval in
Maintenance
The engine is switched off The ignition key is removed
Delivery measures
To our dealer
Packaging and unpacking
Parts enclosed in packaging, Rider
Measures for contact with acid
Battery
Delivery measures
Steering wheel
Tow plate
Check the oil level in the engine
Rider 16, 2003 model
Checking the oil level in the transmission
Wheels
IMPORTANT INFORMATION
IMPORTANT INFORMATION
Test running
Delivery measures
Speed regulator
Administration
Delivery measures
Design and function
General
Design and function
Serial number
Older engines all versions Newer engines Rider 16
Engine
Side-valve engine Rider 11 and
Overhead-valve engine Rider 16
Design and function
Steering
Design and function
Mowing deck
Driving
Design and function
Removing the BioClip plug BioClip 900 mm
Mowing deck with rear ejection, 850 mm
Mowing deck with side ejection, 970 mm
BioClip 1030 mm
The attachment’s lifting device
Mowing height manoeuvring
Design and function
22 - English
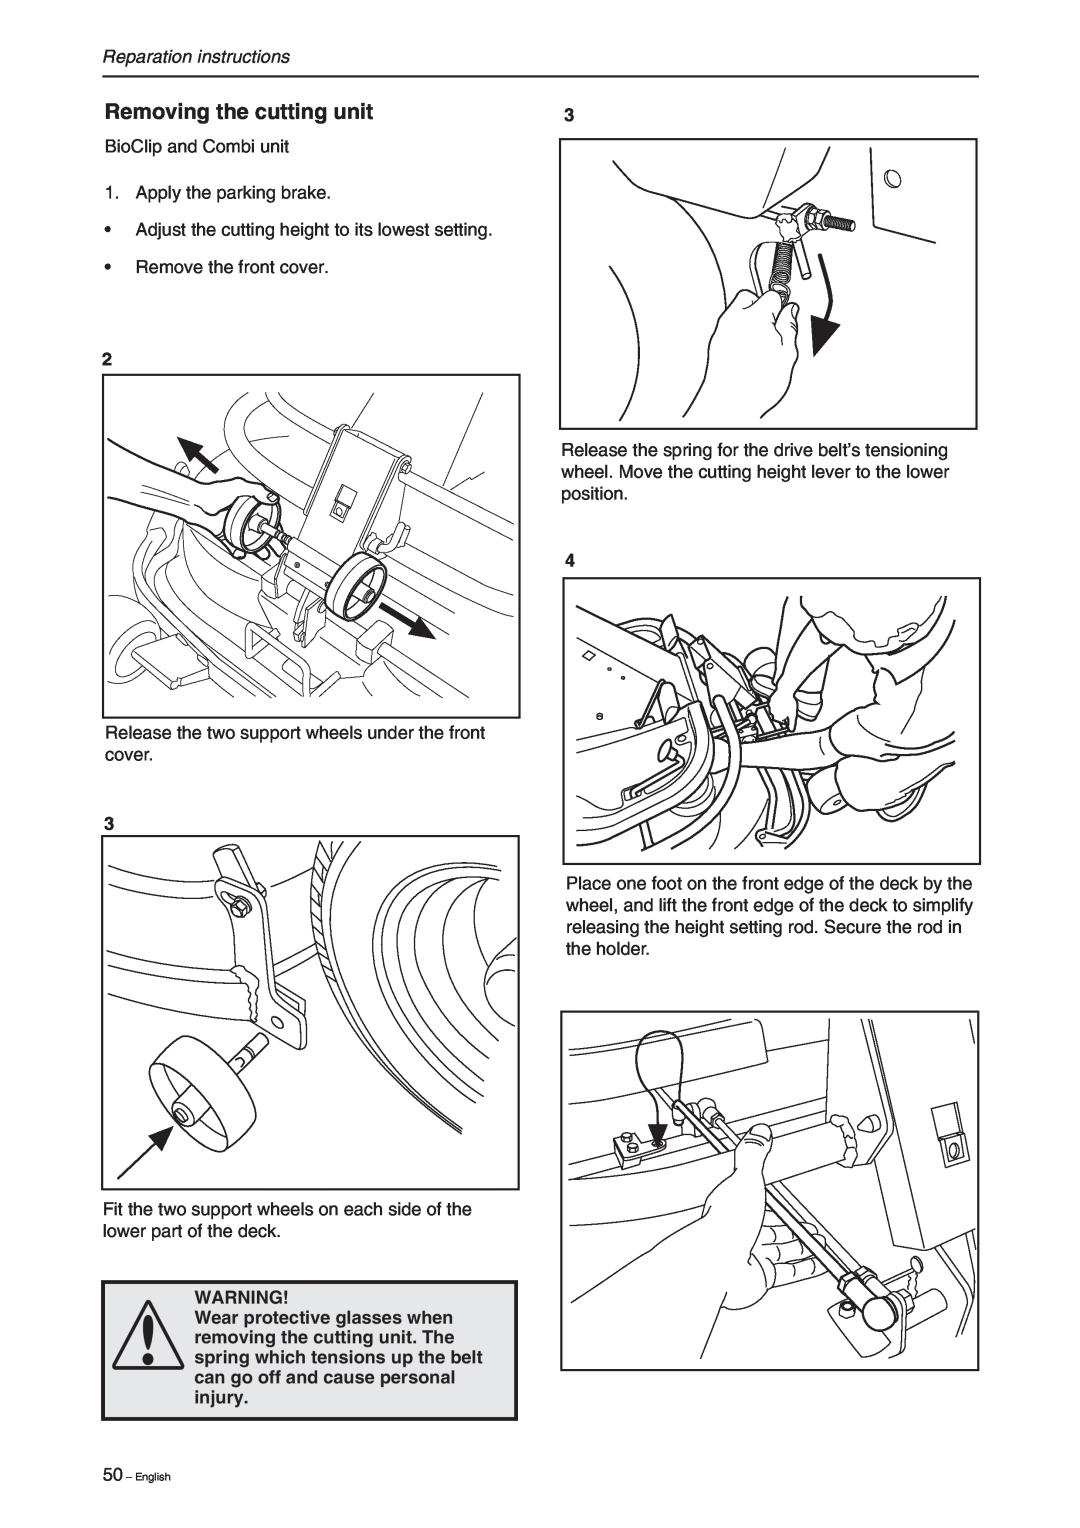
Reparation instructions
Removing engine
Hold the bolts so that the poles are not put under strain
IMPORTANT INFORMATION
Reparation instructions
Tie the hose higher than the fuel tank level
Reparation instructions
Replacing engine
IMPORTANT INFORMATION
Reparation instructions
Choke not actuated
Fitting
Fuel tank Removal
Reparation instructions
Checking and adjusting steering wires
Changing the oil
Avoid skin contact and wash any spillage with soap and water
Reparation instructions
Removal/installation of steering axle
Replacing steering wires
Reparation instructions
Reparation instructions
Removal/installation of wire wheel
30 - English
Checking and adjusting brake wire
A badly adjusted brake can lead to reduced braking capacity
Rider 13 and Rider
Reparation instructions
Checking and adjusting freewheel clutch Rider
Checking and adjusting gear control Rider
Reparation instructions
Checking and adjusting throttle control
Replacing articulated steering bearing
2 Rider
2 Rider 13 and Rider
Reparation instructions
Work off the belts from the pulley
Removal of swing axle
Replacing bushings
2 Rider 13 and
Reparation instructions
Installation of swing axle
3 Rider
3 Rider 13 and
Reparation instructions
Reparation instructions
Removal/installation of gear box
Rider
Sealing collar replacement - input axle
Replacing hydrostatic transmission axle sealing collars
Reparation instructions
IMPORTANT INFORMATION
Sealing collar replacement - outgoing axles
Reparation instructions
IMPORTANT INFORMATION
IMPORTANT INFORMATION
Removal of hydrostatic transmission wire
Replacing hydrostatic transmission wire
Reparation instructions
Reparation instructions
4. Remove the transmission cover
Refitting hydrostatic transmission wire
Reparation instructions
Reparation instructions
Bleeding the hydrostatic transmission oil system
Adjustment of transmission neutral position
Reparation instructions
Oil change
Transmission maintenance
Reparation instructions
Removing the belt
Changing oil - Rider 13 and Rider
Rider 11, Rider 13 H, Rider 16 H och Rider 14 Pro
Reparation instructions
Checking and adjusting mower deck ground pressure
Checking and adjusting mower deck parallelism
Adjusting Rider 11 and Rider 13 H
Reparation instructions
Adjusting Rider 11 Bio and Rider 13 Bio
Adjusting Rider
Reparation instructions
48 - English
Adjusting cutting height area
Adjusting cutting height
Reparation instructions
IMPORTANT INFORMATION
Removing the cutting unit
Reparation instructions
To leave the service position
Reparation instructions
Wear eye protection and work gloves when working on the mowing deck
Dismantling the cutting unit
Rear and side ejectors
Reparation instructions
Belt replacement on BioClip 103 and Combi
Protect your hands by wearing gloves when working with the blades
Replacing the cutting unit’s belts
Reparation instructions
Reparation instructions
Belt replacement on BioClip
IMPORTANT INFORMATION
When working with the mowing deck, use protective glasses and gloves
Replacing the break-pin BioClip 90, 103 and Combi
Removal of blades with bearings
Reparation instructions
The friction washer must be replaced when replacing the shear pin
Reparation instructions
Press out the axle with a puller
IMPORTANT INFORMATION
When working with the blades, use protective gloves
Grinding and balancing of blades
The friction washer must be replaced when replacing the shear pin
Reparation instructions
Circuit diagram Rider
Electrical system
Circuit diagram Rider 13 and Rider 13 Bio
Electrical system
Circuit diagram Rider
Electrical system
60 - English
7/8/9
Electrical system
Inspecting the safety system
Works
Microswitch Neutral Position
Microswitch Seat
Microswitch Mowing Deck
Ignition and Starter Lock
Main fuse
ENGINE WILL NOT START
ENGINE STARTS BUT DOES NOT RUN SATISFACTORILY
Too low or no oil in the engine
Page
Stop and let the transmission cool down. Clean the cooling fins
Brakes do not work satisfactorily The machine moves while in neutral
Svenska
Svenska
Svenska
´z+H.T¶6w¨
Svenska
´z+H.T¶6w¨ 2002W51
114 01
Also See