Copying Guide
Please read this guide before operating this equipment
imageRUNNER 2010F Copying Guide
PCL Printer Driver Installation and Instructions
Basic Operations Troubleshooting Copying Instructions
Setting Up the Network Connection and Installing the CD-ROM Software
Network Connectivity and Setup Instructions
Chapter 5 Appendix
Chapter 1 Introduction to Copying Chapter 2 Basic Copying Features
Chapter 3 Special Copying Features Chapter 4 Customizing Settings
How This Manual Is Organized
Interrupt Mode
Contents
Chapter 2 Basic Copying Features
Canceling a Copy Job
Using Shortcut Keys
Chapter 3 Special Copying Features
Chapter 4 Customizing Settings
Two-Page Separation Margin Mode Frame Erase
Preface
How to Use This Manual
Symbols Used in This Manual
Keys Used in This Manual
Illustrations Used in This Manual
Disclaimers
Legal Notices
Trademarks
Copyright
CHAPTER
Introduction to Copying
Copy Basic Features Screen
Special Features Screen
Overview of the imageRUNNER 2010F
Introduction to Copying
Additional Functions Menu
1 Press COPY
Flow of Copy Operations
Introduction to Copying
If the message INSERT A CONTROL CARD appears
If the message ENTER DEPARTMENT ID AND PASSWORD appears
Introduction to Copying
2 Place your original
3 Set the desired copy mode on the Copy Basic Features screen
Introduction to Copying
5 Enter the copy quantity
4 Set the desired copy modes on the Special Features screen
6 Press Start
Introduction to Copying
If you want to cancel a copy job in the standby mode
If you want to stop a copy job
If you want to interrupt a copy job
Introduction to Copying
8 When scanning is complete, remove your original
9 If the optional Card Reader-E1 is attached, remove the control card
10 If you have set Department ID Management, press ID
Introduction to Copying
Placing Originals
Platen Glass
Feeder
Platen Glass
Vertical Placement
Horizontal Placement
Orientation
Introduction to Copying
Platen Glass
1 Lift up the feeder
2 Place your original face down
1-13
3 Gently lower the feeder
Introduction to Copying
1 Neatly place your originals face up in the original supply tray
Feeder ADF-J1
Introduction to Copying
2 Adjust the slide guides to fit the size of your originals
Original Output Tray
1-15
1 Press Stop
Canceling a Copy Job
Using the Stop Key
You can cancel a copy job in several ways
You cannot select multiple jobs and cancel them all at once
Using the System Monitor Screen
2 Press F2 or F3 to select the job to be canceled
press F4 CANCEL
3 Press Start
Reserved Copying
Reserving Copy Jobs While Printing
2 Place your original, and set the desired copy modes
Features
4 When scanning is complete, remove the original from the
machine
1-19
1 Press COPY
Interrupt Mode
2 Press Interrupt
3 Place your original, and set the desired copy modes
Introduction to Copying
4 Press Start
5 Once the original is scanned, remove it from the machine
1-21
Introduction to Copying
1-22 Interrupt Mode
CHAPTER
Basic Copying Features
This chapter describes the basic copying features Copy Quantity
Copy Exposure and Image Quality Adjustments
Specifying the Required Number of Copies
2 Enter the desired copy quantity 1 to 99 using the numeric
Basic Copying Features
Copy Quantity
keys
2 Enter the desired copy quantity 1 to 99 using the numeric
Basic Copying Features
SYMBOLS
Basic Copying Features
Paper Selection
Automatic Paper Selection
The machine automatically selects the copy paper
Place your original press F2 PAPER SELECT
Manual Paper Selection
Press COPY
3 Make sure that AUTO PAPER is selected press OK
STACK BYPASS
3 Press F3 or F4 to select the desired paper size
Place your original press F2 PAPER SELECT
If you want to use the stack bypass
Press F2 SELECT PAPER
4 Press OK
5 Press Start
Basic Copying Features
Text/Photo Mode
Copy Exposure and Image Quality Adjustments
Copying Features
Text Mode
Place your original press F3 DENSITY
3 Press F1 LIGHT or F3 DARK to adjust the exposure
Copy Exposure Manual
press OK
Image Quality Manual
Text Mode
Text/Photo Mode
Photo Mode
4 Press Start
Copy Exposure and Image Quality Automatic
2-11
Basic Copying Features
4 Press Start
Features
To cancel the automatic exposure control, press
3 Press F2 AUTO EXPOSUR OK
Auto Zoom
Preset Zoom
Changing the Copy Zoom Ratio
Zoom by Percentage
Enlarge
Preset Zoom
Place your original press F1 COPY RATIO
Reduce
Place your original press F1 COPY RATIO
3 Press F3 REDUCE or F4 ENLARGE to select a preset
Zoom by Percentage
reduction or enlargement ratio press OK
correct value
3 Set the copy ratio using the numeric keys press OK
200%. Enter a value within the setting range
Auto Zoom
Copying
2 Place your original press F2 PAPER SELECT specify the paper size
3 Press F1 COPY RATIO
4 Press F2 AUTO ZOOM OK
Rotate
Collating Copies
Optional Units
Collate
Result
If the Collate Mode Is Set
If the Rotate Mode Is Set
Originals
Place your originals press Collate
If the Offset Mode Is Set
If the Staple Mode Is Set
Page Order Collate
2-21
3 Enter the desired copy quantity 1 to 99 using the numeric keys
If you want to set the Rotate mode
If you want to set the Offset mode
Place your original press Collate until STAPLE SORT
3 Enter the desired copy quantity 1 to 99 using the numeric
Page Order Staple
appears
Basic Copying Features
2-23
4 Press Start
2-24 Collating Copies
Basic Copying Features
CHAPTER
Special Copying Features
Place your original on the platen glass press Special
Features
Two-Page Separation
Special
Press F3 LEFT OPENING or F4 RGHT OPENING to select
The Original Size setting menu appears
Cover
3 Press F1 2-PAGE SEP
7 Press Start
6 Enter the desired copy quantity 1 to 99 using the numeric keys
Special Copying Features
5 Press F4 ORIGNAL SIZE to select the paper size press OK
Place your original press Special Features
Margin Mode
Press COPY
5 Press F3 - or F4 + to set the margin width 1 mm to 20 mm press OK
3 Press F2 MARGIN
Special Copying Features
6 Enter the desired copy quantity 1 to 99 using the numeric
press
YES or
Original Frame Erase
Erase Mode
Copy LTR Original Frame Erase Mode Not Selected
Frame Erase
Book Frame Erase
Book Frame Erase Mode Original Selected
Book Frame Erase Mode Not Selected
Original Frame Erase
ORIGNAL SIZE, the next or previous menu option
3 Press F3 FRAME ERASE
Make sure that FRAME ERASE is selected press OK
Press F4 ORIGNAL SIZE to select the size of the original
Special Copying Features
Book Frame Erase
3-11
6 Enter the desired copy quantity 1 to 99 using the numeric
5 Press F4 ORIGNAL SIZE to select the size of the book when
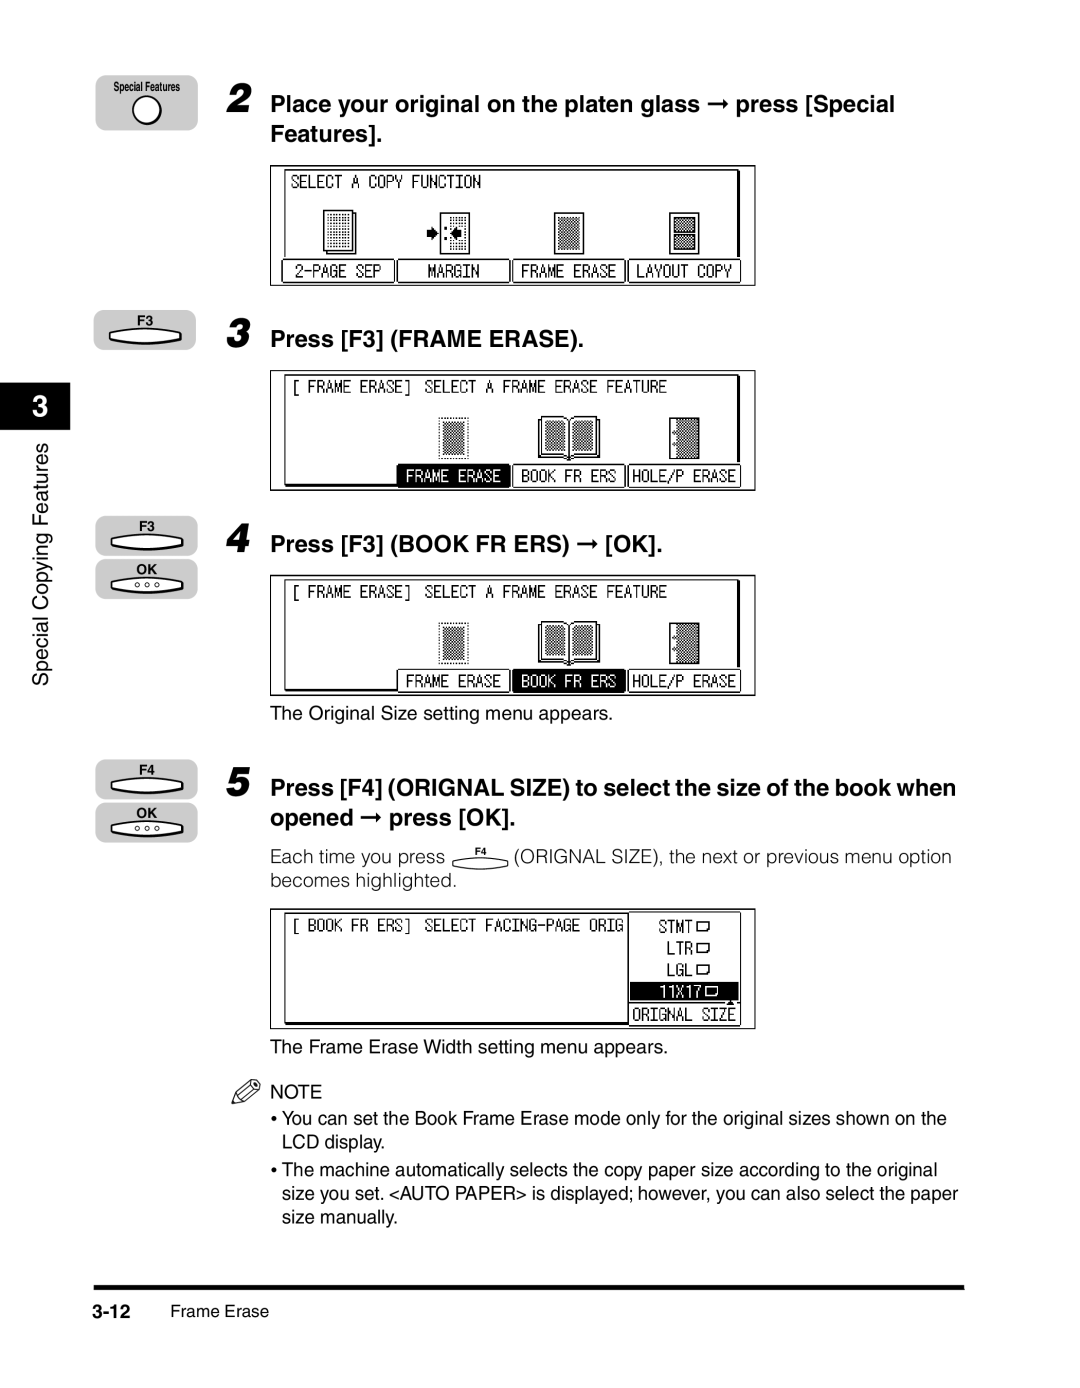
2 Place your original on the platen glass press Special Features
4 Press F3 BOOK FR ERS OK
opened press OK
6 Press F3 - or F4 + to set the desired book frame erase
7 Enter the desired copy quantity 1 to 99 using the numeric
The selected mode is set, and the Copy Basic Features screen appears
The default setting is ‘10 mm’
Place your original press Special Features
Hole Punch Erase
4 Press F4 HOLE/P ERASE OK
Special Copying Features
Each time you press
5 Press F4 ORIGNAL SIZE to select the size of the original press OK
3-15
Special Copying Features
3-16 Frame Erase
7 Enter the desired copy quantity 1 to 99 using the numeric keys
Special Copying Features
8 Press Start
Special Copying Features
Image Combination
2 on
3-17
Press COPY
Place your originals press Special Features
4 on
Features
3-19
3 Press F4 LAYOUT COPY
4 Press F4 ORIGNAL SIZE to select the size of the original press OK
5 Press F2 2 ON 1 COMB or F3 4 on 1 to select the type of layout
If you selected 2 ON 1 COMB in step
6 Press F4 OPTIONS to select the layout order of the originals
paper size press OK
7 Press F2 STACK BYPASS, F3 , or F4 to select the
Special Copying Features
8 Enter the desired copy quantity 1 to 99 using the numeric keys
9 Press Start
3-21
Place your originals in the feeder press the Shortcut key
1 to 4 where you registered the Different Size Originals
Different Size Originals
mode
4 Press Start
3 Set the desired copy modes
3-23
Special Copying Features
3-24 Different Size Originals
Special Copying Features
CHAPTER
Customizing Settings
Applicable
Copy Settings Table
Customizing Settings
Available Settings
Press Additional Functions
Changing the Current Standard Settings
Press F3 or F4 to highlight 02 COPY SETTINGS
Image Quality and Copy Exposure
4 Set the desired standard copy image quality and exposure press OK
5 Press Reset to return to the Copy Basic Features screen
3 Press F3 or F4 to highlight 01 STD IMAGE QUAL
EXP press OK
2 Press F3 or F4 to highlight 02 STD ZOOM RATIO press OK
Zoom Ratio
Copy Quantity
4 Press Reset to return to the Copy Basic Features screen
2 Press F3 or F4 to highlight 03 STANDARD COPY QTY press OK
WIDTH press OK
Settings
Frame Erase Width
2 Press F3 or F4 to highlight 04 FRAME ERASE
4 Press Reset to return to the Copy Basic Features screen
Auto Sort
3 Press F2 - or F3 + to set the desired frame erase width
01 mm to 20 mm press OK
If you want the machine to collate automatically, select 01 ON
Sort Rotate
2 Press F3 or F4 to highlight 05 AUTO SORT
3 Press F3 or F4 to select 01 ON or 02 OFF
3 Press F3 or F4 to select 01 ON or 02 OFF press OK
2 Press F3 or F4 to highlight 06 SORT ROTATE press OK
4 Press Reset to return to the Copy Basic Features screen
Dull Is Set
Sharpness
Dull
Sharp
4 Press Reset to return to the Copy Basic Features screen
2 Press F3 or F4 to highlight 08 SHARPNESS press OK
3 Press F3 or F4 to select 01 ON or 02 OFF
highlight 02 COPY SETTINGS press OK
Prescan
2 Press F3 or F4 to highlight 09 PRESCAN press F4OK
Reset
4 Press Reset to return to the Copy Basic Features screen
Customizing Settings
4-14 Changing the Current Standard Settings
Assigning Functions
Using Shortcut Keys
Customizing Settings
2 Press F3 or F4 to highlight 07 SHORTCUT KEY SET press OK
3 Press F3 or F4 to select a shortcut key press OK
5 Press Reset to return to the Copy Basic Features screen
Making Copies
4 that contains the copy mode you want to set
3 If necessary, specify the settings for each mode
Setting
4-18 Using Shortcut Keys
Customizing Settings
This chapter provides the Combination of Functions Chart and index
Appendix
CHAPTER
Appendix
Combination of Functions Chart
Function to Be Set
Combination available Combination unavailable
Appendix
Function to Be Set
Appendix
5-4 Combination of Functions Chart
Function to Be Set
Function to Be Set
Appendix
1 on
Numerics
Index
Appendix
Appendix
Assigning Functions
Appendix
5-8 Index
CANON EUROPA N.V
CANON INC
CANON U.S.A., INC
CANON CANADA INC