Main
INTRODUCTION
INTRODUCTION
Unpacking
Contents
E-2
E-18
INTRODUCTION
GETTING ACQUAINTED
E-47
E-63
BASIC IMAGE RECORDING
OTHER RECORDING FUNCTIONS
E-94
E-101
E-105
PLAYBACK
DELETING IMAGES
E-113
OTHER SETTINGS
E-136
E-116
CONNECTING TO EXTERNAL EQUIPMENT
Getting Ready
Recording an Image (page E-47)
Playback (page E-94)
Deleting Images (page E-101)
Page
Features
Page
Page
Precautions
General Precautions
Operating conditions
Condensation
About the cameras backlight
Front
GETTING ACQUAINTED
Back
Terminals and Ports Bottom
Lens
Changing the Lens Angle
Installing a Conversion Lens
Filters
Lens Precautions
Monitor Screen Indicators
Screen when SHIFT INFO is pressed
Operation Indicator Lamp
Page
Using the Bundled Accessories
Using the Lens Cap
Attaching the Strap
Using the Soft Case
Page
Power Requirements
Loading Batteries
Page
Page
Low Battery Indicator
Battery Handling Precautions
Using AC Power
Turning the Camera On and Off
Power Save Settings
To power save settings
Memory Cards
Inserting a Memory Card into the Camera
Removing a Memory Card from the Camera
Formatting a Memory Card
IBM Microdrive Precautions
Memory Card Precautions
In case of microdrive malfunction....
Menu Screens
Example Displays
Setting the Current Date and Time
Setting the Date and Time
Turn on the camera, and then use the REC/ PLAY selector to select either REC or PLAY.
Selecting the Date Format
Time Stamp
Recording a Simple Snapshot
BASIC IMAGE RECORDING
Page
About the REC Mode Monitor Screen
About Auto Focus
Recording Precautions
Image Recording when the Battery is Low
Using Zoom
Using Optical Zoom
shutter release button to apply it.
Using Digital Zoom
Select FUNCTION Digital Zoom, and
Using the Flash
Flash Status Indicators
Adjusting the Flash Intensity
Select FUNCTION Flash Intensity, and
shutter release button to apply it.
Precautions when Using Flash
Using the Auto Focus Mode
Selecting the Focus Mode
Press the shutter release button the rest of the way down to record the image.
Using the Macro Mode
Compose the image and record it.
Using the Infinity Mode
Using the Manual Focus Mode
Using Focus Lock
BASIC IMAGE RECORDING
Press the shutter release button the rest of the way down to record the image.
NOTE Locking the focus also locks the exposure setting.
Specifying Image Size and Quality
You can specify the image size and image quality to suit the type of image you are recording.
Select FUNCTION Size/Quality, and then press the shutter release button.
Select the size and quality setting you want, and then press the shutter release button.
Size/Quality Setting and Image Capacity
Using the Self-timer
Press the button to select the self-timer time you want.
Press the shutter release button to start the self-timer countdown.
Exposure Compensation
Use [+] and [] to change the exposure com- pensation value (EV shift).
After the EV value is the way you want, press the shutter release button to record the image.
OTHER RECORDING FUNCTIONS
Page
Shooting Night Scenes
Select NIGHT SCENE (Night Scene Mode), and then press the shutter release button.
Instant Setup Using the Scene Mode
Page
Registering Your Own Scene Setups
Recording a Movie
To record a movie using the past mode
To record a movie using the normal mode
Page
Shooting at Fixed Intervals
8.
9.
7.
Specifying the Exposure Mode
Program AE
Canceling an Interval Mode Timer Opera- tion
Aperture Priority AE
Shutter Speed Priority AE
Select FUNCTION Exposure Mode, and
Select S (Shutter speed priority), and then press the shutter release button.
While holding down SHIFT INFO, use [+] and [] to specify the shutter speed.
Manual Exposure
7.
Quick Exposure Mode Selection
Selecting the Metering Mode
Page
Using the Filter Function
Select FUNCTION Filter, and then press the shutter release button.
Selecting White Balance
Adjusting White Balance Manually
Quick White Balance Selection
Enhancing Certain Colors
Select FUNCTION Enhancement, and
Page
Page
Page
OTHER RECORDING FUNCTIONS
Press .
Mode Memory Items and Settings
Resetting the Camera
Enter the REC mode or PLAY mode.
Using the Cameras Shortcut Features
Changing REC mode FUNCTION Menu Settings Using the Shortcut Buttons
To change settings using the shortcut buttons
Hold down SHIFT INFO.
To assign REC mode FUNCTION menu items to shortcut buttons
Page
Page
PLAYBACK
Basic Playback Operation
the monitor screen.
Slide the REC/PLAY selector to PLAY.
PLAYBACK
Playing a Movie
Use the following procedure to play back a movie recorded in the Movie Mode.
the monitor screen until the movie you want to play is displayed.
Movie Mode icon
Press the shutter release button to start play- ing the movie.
Playing a Panorama
Use the following procedure to play back a panorama re- corded in the Panorama Mode.
the monitor screen until the panorama you want to play is displayed.
Panorama Mode icon
Press the shutter release button to start play- ing the panorama.
Page
Displaying the 9-image View
Press .
[+] []
Page
Using the Slide Show Feature
DELETING IMAGES
Deleting the Displayed Image
Use [+] and [] to scroll through images and display the image you want to delete.
Press .
In response to the confirmation message that appears, use [+] and [] to select Yes.
Page
Page
Page
MANAGING IMAGES
Folders and Files
Folders
Files
Page
Page
Protecting and Unprotecting All Images
DPOF
Making DPOF Settings for Particular Im- ages
Making DPOF Settings for Particular Folders
Page
Turning the Monitor Screen Indicators On and Off
OTHER SETTINGS
Changing the Display Language
Turning the Confirmation Beep On and Off
CONNECTING TO EXTERNAL EQUIPMENT
Connecting to a Television
Selecting the Video Output Signal Mode
Connecting the Wired Remote Controller to the Camera
Connecting an External Flash Unit (QV-2800UX Only)
External Flash Unit Requirements
Attaching an External Flash Unit
Turn on camera power and make the required camera settings.
Connecting to a Computer
USB Port Connection (Windows, Macintosh)
Using a Serial Port Connection
Using a Memory Card to Transfer Image Data
Memory Card Data
DCF Protocol
Memory Card File Structure
()
Image Files Supported by the Camera
Precautions when Using a Memory Card on a Computer
Page
Using the HTML Card Browser
Specifying the Card Browser Type
Select the Card Browser setting you want.
After selecting the setting you want, press the
Viewing Card Browser File Contents
You can click the following items on the screen to perform the operations described below.
Use your Web browser to open the file named INDEX.HTM.
Page
Saving Card Browser Files
To exit the Card Browser, simply quit your Web browser.
REFERENCE
Camera Menus
Page
Scene List
The following list shows all of the scenes that are available in the Scene Mode.
Page
Scene Mode Camera Setups
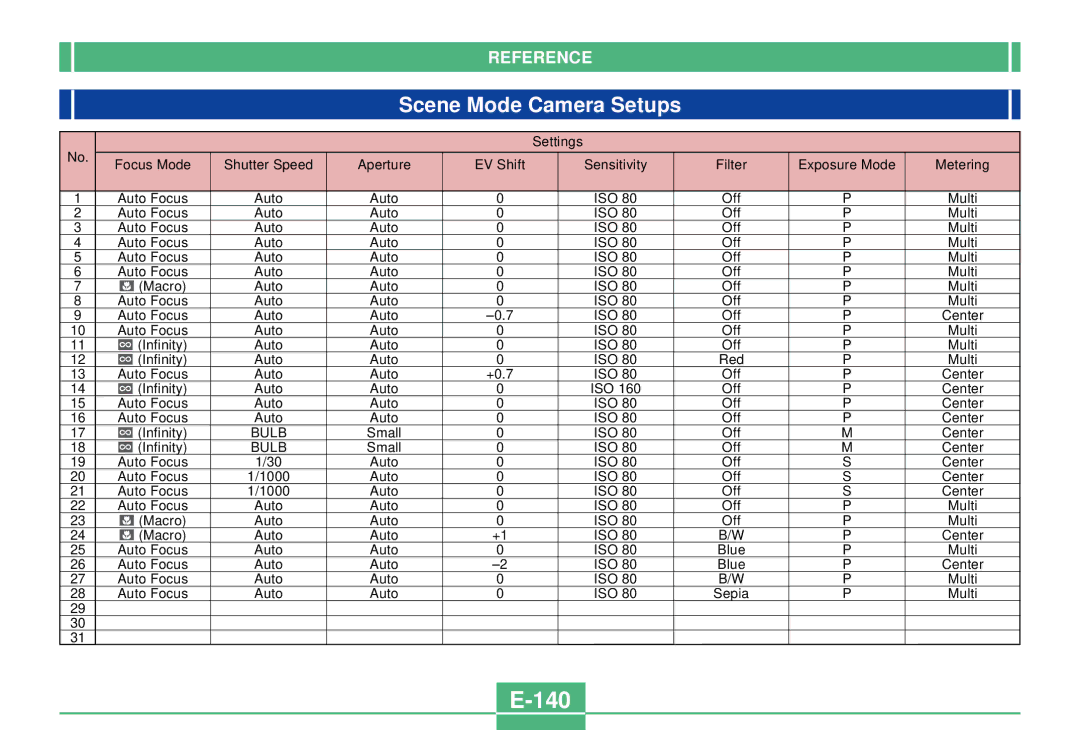
Page
Mode Settings
Settings in Each Mode
Recording Mode + Exposure Mode Combinations
Troubleshooting
Page
Page
Messages
Page
Specifications