This procedure covers the
To replace a blown fuse:
1 | Disconnect and lockout the main power. |
|
|
2 | Open the electrical enclosure door. Turn the screw |
| on the front panel counterclockwise to open. |
|
|
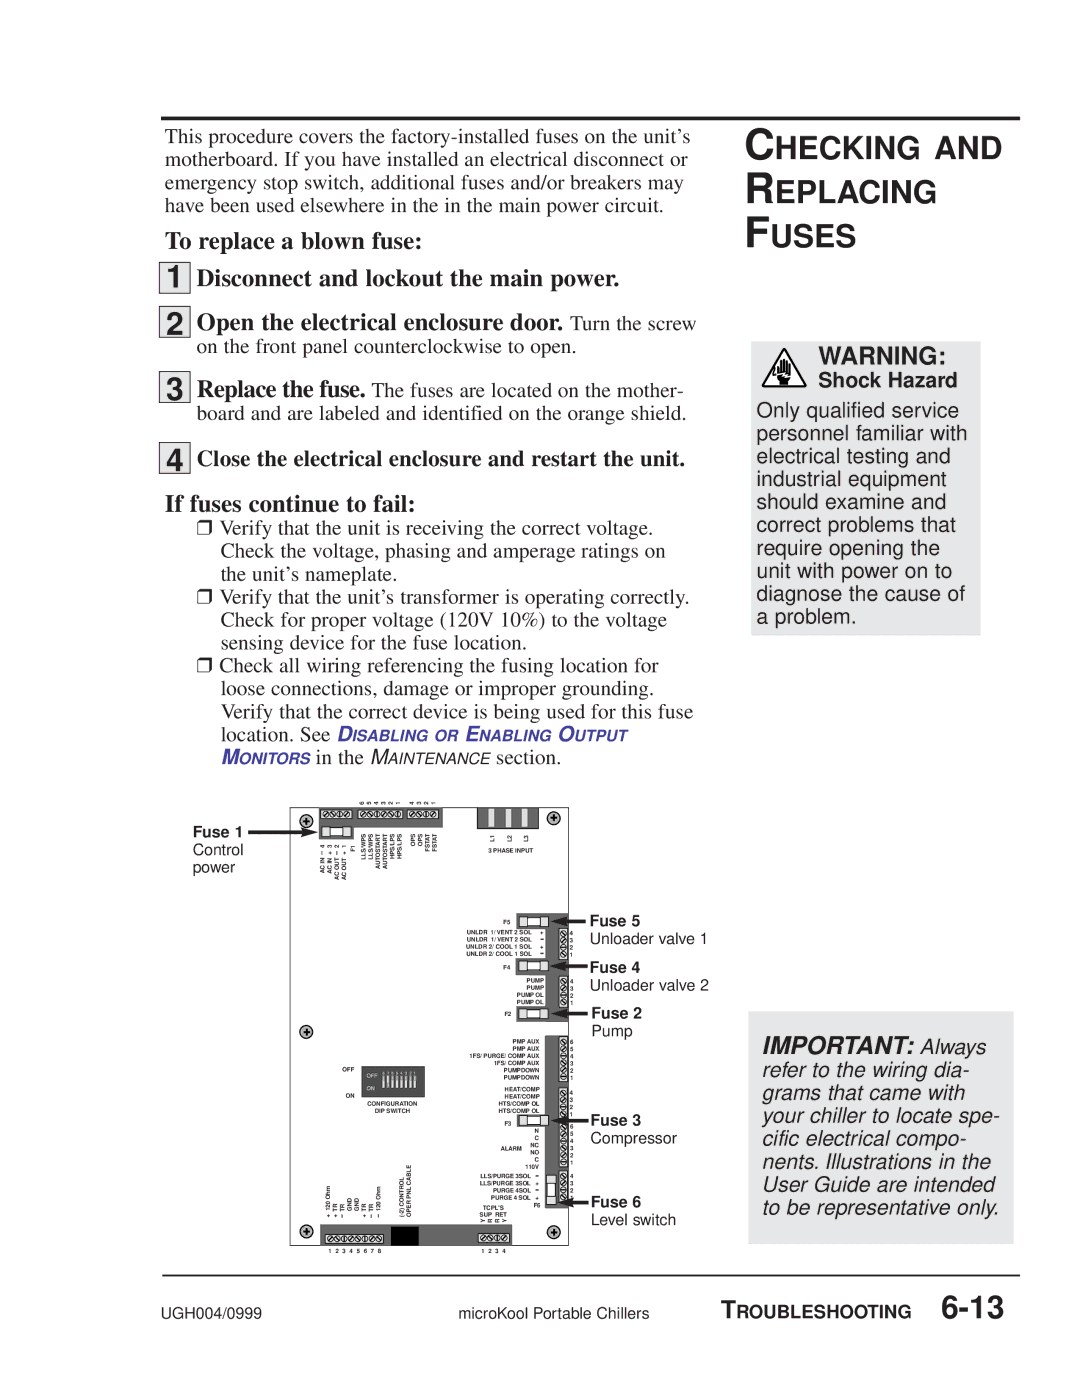
3 | Replace the fuse. The fuses are located on the mother- |
| board and are labeled and identified on the orange shield. |
|
|
4 | Close the electrical enclosure and restart the unit. |
If fuses continue to fail:
❒Verify that the unit is receiving the correct voltage. Check the voltage, phasing and amperage ratings on the unit’s nameplate.
❒Verify that the unit’s transformer is operating correctly. Check for proper voltage (120V 10%) to the voltage sensing device for the fuse location.
❒Check all wiring referencing the fusing location for loose connections, damage or improper grounding. Verify that the correct device is being used for this fuse
location. See DISABLING OR ENABLING OUTPUT
MONITORS in the MAINTENANCE section.
CHECKING AND
REPLACING
FUSES
WARNING:
Shock Hazard
Only qualified service personnel familiar with electrical testing and industrial equipment should examine and correct problems that require opening the unit with power on to diagnose the cause of a problem.
|
|
|
|
|
| 6 5 4 3 2 1 | 4 3 2 1 |
|
|
|
Fuse 1 |
|
|
|
|
| LLS/WPS LLS/WPS AUTOSTART AUTOSTART HPS/LPS HPS/LPS | OPS OPS FSTAT FSTAT | L1 | L2 | L3 |
Control | AC IN 4 | AC IN + 3 | AC OUT 2 | AC OUT + 1 | F1 | 3 PHASE INPUT | ||||
|
|
| ||||||||
power |
|
|
| |||||||
|
|
|
| |||||||
F5 |
|
|
|
|
|
| Fuse 5 |
|
|
|
|
|
| 4 |
|
UNLDR 1/ VENT 2 SOL | + |
| Unloader valve 1 | ||||
UNLDR 1/ VENT 2 SOL |
|
|
| 3 | |||
UNLDR 2/ COOL 1 SOL | + |
| 2 |
| |||
UNLDR 2/ COOL 1 SOL |
|
|
| 1 | Fuse 4 | ||
F4 |
|
|
|
|
|
| |
|
|
|
|
|
| Unloader valve 2 | |
| PUMP |
|
| ||||
| 4 | ||||||
| PUMP | 3 | |||||
| PUMP OL |
| 2 |
| |||
|
| ||||||
| PUMP OL | 1 |
| ||||
F2 ![]()
![]() Fuse 2
Fuse 2
Pump
|
| PMP AUX | 6 |
|
| PMP AUX | 5 |
|
| 1FS/ PURGE/ COMP AUX | 4 |
OFF |
| 1FS/ COMP AUX | 3 |
8 7 6 5 4 3 2 1 | PUMPDOWN | 2 | |
|
| PUMPDOWN | 1 |
IMPORTANT: Always refer to the wiring dia-
ON
CONFIGURATION |
DIP SWITCH |
HEAT/COMP
HEAT/COMP
HTS/COMP OL
HTS/COMP OL
F3 |
4 |
|
3 |
|
2 |
|
1 | Fuse 3 |
6 |
grams that came with your chiller to locate spe-
ALARM
N
C
NC
5 | Compressor |
4 | |
3 |
|
cific electrical compo-
+ 120 Ohm + TR TR GND GND + TR TR 120 Ohm | ||||
|
|
|
|
|
|
|
|
|
|
|
|
|
|
|
NO
C 110V
LLS/PURGE 3SOL |
| ||
LLS/PURGE 3SOL | + | ||
PURGE 4SOL |
| ||
PURGE 4 SOL | + | ||
TCPL'S | F6 | ||
SUP RET |
| ||
Y R R Y |
| ||
|
|
|
|
|
|
|
|
2 |
1 |
4 |
3 |
2 |
![]()
![]() Fuse 6
Fuse 6
Level switch
nents. Illustrations in the User Guide are intended to be representative only.
1 | 2 | 3 | 4 | 5 | 6 | 7 | 8 | 1 | 2 | 3 | 4 |
UGH004/0999 | microKool Portable Chillers | TROUBLESHOOTING |