Serial connector Fans
Headphone connector Microphone connector
Ieee 1394 connector
Diagnostic lights
Abbreviations and Acronyms
Contents
Mail, Modem, and Internet Problems
Optimizing Performance
Restoring the Computer to an Earlier Operating State
Using Microsoft Windows XP System Restore
Resolving Software and Hardware Incompatibilities
Removing and Installing Parts
Protecting Against Electrostatic Discharge
110
105
109
128
Contents
Safety General
Safety When Using Your Computer
Safety When Working Inside Your Computer
Safety Ergonomic Computing Habits
Safety Protecting Against Electrostatic Discharge
Safety Battery Disposal
W . d e l l . c o m s u p p o r t . d e l l . c o m
Finding Information for Your Computer
How to change my display resolution
Drivers for my computer
Service Tag and Microsoft Windows Label
ResourceCD
My computer documentation
Finding Information for Your Computer
Opening the Drive Door Connecting Two Monitors
Using Your Computer
TV OUT connector DVI white connector
If both monitors have VGA connectors
Optional VGA adapter
Settings and Functions
Configuring Graphics Cards
If one of the monitors is a television
About Serial ATA Drives
About Your RAID Configuration
Removing the Graphics Card Driver
RAID Level
Segment Hard drive
Transferring Information to a New Computer
Segment
Copying CDs and DVDs
Using Blank CD-Rs and CD-RWs
How to Copy a CD or DVD
Helpful Tips
Turning Off Your Computer
Network Setup Wizard
Integrated firewall provided with Windows XP
Using Your Computer
Hyper-Threading
Intel Performance Acceleration Technology
DDR Memory and Processor Front-Side Bus
Optimizing Performance
Overclocking
Finding Solutions
Solving Problems
Finding Help Information
Drive Problems
Battery Problems
Floppy drive problems
CD drive problems
Hard drive problems
Problems writing to a CD-RW drive
DVD drive problems
Under Error-checking, click Check Now
Mail, Modem, and Internet Problems
Click Add or Remove Programs
Error Messages
Click the Change or Remove Program icon
Computer stops responding
General Problems
Program stops responding
Program crashes repeatedly
Other software problems
Solid blue screen appears
Other technical problems
General hardware problems
Keyboard Problems
Ieee 1394 Device Problems
Click Printers and Other Hardware
Mouse Problems
Simultaneously press CtrlEsc to display the Start menu
Network
Network Problems
Integrity/speed light
Power Problems
Printer Problems
Scanner Problems
Click Scanners and Cameras
Sound and Speaker Problems
No sound from speakers
No sound from headphones
Video and Monitor Problems
If the screen is blank
If the screen is difficult to read
Click Appearance and Themes
Solving Problems
Light Pattern Problem Description Suggested Resolution
Diagnostic Lights
Advanced Troubleshooting
= yellow = green = off
Light Pattern Problem Description
When to Use the Dell Diagnostics
Dell Diagnostics
Starting the Dell Diagnostics
Starting the Dell Diagnostics From Your Hard Drive
Starting the Dell Diagnostics From the ResourceCD
Option Function
Dell Diagnostics Main Menu
Tab Function
What Is a Driver?
Drivers
Reinstalling Drivers
Identifying Drivers
Using the ResourceCD
Using Microsoft Windows XP System Restore
Creating a Restore Point
Click System Restore
Undoing the Last System Restore
Restoring the Computer to an Earlier Operating State
Click the System Restore tab
Enabling System Restore
Click Performance and Maintenance
Click Performance and Maintenance and click System
Booting From the Operating System CD
Reinstalling Microsoft Windows XP
Reinstalling Windows XP
Before You Begin
Windows XP Setup
Next
Advanced Troubleshooting
Front View
Removing and Installing Parts
Front and Back View of the Computer
Computer. Instead, perform a Microsoft Windows shutdown
Front View Doors Open
Back View
Network or broadband jack
Removing and Installing Parts
Before You Begin
Precautionary Measures
Recommended Tools
Protecting Against Electrostatic Discharge
Opening the Computer Cover
Page
Inside View of Your Computer
Floppy drive CD/DVD drive Hard drive
System Board Components
Memory
Memory Installation Guidelines
DDR Memory Overview
Installing Memory
Notch Memory module Cutouts Crossbar
Installing a PCI Card
PCI Cards
Not fully seated card Fully seated card Bracket
Removing a PCI Card
Filler bracket Alignment guide Alignment bar Retention arm
AGP Cards
Removing an AGP Card
Drives
Installing an AGP Card
Overview
Removing a Hard Drive
Hard Drive
Floppy drive CD/DVD drives Hard drives
Power cable Tabs
Installing a Hard Drive
Power cable Tabs IDE hard- drive cable
IDE hard drive example
System board Connector
Drive Bracket rails Screws
Floppy Drive
Removing a Floppy Drive
Installing a Floppy Drive
Tabs Floppy drive
Tabs Floppy drive
CD/DVD Drive
Power cable Tabs CD/DVD drive cable Audio cable
Removing a CD/DVD Drive
Installing a CD/DVD Drive
Power cable Tabs CD/DVD drive cable Audio cable
Processor Airflow Shroud
Removing the Processor Airflow Shroud
Top anchor tabs
Installing the Processor Airflow Shroud
Side anchor tabs Indentations Bottom anchor tabs
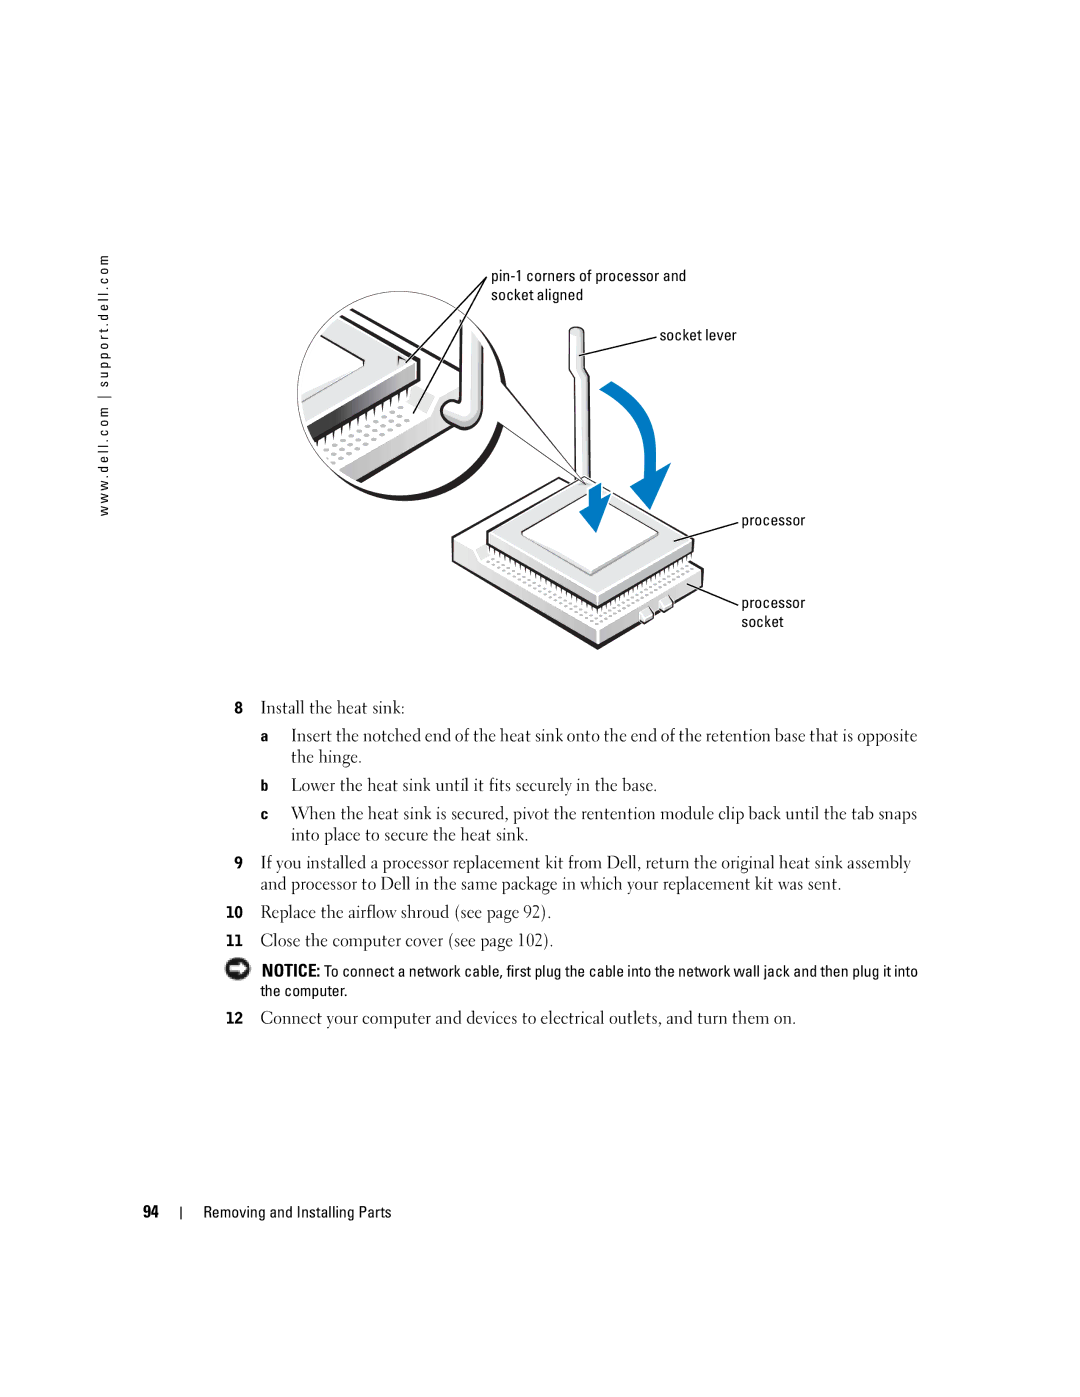
Installing the Processor
Processor
Processor socket
Removing the Processor
Retention module Heat sink processor socket Release tab
Removing the Front Panel
Front Panel
Release lever Processor Socket
Replacing the Front Panel
Drive Door
Removing the Drive Door
Replacing the Drive Door
Top bracket hinge Bottom bracket hinge
Hinge tab Door hinges Door bracket
Door bracket/door hinge assembly
100
Door hinge
Battery
101
Closing the Computer Cover
Battery
102
103
Cover latch release Security cable slot Padlock ring
Removing and Installing Parts
Specifications
105
Audio
106
Video
Expansion Bus
107
Controls and Lights
Physical
Power
108
Environmental
System Setup Screens
Standard Settings
Viewing Settings
Boot Sequence
Changing Boot Sequence for Future Boots
Clearing Forgotten Passwords
Changing Boot Sequence for the Current Boot
110
Dell Technical Support Policy U.S. Only
111
Definition of Third-Party Software and Peripherals
Definition of Dell-Installed Software and Peripherals
Contacting Dell
112
113
114
115
116
117
118
119
120
121
122
123
124
125
126
127
Regulatory Notices
What is covered by this limited warranty?
What is not covered by this limited warranty?
Limited Warranties and Return Policy
How long does this limited warranty last?
129
What will Dell do?
What do I do if I need warranty service?
130
Total Satisfaction Return Policy U.S. Only
What if I purchased a service contract?
May I transfer the limited warranty?
How will you fix my product?
132
133
134
Total Satisfaction Return Policy Canada Only
Dell Software and Peripherals Canada Only
Intel’s Three Year Limited Warranty
136
137
What are Errata?
Appendix
Index
Index 139
Help file, 14 accessing
Processor Problems Modem problems
140 Index
Index 141
Wizard, 37 reinstalling, 60 scanner, 44 System Restore
142 Index

 processor socket