Operation, cont’d
Advanced Input submenu options
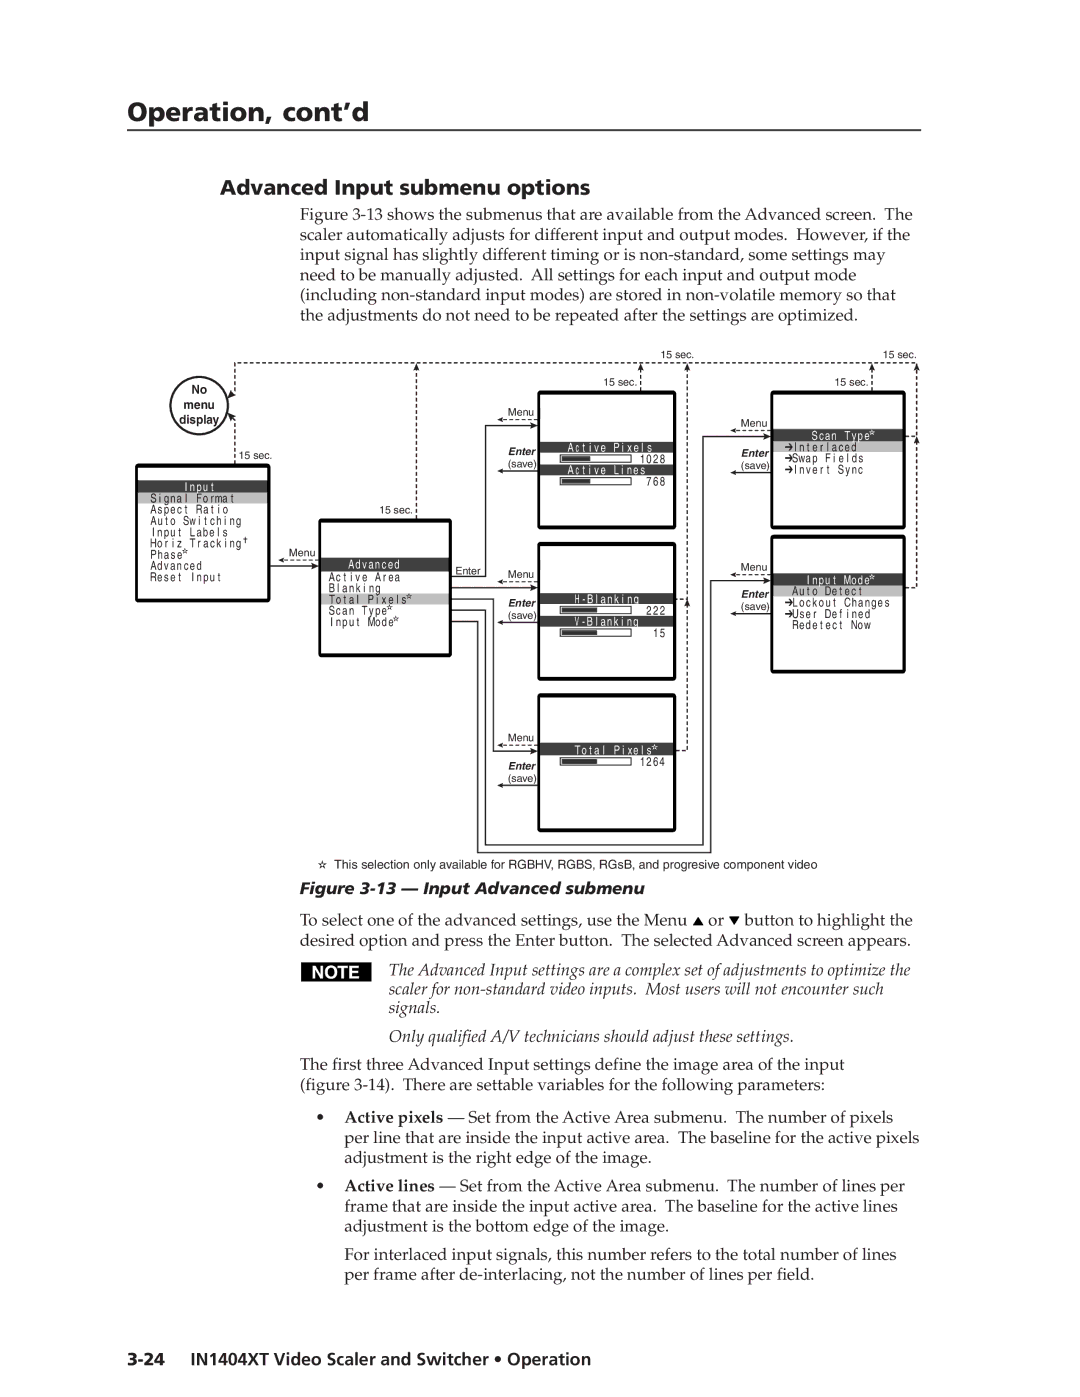
Figure 3-13 shows the submenus that are available from the Advanced screen. The scaler automatically adjusts for different input and output modes. However, if the input signal has slightly different timing or is non-standard, some settings may need to be manually adjusted. All settings for each input and output mode (including non-standard input modes) are stored in non-volatile memory so that the adjustments do not need to be repeated after the settings are optimized.
No
menu
display
| 15 sec. | ||
|
|
| |
I n pu t |
|
| |
S i gna l | Fo rma t |
|
|
As pe c t | Ra t i o |
|
|
Au t o Sw i t ch i ng |
|
| |
I npu t | L abe l s | ✝ | |
Ho r i z T r ac k i ng | |||
Ph as e✫ |
|
|
|
Adv an c ed |
|
| |
Re s e t | I n pu t |
|
|
|
|
|
|
|
|
|
| Menu |
| |
|
|
|
|
|
|
|
|
|
|
|
|
|
|
|
|
|
|
| Enter |
| |
|
|
|
|
|
|
|
|
| ||
|
|
|
|
|
|
|
|
| ||
|
| 15 sec. |
|
|
|
| (save) |
| ||
|
|
|
|
|
|
| ||||
|
|
|
|
|
|
|
|
| ||
Menu |
|
|
|
|
|
|
|
|
| |
| Ad van c e d |
| Enter |
|
| Menu |
| |||
| Ac t i v e | A r e a |
|
|
| |||||
|
|
|
|
|
| |||||
| B l a n k i ng |
|
|
|
|
|
|
| ||
|
|
|
|
|
|
| ||||
| To t a l | P i x e l s✫ |
|
|
|
|
| Enter |
| |
| Sc a n Ty p e✫✫ |
|
|
|
|
| ||||
|
|
|
|
| (save) |
| ||||
| I n p u t | Mod e |
|
|
|
|
|
|
| |
|
|
|
|
|
|
|
|
|
|
|
15 sec.
15 sec. ![]()
A c t i v e | P i x e l s |
|
A c t i v e | 102 8 | |
L i n e s | 6 8 | |
| 7 | |
H - B l an k i ng
22 2
V - B l an k i n g
1 5
Menu
Enter (save)
Menu
Enter
(save)
15 sec.
15 sec. ![]()
Sc an Ty p e✫
➔ I n t e r l ac e d
➔Swap F i e l d s ➔ I nv e r t S yn c
I npu t | Mode✫ |
Au t o De t e c t | |
➔Lo c k ou t | Change s |
➔Use r De f i ne d | |
Rede t e c t | Now |
Menu | To t a l P i xe l s✫ |
| |
Enter | 1 2 64 |
| |
(save) |
|
✫This selection only available for RGBHV, RGBS, RGsB, and progresive component video
Figure 3-13 — Input Advanced submenu
To select one of the advanced settings, use the Menu ![]() or
or ![]() button to highlight the desired option and press the Enter button. The selected Advanced screen appears.
button to highlight the desired option and press the Enter button. The selected Advanced screen appears.
The Advanced Input settings are a complex set of adjustments to optimize the scaler for
Only qualified A/V technicians should adjust these settings.
The first three Advanced Input settings define the image area of the input (figure
•Active pixels — Set from the Active Area submenu. The number of pixels per line that are inside the input active area. The baseline for the active pixels adjustment is the right edge of the image.
•Active lines — Set from the Active Area submenu. The number of lines per frame that are inside the input active area. The baseline for the active lines adjustment is the bottom edge of the image.
For interlaced input signals, this number refers to the total number of lines per frame after
